
Looking for an efficient way to convert your images to WebP and…
Are you a web designer eager to create a standout portfolio website? Your concern for excellence is well-placed, as your portfolio functions as your digital resume and the first impression potential clients form of you. Your portfolio should not only demonstrate your skills but also reflect your brand and style. A well-designed portfolio website featuring excellent usability and swift loading times can be a powerful tool for attracting clients and job opportunities.
In this guide, we’ll explore the 14 key steps to create a web design portfolio website that not only highlights your expertise but also captivates your audience, setting you apart in the competitive world of web design.
14 Tips to Create a Web Design Portfolio that Stands Out
Your portfolio website should reflect your brand and style. Keep it clean, organized, and easy to navigate. Here’s what makes a good portfolio website:
1. Highlight Your USP
Creating a portfolio that truly stands out is a multifaceted task, and one of the key factors that can set you apart from other web designers is identifying and emphasizing your Unique Selling Proposition (USP). Your USP is essentially what makes you distinct, what you excel at, and what you offer that others may not.

How to Highlight your Unique Selling Point on your Portfolio site
✅ On your homepage banner or headline: Place your USP prominently on your homepage. Use a concise, compelling headline that immediately communicates what sets you apart. For example, “Creating Stunning Real Estate Websites” if your USP is about real estate.
✅ In your “About” page: Dedicate a section of your “About” page to elaborating on your USP. Explain why you’re unique, what drives your passion, and how it benefits your clients.
✅ In your case studies: Feature case studies that exemplify your USP. Highlight projects where you applied your unique approach or expertise to achieve outstanding results.
2. Show Your Personality With a Spotless Design
Let your personality shine through in your content and design. A little personal touch can make your website more engaging, and so does a professional logo. Your website functions as your portfolio, so choose the right theme or, even better, create a website that leaves a lasting impression with your design.
As an example, that’s how Huemor shows that they are memorable and result-oriented. It’s bold, clear, and…memorable, plus using an astronaut emphasizes the results and data-driven philosophy.

How to Represent your Personality on your Portfolio Site
To represent your personality on your portfolio site, use a personal bio, friendly language, and a professional photograph, and incorporate elements of your design style and personal interests into the site’s aesthetics.
✅ Use high-quality, professional profile pictures and logos.
✅ Use your design style to reflect your branding. If your uniqueness lies in minimalist design, ensure your site’s design mirrors this aesthetic. Use videos, animations, or interactive content to convey your message in a visually engaging way.
✅ Incorporate distinctive icons or visual elements that represent your USP and own branding. For example, if you’re known for being a bold agency, create a bold design.
✅ Craft compelling content that reinforces your branding. Write articles, blog posts, or insights that showcase your expertise and passion.
3. Structure the Main Portfolio Page
This is the page where you showcase a list of all your completed projects. It should be visually appealing and well-organized to entice potential clients to explore your work. Arrange your portfolio logically, for instance, from most recent to older projects or from your most prominent works for well-known brands. Additionally, create distinct sections for various types of work or clients, ensuring visitors can effortlessly navigate using a consistent layout for each project such as:
- User-friendly navigation (including filters and customized search options)
- Client’s name
- Categories and services provided
- Concise summary explaining your role and contributions
- Links to in-depth case studies
- Links to live project
- Eye-catching images or videos
I think that Brand Vision is doing a great job here:

4. Plan Your Structure for the Case Study Itself
After clicking the ‘View Case Study’ button, clients will be directed to the project’s details. Typically, the following elements are included when presenting a specific project:
- Project Descriptions: Provide context for each project, explaining the goals, your role, and any notable achievements.
- The impact that you had: Describe, with easy words, the solutions you found for this client.
- High-quality images and videos: Include images, videos, or other media to illustrate your work.
- Links: Don’t forget the links to live projects you’ve worked on. Client or employer information
- Date: Potential clients are more interested in recent projects than the ones from 10 years ago as technology evolves. Make sure to keep your portfolio up-to-date.
- Testimonials: Gather the quotes or reviews from a satisfied client to build credibility when presenting the project. If you don’t have any reviews yet, ask satisfied clients to write recommendations you can display on your site.
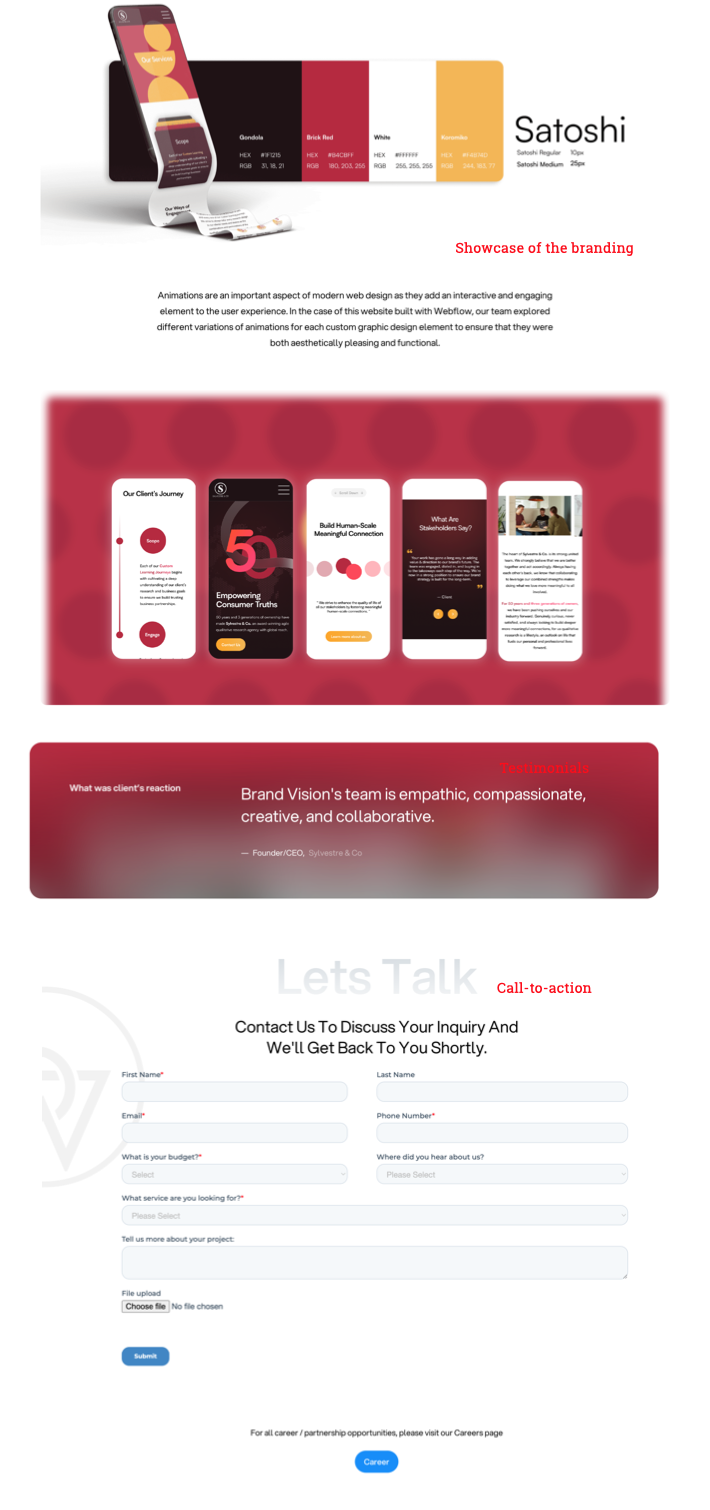
As a source of inspiration, I find the BrandVision case study particularly compelling, as it checks all the essential criteria. While the case study is more extended and features more visuals on their website, we’ve divided it into two parts to save space.
 |  |
How To Design A Portfolio Template that Stands Out on WordPress
There are two approaches to designing a portfolio template. You can either opt for a pre-made demo from a well-regarded design author like Divi, The7, or Avada, or you can craft your unique design, which can have a more significant impact as it’s entirely custom and hand-crafted.
✅ If you go for option 1, Divi has a dedicated Portfolio module that is very easy to use, plus you can also install a template:

✅ If you choose the second option, you can still benefit from page builders like Elementor and its dynamic options. This allows you to create a template layout that you can use for each project. Here are a few guidelines:
- Create a custom post type and name it “Projects”. I used CPT UI, which is free:

- Add custom fields (e.g., Name of the client, explanation about the project, Year, Testimonial, link to website). I used ACF, which is also free.

- Use a page builder that supports dynamic content like Elementor and start designing your template:

5. Use Tags and Categories for Smooth Navigation and Usability
Add a navigation menu to guide visitors to different sections of your portfolio, ensuring visitors can find what they’re looking for quickly. You can also use tags and categories to classify each project accurately. That’s what 500designs did:

- Search and Filter Functionality (for extensive portfolios): If you have a large portfolio, consider adding search and filter options to help visitors find specific projects or categories. Brand Vision excels in this regard and can categorize their work using tags such as SEO, branding, development, web design, and UX.

How to Create a Filterable Portfolio on WordPress
You can create a filterable portfolio on WordPress using either a plugin or custom code.
✅ You can use a plugin like Portfolio – WordPress Portfolio Plugin – This portfolio WordPress plugin has advanced filters that allow you to display your items by various criteria.
✅ Alternatively, you can manually code a solution using custom post types and taxonomies, but this method requires more technical expertise.
6. Write Up a Meaningful About Page
Craft a compelling “About” page to create a meaningful connection with your audience. In your bio, highlight your background, skills, and pertinent experiences, providing visitors with insight into your professional journey. Introduce your team with individual professional photographs, emphasizing the human element behind your work. You can also display your professional achievements and certifications as badges of expertise. Personalize your portfolio by weaving your story and values into your narrative, allowing visitors to resonate with your mission.
Huemor checks all the boxes with a short story about how it started and where they are now. It also gives key figures with a touch of humor. Finally, you can see the team with laid-back photographs.

7. Make Your Contact Information Prominent
Ensure easy accessibility by offering clear contact information, making it effortless for visitors to reach out and connect with you. Offer multiple ways for visitors to contact you, such as a contact form, email address, and links to your professional social media profiles.
On their contact page, Huemor asks you to take action. It’s not a traditional contact page. You book a “strategy session” and the CEO (the video below) tells you that the team can improve your website by 20%.

Taking a somewhat traditional approach, the Tiny Frog agency also provides all the essential information:

How to Create An Advanced Contact Form (for Quote)
✅ WPForms: WPForms is a user-friendly and feature-rich form builder plugin for WordPress. With its drag-and-drop interface, you can easily create quote request forms, and it offers various templates and advanced features for customization. WPForms is available in both free and premium versions.
✅ Formidable Forms: Formidable Forms is another powerful form builder plugin for WordPress. It enables you to create complex forms, including quote request forms, with ease. It offers advanced features like conditional logic, file uploads, and integration with payment gateways. While it has a free version, more advanced functionality is available in the premium version.

8. Add Call to Action (CTA)
Encourage visitors to take action, such as contacting you for inquiries and a quote, the recommended option is to have a prominent CTA button “Get a quote” in the navigation bar that stands out from the regular elements.

How to Add a Call-To-Action Button to Your Navigation
✅ Add some CSS with a class in your navigation menu section, such as “CTA-button”, then add your own CSS in the editor.
✅ Use a theme that comes with custom navigation options, including a CTA.
✅Use a website builder like Elementor that lets you design your header and add custom buttons in the navigation bar.
9. Elevate Your Web Design Portfolio with High-Quality Content and Images
Display your finest work with high-resolution images and utilize before-and-after comparisons to showcase design enhancements. Using clear and high-quality images to showcase your web design portfolio is essential. Clear images not only captivate your audience but also provide a detailed view of your work. They offer a better understanding of your design aesthetics and attention to detail, making a strong impression on potential clients. With clear visuals, you can effectively communicate your skills and creativity, building trust and engagement with your portfolio visitors.
Bop Design has a great before+after section that shows the improvements they brought to their clients.

How to do a Before/After With WordPress
✅ Use the WordPress editor and add two images side by side
✅ Use a plugin like Before & After image by Divi Supreme that lets your visitors slide between two images at the same time. (Tips: don’t use this on mobile or tablet).

10. Explain Your Work in Detail (Detailed Case Studies)
For each project include case studies that explain your design process, the challenges you faced, and how you overcame them. This helps potential clients understand your approach. It could also be an interview with your client that highlights the benefits they got after working with you.
I particularly like the app that the 500design agency did for “Everytable”. In the case study, they explain the user-centric strategy they follow:

How to Create a Case Studies Page
✅ Choose a theme that offers a case study template with key figures like Avada:

11. Regular Updates
Keep your portfolio up-to-date by regularly adding new projects, articles, or updates about your skills and services. Clients may be suspicious if they don’t find any recent work.
12. Social Proof, Awards, and Clients
If you’ve received industry awards or recognition, feature these prominently. Social proof can be a powerful persuader.

If you are fortunate to have Google or TikTok as clients, or similar well-known brands, we recommend featuring their logos on your website through a logo carousel:

13. Make Sure Your Projects and Your Portfolio Are Responsive
Make sure that your portfolio is visually and functionally appealing on a range of devices, such as smartphones and tablets. In today’s digital landscape, responsiveness is crucial, and not having a mobile-friendly design could result in the loss of potential clients.
How to Display Your Projects Using Mockups for Various Screens
✅ As an example, you can visit Freepik and search for “tablet mobile desktop.” You’ll find numerous free mockups that you can download and replace the blank screens with your projects on each device.”

14. Analyze and Improve Website Performance
Impress visitors with a good-looking AND fast website. Too many web designers want to impress, but they overlook their website performance. Use analytics tools to monitor how visitors interact with your site and make adjustments based on the data. On top of that, run regular audits on PageSpeed Insights so you can check how your performance is going over the months and improve it if needed.
How to Test and Improve Your Portfolio Website’s Performance
✅ Begin by assessing your PageSpeed Insights report to identify and resolve any highlighted issues.
✅ Implement performance improvements using a WordPress plugin such as WP Rocket, which enables caching, code optimization, and the introduction of lazy-loading for images.
✅ Further optimize your website by using Imagify for image compression and WebP and Avif conversion, ensuring faster load times and an improved user experience.
Now that you’re equipped with valuable insights on creating a standout web design portfolio, the next step is to guarantee that your website operates at optimal speed. Achieving top-notch performance involves essential practices such as image optimization, which encompasses compression and WebP conversion. In the upcoming section, we’ll introduce you to Imagify, a powerful tool that simplifies and streamlines image optimization for your portfolio.
How to Make Your Images Lighter with Imagify
Imagify is one of the best image optimization plugins designed to enhance your images by reducing their weight through compression and WebP and Avif conversion. Imagify has a very user-friendly interface and takes care of the heavy lifting for you, including bulk compression.
It comes with a Smart mode that intelligently reduces file sizes while preserving quality. Feel free to see for yourself; the quality remains unchanged.

| 🚀 Performance Hint: Imagify is commonly used to improve portfolio website performance by serving optimized images to your visitors. |
Here’s how to use Imagify to make your portfolio images lighter and boost performance:
- Download and activate the free Imagify plugin.
- Create an account to receive your API key and add your API key in the installation wizard.
- Go to Settings > Imagify. Here, you can decide if you want to optimize images on upload, if you want to back up your original images, and if you want to change from Smart Compression to Lossless.

| Smart compression vs Lossless: Which mode to choose? – With Smart compression (lossy), you get the best compression rate with optimal quality (recommended because the change in quality is invisible to the naked eye). – With lossless, the compression rate is lower, but the quality remains untouched. 📖 Read more about lossy (Smart) vs lossless in our dedicated guide. |
- Scroll down to the Optimization WebP Format tab. To achieve a reduced image size, it’s essential to convert your JPG files to WebP. Therefore, check both boxes: Create a WebP version of images and Display images in WebP format on the site.

- Click on the “Save & go to bulk optimizer” button to optimize your images in bulk. If you have a large number of images to optimize, you can use this feature to reduce the file size of all your existing images at once.

- And the final step, hit the “Imagif’em all button”. You can also go to the WordPress library and optimize your images one by one.

- That’s it. Imagify converted our file to WebP and saved almost 70% of the total file size. It went from roughly 280KB to 90 KB.

- Let’s perform a quality control inspection to ensure the compression maintains the image’s high quality. Everything appears to be in order; the compressed image on the right still maintains its excellent appearance:

Pricing: With Imagify, you can compress up to 20 MB of data for free each month. If you need more, you can select from two cost-effective paid plans: either $9.99 per month for unlimited data or $5.99 per month for 500 MB.
Wrapping Up
Remember that your portfolio website should reflect your brand and style. Keep it clean, organized, and easy to navigate. Regularly update your portfolio to showcase your latest work and accomplishments. Solicit feedback from colleagues, mentors, or friends to ensure your portfolio is engaging and effective.
If you have many different projects to showcase with high-quality images, then we suggest you use image compression. When executed correctly, image compression enhances loading speed and elevates the overall user experience. We saw it with Imagify! Interested in the compression of your images? You can try Imagify for free.


