
Looking for an efficient way to convert your images to WebP and…
Do you want to learn more about WordPress background images? Great! Background images can make a big difference in creating a visually appealing and engaging site. In this guide, we’ll share some easy and practical tips for using and optimizing background images on WordPress.
We’ve got you covered, from adding and optimizing background images to ensuring they load quickly and look great on all devices.
What Are Background Images on WordPress?
A WordPress background image serves as a full custom background for your website. It can significantly improve the visual appeal of your site, capture visitors’ attention, and provide an engaging user experience. Background images can be applied in various styles and locations to match your site’s theme and content.
Let’s go over them in more detail.
Types of Background Images
Let’s highlight the types of background images you can use according to your design needs:
- Full Color: Opt for a single background color to create a clean and simple look. This is ideal for minimalist designs.
- Patterns: Choose repeating designs to add texture and visual interest, but be careful not to overwhelm the content. The text and images need to remain visible and apparent.
- Gradients: Implement gradients for smooth transitions between two or more colors, adding depth and a modern touch to your site.
- Images: Add a photograph or picture to make your website look more attractive and professional. They also engage visitors and convey your brand’s identity and values.
- Videos: Choose a video background to elevate your user experience and add movement to your website. Videos are also excellent for storytelling and can create an emotional connection with your audience. For example, you can use them to show something special to your visitors, such as a travel destination website, or demonstrate a product in action.
Locations of Background Images
Background images can be strategically placed in various locations on your WordPress site to improve its visual appeal and functionality. Here are some typical locations where you might use background images:
- Full page: The background image covers the entire webpage, giving a cohesive look to the site.

- Header: Positioned at the top of the page, behind the header text, navigation menu, or logo, enhancing the first impression.

- Behind a specific WordPress page or post: Applied to individual pages or posts highlighting particular content.

- On a WooCommerce category page: Enhances the shopping experience by visually differentiating product categories.

- Inside a block: Text or colors can be used within content blocks to emphasize certain sections or information.

- On a pop-up: Used on an interstitial, such as a login page or a form to subscribe to the newsletter to match your site’s branding and style.

- On the maintenance or coming soon pages: Keeps your site looking professional and engaging even when under construction.

How to Choose the Best Size for Background Images
Choosing the right size for your background images is crucial to ensure they look great and load quickly. The best background image size for WordPress should be a minimum size of 1024 x 768 pixels. However, a 1920 x 1080 pixels resolution is preferred for a more polished and high-quality appearance.
Of course, always consider the specific location and purpose of the background image when deciding on the size. For example, is it going to be portrait or landscape?
Here’s a general guideline:
- Small backgrounds: For backgrounds in smaller areas like content blocks, aim for a width between 1000 and 1200 pixels.
- Medium backgrounds: For headers or smaller sections, use images between 1200 and 1600 pixels in width.
- Large backgrounds: A width between 1920 and 3000 pixels is ideal for full-page backgrounds.
| 💡Hint: Larger images should be optimized for web use to prevent slow loading times, which can affect user experience and site performance. |
There are several ways to add a background image to WordPress. We’ll go over four techniques:
- Adding a Regular Website Background
- Adding an Image Background on a Block or Element (Using a Page Builder or the Site Editor)
- Adding a Background for a WooCommerce Category
- Adding an Image Background with CSS (Using the ::before and ::after Pseudo-Elements in CSS)
Let’s go over each technique so you will have the knowledge to choose the best method for your needs:
1. Adding a Regular Website Background
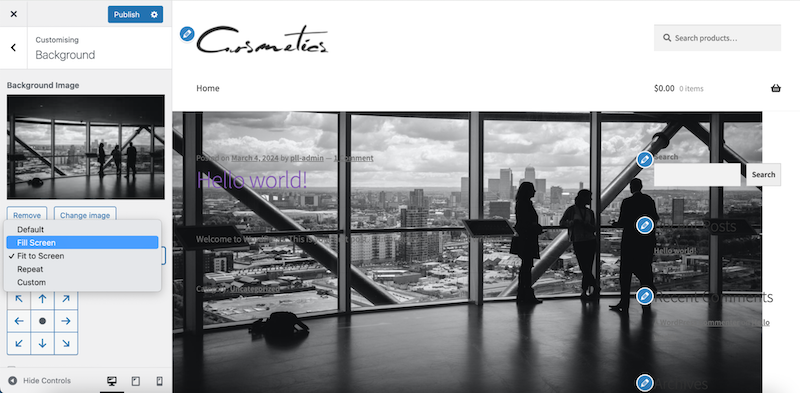
The easiest way to add background images on WordPress is to follow this path:
- Go to Appearance > Background from the admin.

2. Click on the Select image button, as you can see below.

3. Simply choose your image from the WordPress library:

4. That’s it, you have added a background to your site:
2. Adding an Image Background on a Block or Element (Using a Page Builder or the Site Editor)
Here are the steps you should take:
- Go to the page or post you want to edit.
- Look for some background in the pattern field.

3. Insert the premade background pattern, and click the Replace and Open Media Library buttons to add your image.

4. You can also add a color background to any blocks by opening the “Block” settings on the right sidebar:

3. Adding a background for a WooCommerce Category
- Create a new page.
- Open the Block Editor and add a featured category cover image.

3. Modify the text and the image with your content.

4. Adding an Image Background with CSS Properties
The background-image property allows you to set an image as the background of an element. By default, the image repeats to cover the entire element.

Here’s the code snippet to add a background to your page:
<!DOCTYPE html>
<html>
<head>
<style>
body {
  background-image: URL("paper.gif");
}
</style>
</head>
</html>
</body>
| 💡Good to know: Using a background property, you can add any background color, repeat, no-repeat, and many other image attributes.If you use a background-image property, you can only add an image. |
5. Adding an Image Background with CSS (Using the ::before and ::after Pseudo-Elements in CSS)
The ::before and ::after pseudo-elements in CSS allow you to insert content onto a page “outside” of the HTML.
For example, that’s how you can display an image before the title:

If you want to use those pseudo elements for a background image, you can set it as “content: URL (img.jpg), just like shown in the snippet below:
::before{
  content:URL(img/image.jpg) ;
  position:relative;
  left:-3px;
  top:8px;
 }
| Pros of using before and after pseudo-elements: You can set the width and height. You can even resize background size. |
How to Change a Background Image on WordPress
The easiest way to change background images on WordPress is to go to:
- Appearance > Background from the admin.

2. Then you can click on the Change image button as you can see below:

3. Choose another image from the WordPress library.

4. That’s it, the background is changed:

How to Change a Background Colour
You can follow the same path by going to Appearance > Background from the admin, but this time, click on the Select Colour button.

Now that you know how to easily add or modify a background image on your WordPress site, it’s essential to ensure that this image is optimized. While a beautiful background can enhance your site’s aesthetics, it shouldn’t impact its speed. The following section offers a few optimization tips and easy-to-use plugins that can help you achieve the best performance.
How to Optimize Background Images
Here are six tips for optimizing background images to make sure that your page speed is not impacted:
1. Choose the Right Format
Selecting the appropriate image format is essential for maintaining quality without unnecessary file size. WebP and AVIF are excellent choices, as they offer superior compression compared to traditional JPEG or PNG formats while achieving the same quality.
According to research made by Google, we can see that WebP offers an additional 25%-34% compression advantage over JPEG:

✅ Solution with a WordPress plugin
The Imagify plugin can easily convert all your images to WebP or AVIF. Imagify converts all your images, including background ones, in a few clicks directly from your WordPress admin. You have nothing to do, and no technical skills are ever needed.

2. Compress and Resize
Compressing and resizing background images reduces their file size while maintaining visual quality. Plugins like Imagify can help shrink pictures to load faster without a noticeable drop in quality, enhancing overall site performance in minutes.

✅ Solution with a WordPress plugin
Again, Imagify is the easiest image optimizer, saving you time and minimizing the steps needed to create lighter images. The plugin also helps to speed up your site by serving smaller images to the visitors. It uses the Smart compression mode to compress to the maximum without impacting the quality.
3. Use Responsive Images
Serving different image sizes for various devices ensures optimal display and performance.
✅ Manual Solution
Use the srcset attribute in HTML or responsive CSS techniques to provide images tailored for desktops, tablets, and mobile devices, improving load times and user experience on all screen sizes.
4. Implement Lazy Loading
Lazy loading defers the loading of images until they are needed, such as when they appear on the user’s screen. This optimization technique delays loading CSS background images, reducing initial load time and saving bandwidth.

✅ Solution with a WordPress plugin
WP Rocket is the most powerful performance plugin for WordPress. It does all the heavy lifting for you, saving you time and effort. No matter your technical knowledge, the plugin helps you solve performance issues and speed up your website easily with caching, lazy loading, and code optimization.
WP Rocket can lazy load your images, videos, and the CSS background images feature:

5. Preload the LCP Image
Preloading images used in the Largest Contentful Paint (LCP) element can enhance page load speed.
✅ Manual Solution
The concept is simple: add a <link rel=”preload” href=”image.jpg” as=”image”> tag in the HTML <head> so you can ensure critical images are prioritized and loaded faster. Here’s a tutorial on how to preload your Largest Contentful Paint.
✅ Solution with a WordPress plugin
WP Rocket comes with a feature called “Optimize Critical Images” that automatically optimizes the images above the fold, including the background ones, by excluding them from lazy loading. As a result, images load faster.
This feature, enabled by default, performs two key actions:
- It automatically identifies the Largest Contentful Paint (LCP) image on a page and preloads it as a priority using the fetchpriority=”high” attribute.
- Exclusion from lazy loading: The LCP image is excluded from lazy loading just like all the images above the fold.
6. Don’t Use Image Sprites
Image sprites, which combine multiple images into a single file, need to be updated and more effective for modern responsive design. Instead, focus on optimizing individual images for better performance and easier maintenance.
One of the best ways to optimize background images is to use plugins like Imagify or WP Rocket. These tools handle all the technical aspects of image optimization, allowing you to focus on your business without worrying about performance issues.

Wrapping Up
Now, you have tips for effectively using background images on your WordPress site, including where to place them and how to add or modify them. The most important part is that you also know how to optimize these images to ensure your site remains fast and user-friendly with plugins like WP Rocket and Imagify.
The same team develops both plugins; they are easy to use and handle all the technical aspects. They are the best combo for optimizing images:
WP Rocket is your best ally for caching, preloading, and adding lazy loading to images, including CSS backgrounds.
Imagify converts images to WebP and AVIF formats and compresses them without affecting quality. The best part is that you don’t take any risks because you can try Imagify for free!


