
Looking for an efficient way to convert your images to WebP and…
Are your images optimized for the web or are they slowing down your site? Time to find out and test image performance now!
In this guide, you’ll discover the best tools to measure image performance, along with practical tips, target thresholds, and proven best practices to follow. We’ll also walk you through a real case study and explain how to start a before and after optimization audit.
Learn from our process, apply the same steps to your own project, and confidently track your progress against key performance targets.
| TL;DR To speed up your WordPress site, you need to test image performance, not just overall load time. Check how images impact LCP, page weight, and loading time by reviewing their size, format and responsiveness. Use tools like GTmetrix, WebPageTest, and PageSpeed Insights to audit image performance, formats, content breakdown, and responsiveness. Then, fix what matters with Imagify for smart compression and next-gen format conversion. Don’t forget to run another test to see your results post-optimization. Key Takeaways ✅ Test image performance regularly with GTmetrix, WebPageTest, and PageSpeed Insights. ✅ GTmetrix & WebPageTest = deep insights (devices, connections, content breakdown). ✅ Track key metrics: LCP, image file size, total page weight, and loading time. ✅ Use WebP or AVIF formats for faster, lighter pages. ✅ Imagify is the easiest image optimization plugin for WordPress that compresses images without losing quality and converts them to AVIF or WebP in one click. ✅ Performance targets to aim for: Page load speed: < 3 seconds Image file size: < 200–300 KB Total page weight: < 3 MB Total image weight: < 1 MB |
Best Tools to Test Image Performance
The best tools to measure image performance of your site are page speed tools like GTmetrix, WebPageTest, and Google PageSpeed Insights. Let’s review their image-related flags and features to leverage them for image performance improvements.
Page Speed Tools for Image Performance
Page Speed tools usually come with a global performance score, audits that highlight image-related issues, and KPIs. They flag issues that could lead to potential improvements for your images and explain how to fix them. All you need to do is enter your URL and click a button to start the test.
GTmetrix
GTmetrix is a performance testing tool powered by Lighthouse that gives you deep insight into how your site loads. You can test from multiple devices and simulate different connections (like 3G, 4G, 5G, or Wi-Fi), then analyze audits, waterfall charts, content breakdowns, and Core Web Vitals.
You can also monitor performance for specific locations and trigger alerts. For instance, if you establish a rule that the page loading speed for users in Paris should not exceed 3s, and the load time exceeds 4s specifically for users in Paris at any point, you will receive an email notification.
Image optimization KPIs: Page speed (in seconds), total page weight, image weight (in KB), HTTP requests, Content breakdown and Core Web Vitals (LCP, CLS, INP).
Image-related diagnostics: Includes suggestions in the “Top Issues” section like Serve images in next-gen formats, Properly size images, and Defer offscreen images.
Here’s an audit example:

WebPageTest
WebPageTest offers detailed, advanced performance testing with options to simulate devices (e.g., iPhone 14, Samsung) and network conditions. It includes waterfall charts, content breakdown, and Core Web Vitals and stands out for its Image Analysis tab, which provides optimization opportunities, format insights, and compression tips. That’s how the interface looks like:

- Image optimization KPIs: Load time in seconds, page weight, KB occupied by images, HTTP requests, Core Web Vitals.
- Image-related diagnostics: Serve images in next-gen formats, Image compression, image weight and size audit via the dedicated Image tab.
Here’s how WebPageTest presents the Tips section:

Google PageSpeed Insights
PageSpeed Insights is a free tool from Google that gives you a performance score out of 100 for both mobile and desktop. It’s powered by Lighthouse and focuses on high-level performance, SEO, and accessibility audits. Unlike the others, it doesn’t provide advanced testing options or a full content breakdown but more like generic KPIs and an audit section.

Optimization KPIs: Core Web Vitals (LCP, CLS, INP), performance score (/100) and image-related diagnostics such as Defer offscreen images or Improve image delivery.

What to Check When Testing Image Performance
Before optimizing your images, it’s important to understand what you’re working with. For example, we recommend you check their current size, formats and if lazy loading is already activated or not.
What Are Your Image Formats and Sizes?
You can easily check your image formats and file sizes directly from the WordPress media library or your desktop.
Via the WordPress Media Library: Go to your Media section, click on an image, and you’ll see both the file size and the format.

Via your desktop: Right-click the image > “Info” or “Properties” > check format and dimensions.
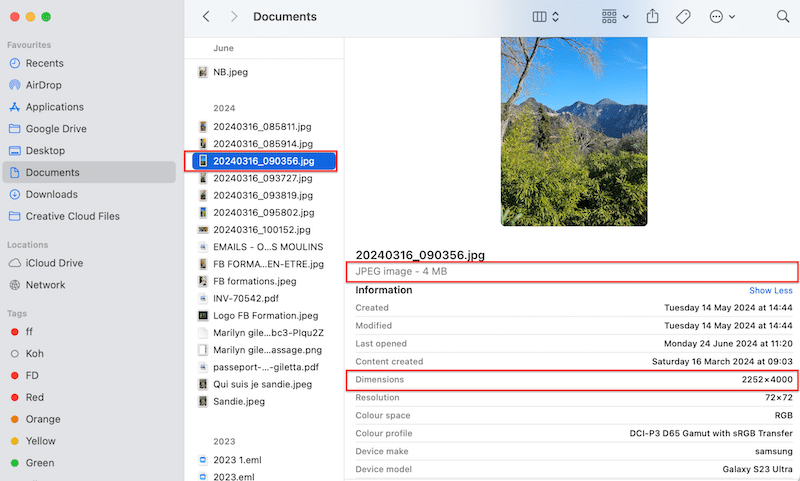
✅ Recommended threshold: When it comes to image file size, keep your image under 200-300 KB if you want to use it on the web.
Are You Lazy Loading Images?
Lazy loading ensures that offscreen images are only loaded when needed, reducing page weight and improving speed. Here’s how to check if lazy loading is working properly.
Audit the “Defer Offscreen Images” Diagnostic
Run a test on Google PageSpeed Insights or GTmetrix. The issue should be resolved or appear in the Passed Audits section.

Visual Test (Especially for Ecommerce)
On long pages (like product listings), scroll down and watch how images load. If they appear gradually as you scroll, lazy loading is likely active.
Use Chrome DevTools to Inspect
Open DevTools from View > Developer > Inspect > go to the Network tab and filter by “Img”. You should see the lazy load tag in the initiator column:

Are You Serving Responsive Images?
Testing your current image performance also means checking whether your images are optimized for every screen size. You can perform a live test by opening your website on multiple real devices, such as a phone, tablet, and desktop, to conduct a manual and accurate visual check. The limitation is that you can only test on a device that you have next to you. For more advanced testing, you can use the following tools:
🛠️ Tools:
- Use Chrome DevTools: Open DevTools, click the device toolbar, and select different screen sizes to simulate various devices. We’ve chosen “iPad Pro” in our example:

- Use a responsive checker like responsivetesttool.com to simulate how your images behave across screen sizes.
- Use Google PSI because it suggests which image size you should deliver according to the viewport (displayed dimension).

How to Choose the Right Image Performance Tools for Your Needs
Not sure which tool to use? We help you narrow it down in seconds.
- Consider GTmetrix or WebPageTest for more advanced image performance measurement and using the advanced KPIs mentioned above (page weight, page speed etc.). Both tools are freemium, allowing custom reports, simulating user conditions (e.g., testing with a 4G connection in France from a US server), and supporting several devices.
Andre Menzies from floodreport.nz says: “With GTmetrix, we can monitor not only image performance but also the entire site. If a metric goes above a certain threshold, we receive an alert. That’s ideal for identifying slowdowns before they become an issue and to make sure that images never impact the speed“.
- If you’re a blogger or marketer looking for a quick snapshot to see if Google is happy with your images, PageSpeed Insights is your go-to. It’s perfect to test how your site performs on mobile vs desktop, without diving into advanced KPIs.
- To check your site’s responsiveness and ensure your images are optimized for mobile, you can use the online tool responsivetesttool.com or the device section in DevTools.

6 Best Practices to Improve Image Performance
To improve image performance and maintain a fast website, implement the following six techniques. These are essential image performance best practices for any modern website—especially if you’re running WordPress.
1. Use Images Only If Needed
Don’t add unnecessary KB to your page. Before uploading an image, ask yourself: does it add value? Use images for key visual content, but avoid using them solely for decoration.
✅ Good example: on a WooCommerce store, a hoodie might need 2–3 images to show the front, back, and zoom detail.
❌ Bad example: a stock photo of people sitting at a meeting in an article titled “How to Run an Efficient Meeting” adds nothing but page weight.
2. Use Image Compression to Reduce Your File Size
Image compression is the best way to serve smaller images to visitors and improve page speed. Whether you choose lossy compression or lossless compression, the goal is to reduce file size while preserving quality. Lossy compression is totally fine if done well, and most users won’t notice any visual difference.
✅ Try to keep images under 200–300 KB.
✅ Aim for a page loading speed under 3 seconds to meet Google’s guidelines.
🛠️ Tool: Imagify
The easiest image optimization plugin for WordPress. It handles everything for you and comes with Smart Compression that automatically balances performance and visual quality. And the best part? You can do it all directly from your WordPress dashboard.
3. Use Next-gen Formats
Swap out old formats like JPG, PNG, or even SVG and go for WebP format or AVIF format. These image formats provide the same visual quality at a much smaller file size.
✅ Google recommends next-gen formats like WebP and AVIF for faster load times and superior compression capacities.
🛠️ Tool: Imagify (again!)
Convert all your JPG, PNG, PDF, and GIF files to next-gen formats like AVIF and WebP in one click, straight from the plugin interface.
4. Resize Images to Match the Screen
Always serve responsive images tailored to the user’s device and use image resizing techniques to deliver the right dimensions.
✅ Example: for a blog post, images should be around 600–800 px wide. There’s no need to upload a 3000px image if it’ll be scaled down on mobile.
5. Implement Lazy Loading
Lazy loading images helps defer the loading of images below the fold until the user scrolls down. This reduces initial page load time and speeds up perceived performance. It can also help improve LCP (Largest Contentful Paint) and overall user experience.
To manually add lazy loading to an image in HTML, you can use the following tag:
<img src="your-image.jpg" loading="lazy" alt="Description of image"> 🛠️ Tool: Lazy Load by WP Rocket (free plugin). Once installed, it automatically adds loading=”lazy” to your images, no manual action needed.
6. Use an Image CDN
A Content Delivery Network (CDN) stores and delivers your images (and other content) from servers that are geographically closer to your visitors.
✅ Example: If your WooCommerce store is hosted in Dublin and you’re targeting users in Tokyo, a CDN ensures your images load fast in Japan too.
🛠️ Tool: RocketCDN is an easy service to do implement a CDN because they do all the tech for you.
Case Study: Imagify at Work
Imagify is the easiest image optimization plugin for WordPress. Thanks to the Smart compression feature, Imagify automatically reduces your image file sizes as much as possible without compromising visual quality. It finds the perfect balance between performance and aesthetics.
You can also automatically convert PNG, JPG, PDF, and GIF files to WebP or AVIF, the most efficient next-gen formats.
Here’s how to optimize images with Imagify:
- Install the free Imagify plugin from the WordPress plugin repository.
- Create an account and get your API Key.
- Go to Settings and activate the next-gen conversion feature to convert images to WebP or AVIF.

4. Bulk compress your existing images or optimize them one by one from the library. That’s it.

5. Enjoy faster page load times and better performance scores, with zero effort and stable visual quality. Imagify reduced by 70% our images file size:

Now that you know how much time and KB you can save with Imagify, let’s take it a step further. Here’s how to check if all that image optimization is truly paying off in terms of speed and overall performance.
How to Measure Performance Improvements After Image Optimization
The best way to measure your image performance improvements after optimization is to conduct a “before and after” audit. You can learn from our process and easily reproduce the test for your own website.
Technical Test Setup of the Performance Test
To measure the impact of image optimization on performance, we ran tests under the following conditions:
- A simple test page listing the best destinations of 2025 (with 10 JPG images)
- Performance tools: GTmetrix and Google PSI
- Test Location: Dubai
- Server Location: France (Paris)
- Device: iPhone 13
- Browser: Chrome in Incognito Mode
- Test Page: 1 page containing 10 unoptimized images
- Optimization Tool: Imagify
- We compared key image performance metrics before and after Imagify.
Key Takeaways: Before and After Optimization with Imagify
First, we began by running a GTmetrix test on our current setup with unoptimized images. Here are the results:

- Format: JPG only
- Page speed: 4 s
- Page weight: 2.5 MB
- Total image weight: 1.7 MB
There are also some improvements to do about serving images in next-gen formats (WebP or AVIF), and properly size and compress images:

We also run a test on Google PSI and as a result, we also need to improve image delivery. It means to reduce their size and serve them in the right format.

That wraps up the first part of our audit!
Next, we installed Imagify and optimized our images using its compression features and AVIF conversion.
Let’s take a look at the post-optimization data using Imagify, it’s a big improvement:
- The large images are now resized to match display dimensions.
- All the JPG are now converted to AVIF (next-gen format).
- All file sizes are drastically reduced: all images under 300KB.
- Page speed: 2.9 s (under target)
- Page weight: 1.73 MB
- Total image weight: under 1MB

| 💡 Hint: Imagify helped reach most performance targets with better format, lighter files, and faster loading. |
To help you clearly see the impact of your image optimization efforts, you can create a simple before/after spreadsheet. The visual checklist helps you track and compare results, identify whether your optimizations hit performance goals, spot remaining issues, and clearly see how much tools like Imagify improve image performance.
3 Common Mistakes to Avoid When Testing Image Performance
Here are three common mistakes to avoid when testing image performance. If you overlook them, it could lead to inaccurate results and missed optimization opportunities.
1. Ignoring Real-World Conditions
Testing only on a high-speed desktop connection doesn’t reflect how your site performs for mobile users or people on slower networks. Use tools like GTmetrix or WebPageTest to simulate different devices (like an iPhone 14) and connections (like 3G, 4G, or 5G).
2. Forgetting to Check the Front-End
When you use an optimization tool, always double-check your images on the actual front-end, across devices and viewports. For example, make sure your logo isn’t blurry on mobile or that product photos load properly on tablets.
3. Over-Optimizing When It’s Not Needed
If your site is already converting well and performance is decent, don’t overcomplicate your strategy. Focus on quick wins like image compression and using WebP or AVIF formats. Don’t waste time chasing a perfect score with hundreds of performance optimizations if the user experience is already solid. For example, if your site loads under 3 seconds, navigation feels smooth on both desktop and mobile, then your users are likely already enjoying a solid experience.
Wrapping Up
Images often make up more than half of your page weight, so optimizing them is key to boosting performance. Use tools like GTmetrix, WebPageTest, PageSpeed Insights, and Chrome DevTools to check image size, format, lazy loading, and impact on speed.
Need a quick win? Imagify compresses, resizes, and converts images to WebP andA VIF in one click, helping you improve speed and Core Web Vitals easily. Try Imagify for free!


