
Looking for an efficient way to convert your images to WebP and…
Do you want to know how to compress JPEG images without losing quality? That is a fair question because it’s all about the perfect balance between the smallest file size and the highest visual quality. When done correctly, compression does not mean a blurred image; instead, it means a fast-loading page and a great user experience!
In this guide, you will learn three easy ways to decrease the size of your JPEG images without impacting their quality.
But before diving into the JPEG compression process and explaining why it is essential for keeping a fast website, let’s review the popular JPEG format.
What Is the JPG/JPEG Format?
JPEG or JPG (Joint Photographic Experts Group) is a graphic image file format compressed with lossy compression, mainly used to store images. JPEG is popular because it can store a lot of data in a small file size. It’s also the most widely recognized image file format, offering excellent compatibility with nearly all browsers and software.

JPEG is a format already using lossy compression, meaning that the file size and the quality are already reduced compared to PNG for example. Now you may think, if it’s already compressed, why not stick to JPEG format and simply upload them on your site?
The truth is, the best way to compress JPEGs without losing quality is to convert them to a better format (such as WebP or AVIF).
Why Compress JPEG Images
There are four main benefits to compressing your JPEG files:
- Saves space on your storage drive: a compressed image takes up less space.
- Makes the total page weight much lighter: it improves the total transfer time. Transfer time is how long a web page’s data travels from the website’s server to your computer. A lighter webpage means less data to send, so it goes faster and loads the page quicker.
- Boosts site performance: the compression decreases image file loading.
- Makes it more convenient to send multiple pictures via email: smaller file sizes are quicker to send and receive.
| 💡Why is JPEG compression so important? Compressed JPEGs load faster because they’re smaller. Compression is a performance technique that can reduce the overall loading time; therefore your site may rank better in search results. |
Now that you know why image compression is an important step in improving performance, let’s explore the best tools for achieving it.
How to Compress JPEG and JPG Images Without Losing Quality
To reduce the size of a JPEG picture without losing quality, you can use image compression WordPress plugins, online platforms, or design software. An effective image compression process is based on those three optimization techniques:
- Selecting the right compression level: you can choose a level that reduces the total image size without impacting quality. (e.g., use a tool that applies the best compression optimization automatically).
- Resizing larger images: don’t serve larger images than you need on your screen, so make sure the tool you use allows you to reduce the size of the pictures.
- Converting your image to the most advantageous format: converting from JPEG to next-gen formats like WebP and AVIF (recommended by Google) can be beneficial in terms of savings. According to a Google study, WebP images are more than 30% smaller than JPEG ones and are of similar quality.

With the right tools, you’ll see that compressing JPEG images and maintaining a high quality can be easy. Let’s review some of the most popular tools available on the market.
Compressing JPEG Images with a WordPress Plugin
An image compression WordPress plugin optimizes JPEG images (and other formats) directly on your site to improve performance and reduce file sizes. Some of them let you choose the compression level, while others automatically select the best balance between file size and quality for you. An example is Imagify, the simplest image optimizer you will discover soon in the tutorial below.
Pros of using a WordPress plugin for JPEG compression:
- Convenience: it automatically compresses images upon upload and existing images from WordPress.
- Consistency: it ensures all images are optimized uniformly.
- Batch processing: it supports bulk compression, which means compressing multiple images simultaneously and saving time.
Cons of using a WordPress plugin for JPEG compression:
- Limitation: the compression process is limited to having a website on WordPress.
- Dependency: relies on the plugin’s continued support and updates.
📋 Example: how to compress JPEG Images using the Imagify WordPress plugin
Imagify is the easiest image optimization plugin that automatically finds the best balance between image size and quality, thanks to the Smart compression feature. The plugin compresses JPEG images in seconds, saving you a considerable amount of time and effort.
- Install the free Imagify plugin directly from your WordPress admin.
- Create an account to get your free API key. Imagify is free for up to 20MB of data each month.
- Go to Media > Bulk Optimization and press the Imagify’em all to compress all your JPEG images.

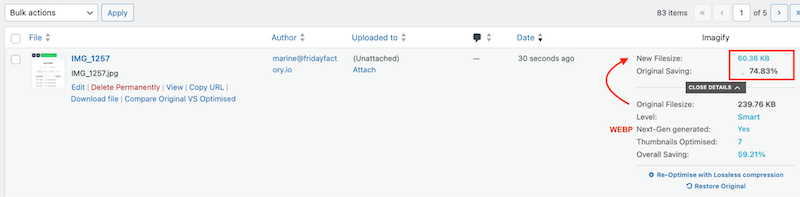
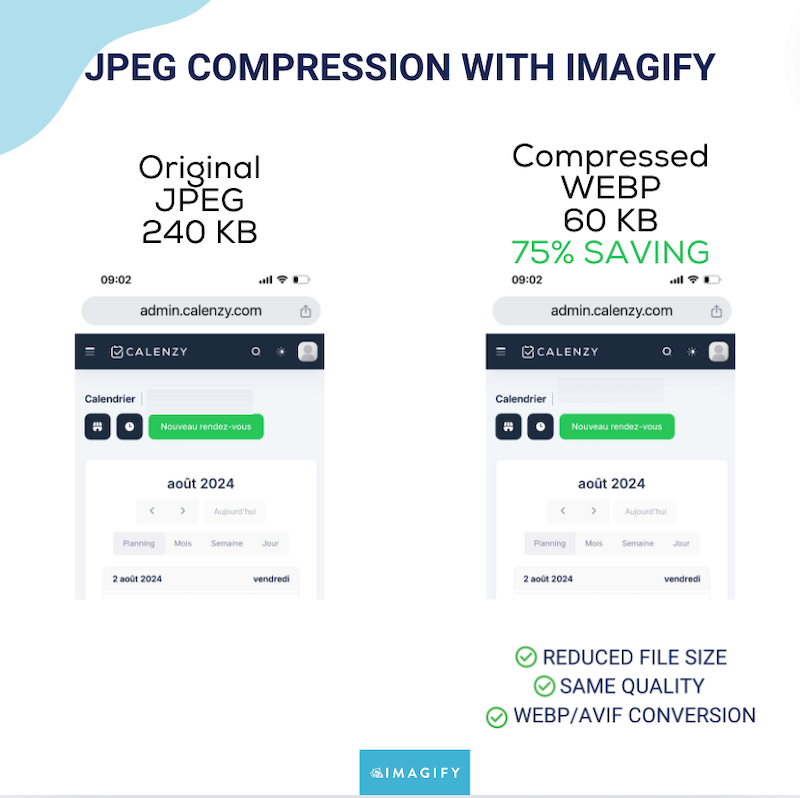
4. That’s it! Go to Media > Library to see the compression statistics for each image. As you can see, the JPEG image was initially around 240 KB and now weighs only 60 KB (a 75% savings). The image was also automatically converted to WebP to ensure better compression.
Let’s have a look at the original and the compressed images to make sure that the quality of the JPEG is still intact with Imagify:
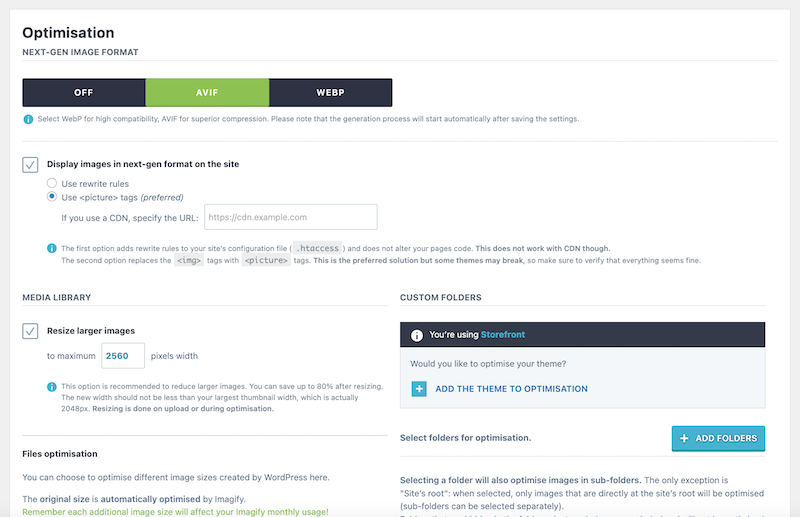
Note: Imagify converts JPEG images to WebP by default, but you can go to the settings page and change your preferences – including keeping them in the JPG format, even though it won’t be convenient for your website performance.
Go to Settings > Imagify.
- You can decide to auto-optimize images when uploading.
- You can choose to keep a copy of your original images.
- By default, Imagify uses a Smart (lossy) compression to strike the perfect balance between image quality and file size. You also have the option to select a lossless compression.
| 💡Note: You can compress your images with the Imagify plugin, and if your website is not built on WordPress, you can opt for Imagify’s online platform. |
Compressing JPEG Images with an Online Tool
Most online tools are user-friendly and compress JPEG images nicely without impacting quality. You only need to drag and drop your photos and download them onto your computer.
🛠️ Most popular online tools: CompressJPEG, Imagify online optimizer, Compressor.io.
📋 Example: how to compress JPEG Images using CompressJPEG
- Go to CompressJPEG.
- Drag and drop your image in the dedicated field. The compression starts automatically.
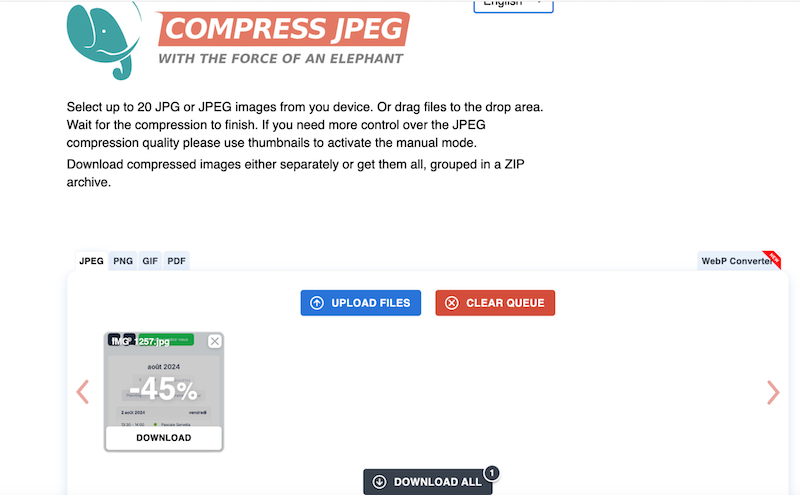
- The image has been compressed to 45%, so the new image file size is 133 KB.
- Click on the Download all button to get the image. As you can see, the quality is still excellent despite the compression:

Pros of using online tools for JPEG compression:
- Accessibility: it can be used from any device with an internet connection.
- Ease of use: it often requires no technical knowledge.
- No installation is required: it compresses a few images without consuming resources on your device or website.
- Cost: it’s usually free for basic features.
Cons of using online tools for JPEG compression:
- Limited features: it may not offer advanced compression options and impose a size limit that you can upload.
- Not integrated with WordPress: you must download each optimized image and re-upload it to WordPress.
- Longer process: compression and WebP/AVIF conversion are, most of the time, only possible using two different platforms. So you need to upload, download, and upload them to WordPress or the CMS.
Compressing JPEG Images with a Design Software
You can compress JPEG images using popular design software, which offers resizing and other optimization options.
🛠️ Most popular design software: Photoshop, Lightroom.
📋How to compress JPEG Images using Photoshop
- Open your image in Photoshop.
- Navigate to File > Save As.
- In the Save as dialog box, choose WebP as your preferred format from the Format drop-down list, and then hit the Save button.
- Choose between Lossless and Lossy compression and use the Quality slider to determine the quality before the final export. We put 90 for this test because anything under 90 will have a little visual impact on your image quality.

5. Hit the OK button. You get a compressed JPEG image converted to WebP with a file size down to 101 KB instead of 240 KB (57% savings).

6. Photoshop’s compression process (when set around 90%) does not impact the JPEG image quality.

Pros of using advanced design software for JPEG compression:
- Advanced features: it offers more control over image settings.
- No internet is required: the compression can be made offline.
Cons of using advanced design software for JPEG compression:
- Cost: some software can be expensive.
- Learning curve: it requires time to learn how to use it effectively, and you can end up with blurry pictures.
Summary
Most tools available for compressing JPEG images without losing quality can save you valuable bytes and help maintain a good user experience.
- Online tools are the best option if you are looking for an easy way to convert images to store them on your desktop or send them by email.
- A WordPress plugin is your best ally if you want to focus on web speed with a convenient way to compress your images directly from your WordPress dashboard.
- If you are a WordPress agency seeking an automatic and easy solution to implement for your clients that will work out of the box for future JPEG images they upload, then a WordPress plugin is also your best bet.
- If you have advanced design skills and need to do more than just compression, software like Photoshop is the best choice.
Wrapping Up
Compressing your JPEG images and converting them to next-gen formats (WebP or AVIF) is the best way to reduce file size. If you want to focus on performance and save time, try Imagify. The plugin is very easy to use and handles everything for you: bulk and Smart compression with no quality loss and WebP/AVIF conversion, as recommended by Google to boost performance. The best part is you can try Imagify for free, so there’s no risk. Don’t just take our word for it—compress a few JPEGs and see the impressive results yourself.


