Looking for an efficient way to convert your images to WebP and…
Are you looking for the best image optimizer plugins for WordPress? Look no further—we have compared the best tools available on the market! Did you know that unoptimized images are often responsible for slowing down a website? If your site has experienced performance issues lately, then you probably need an image optimizer plugin.
We’ve listed the must-have features you should look for to help you choose the best image optimizer plugin for your next project.
The Top 5 Image Optimizer Plugins
The best five image optimizer plugins we’ll go over and test are the following:
- Imagify
- Optimole
- ShortPixel Image Optimizer
- EWWW Image Optimizer
- Compress JPEG & PNG images by TinyPNG
1. Imagify: The Easiest Image Optimizer Plugin
Popularity: 900 000+ installs
Imagify is the simplest image optimizer for WordPress. It automatically compresses images and converts them to AVIF and WebP, improving your website loading time. It also comes with asynch bulk compression and an intuitive interface that saves you a lot of time during the optimization process.
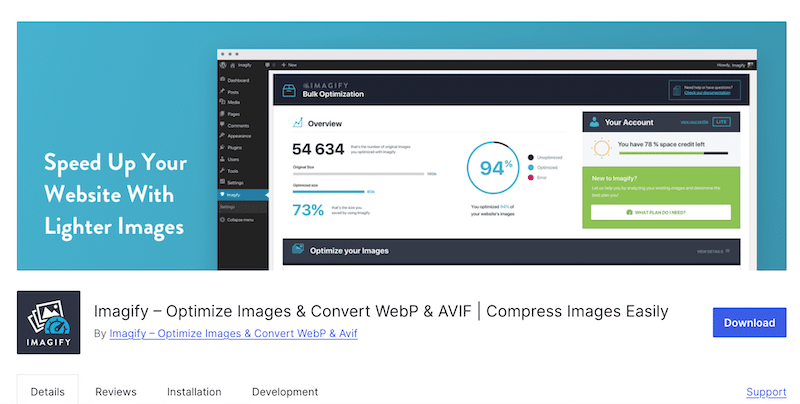
Key Features:
- Smart Compression feature – you can automatically optimize your images at their best, so you don’t need to worry about which compression level is right for your needs.
- WebP and AVIF conversion:
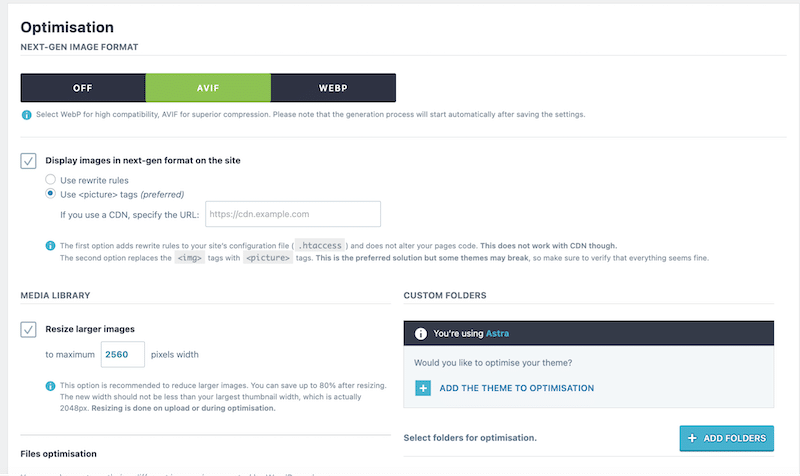
- Intuitive interface: The settings are straightforward, and there is one final button to click, and the job is done!
- Performance-oriented plugin: Images are optimized on their servers and it’s developed by the same team as WP Rocket and RocketCDN.
- It supports many image formats, such as PNG, JPG, GIF, PDF, and, of course, WebP and AVIF.
- Optimization and resizing are done automatically on upload.
- You can manually choose the images to optimize, or use the Bulk Optimization feature to compress many images at once asynchronously.
- Your original files are not deleted.
Pricing:
Free for 20 MB worth of data per month, the plan starts at $4.99/mo for 500MB or $9.99/mo for unlimited optimizations. Check the full pricing here.
Imagify’s Performance Result:
Imagify helped decrease my image file size by 87.73%. It went from 502 KB to 53.70 KB without compromising quality.
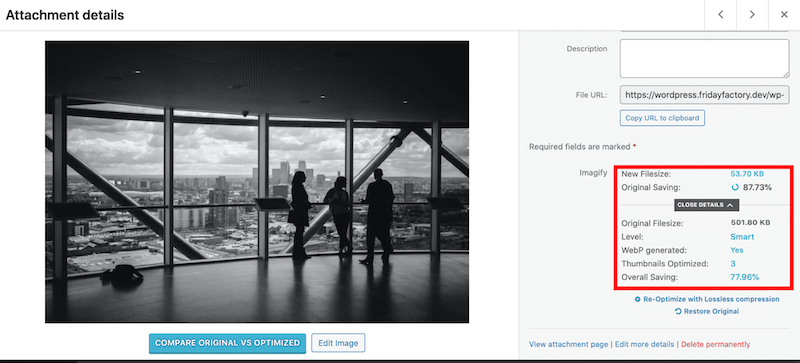
Tips when you use it: You’ll see that with the Smart compression feature, the quality is unaltered, but the file size is much smaller! The “Visual Comparison” tool is a nice feature for checking the before-and-after of compression.
What the WordPress community says about it: Very powerful compression, easy to use, and reliable – “We’ve been using this plugin to optimize images for many of my clients for years and it works great.” -“Using this plugin on every site I create and does an amazing job in optimizing images and delivering WebP ones for faster speed.”
2. Optimole: Lazy-loading and CDN distribution
Optimole is a cloud-based system that offers full automation and a range of optimization features. It delivers images in smaller sizes without compromising on quality on every type of device.
Key Features:
- Minimalistic and clear interface with two clear tabs called “dashboard” and “settings”.
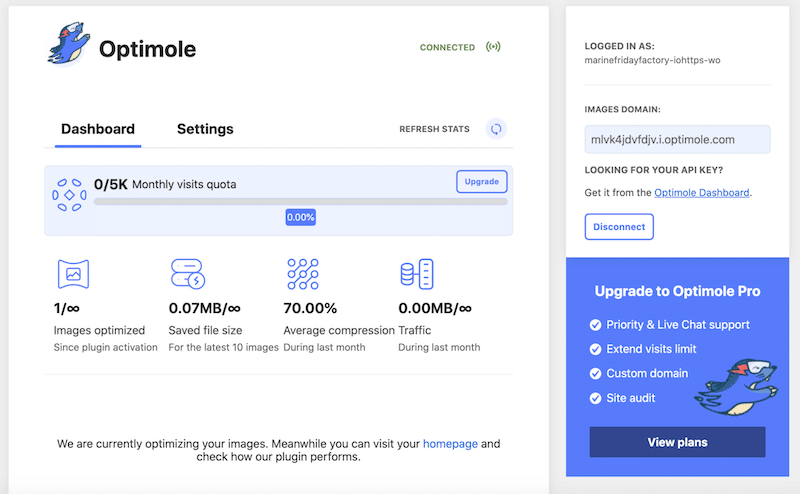
- WebP and AVIF conversion: It allows you to serve images in WebP format and converts all formats to WebP and AVIF.
- Lazy-loading: You get access to apply lazy-loading on the images of your choice.
- Machine learning compression: The algorithms provide the lossy or lossless optimization for the best-looking image at the smallest size.
- Responsive settings: You can pick the right image size for the visitor’s browser and viewport.
- Cloud Library support: It’s possible to offload your website images directly to Optimole Cloud (which means you save storage space on your server)
- Watermark: It allows you to add a watermark on all your pictures if that’s something you need for your business.
- CDN distribution: You can serve images from a global CDN.
Pricing:
With the basic plan, you will be able to optimize an unmetered number of images for up to 5K monthly visits. Then, you need to upgrade according to plan that suits you best, starting from €19.08 per month.
Optimole’s Performance Result:
Optimole decreased my image file size by 67%. It went from 502 KB to 164 KB. You can’t see the optimization in the WordPress library because it’s made on the cloud: Optimole directly serves optimized images to visitors on the front end.
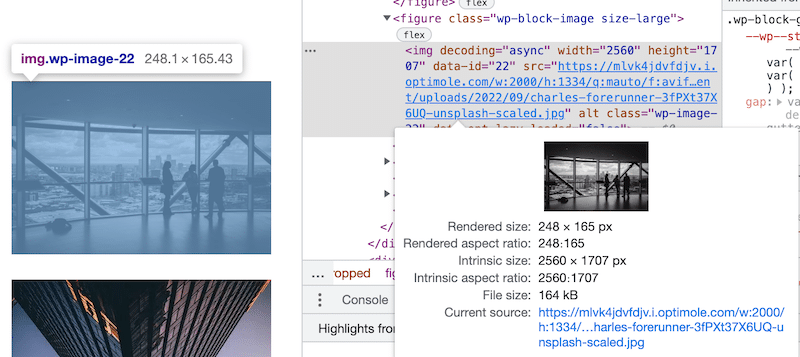
Tips when you use it: If you are a photographer and need a watermark automatically applied to your images, this is a great plugin to think about. If you are on a budget with low traffic on your site, the optimization is free for up to 5,000 visitors per month.
What the WordPress community says about it: Users particularly enjoy the CDN integrated into the optimization plugin – “Works great, great CDN and support”.
3. ShortPixel – A Sleek Interface
Popularity: 300 000+ installs
ShortPixel is an easy-to-use image optimization plugin that can compress all your images and PDF documents with a single click.
Key features:
- Simple interface that offers quick buttons to determine the compression type, backups, and resize large images.
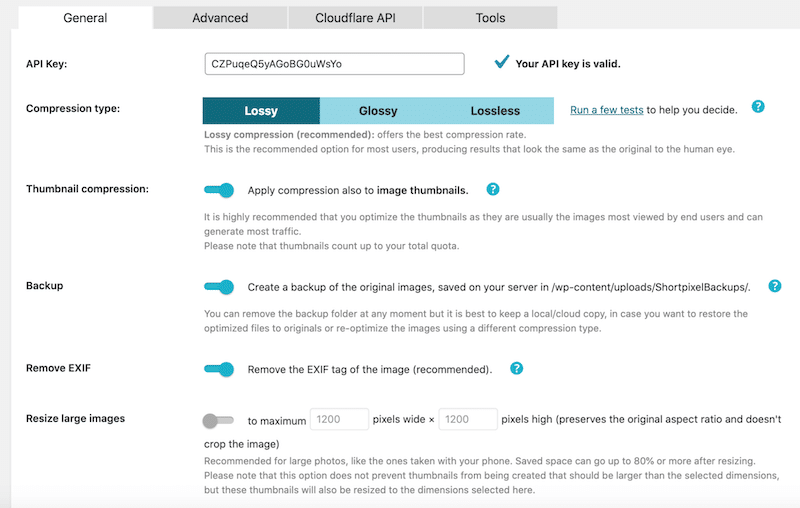
There is also an “advanced” tab that provides all the next-gen settings you need to convert images to WebP or AVIF.
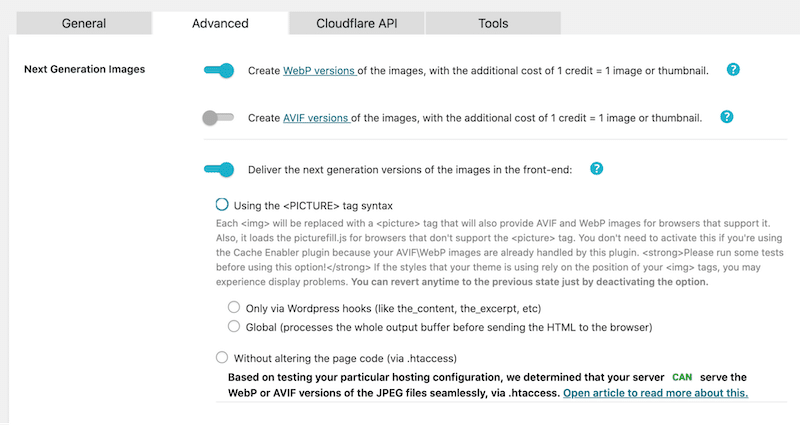
- A powerful Bulk compression with a very handy wizard in 4 steps. You can ‘Bulk’ optimize all the existing images in the Media Library and in third-party plugins like NextGen Gallery.
- No credits are used for the images that are optimized less than 5%.
- There is the option to scale images down, with 2 different options, which are handy for large images.
- Cloudflare integration so you can distribute images faster worldwide (you need to have your CDN).
Pricing:
ShortPixel provides 100 free image credits every month. Monthly plans or cash credits are available according to what fits you best. The first plan starts at $9.99 per month.
ShortPixel’s Performance Result:
Shortpixel decreased my image file size by 66.95% and converted it to WebP. It went from 502 KB to 165 KB.

Tips when you use it: It’s the best plugin to do some advanced optimization exclusion. Keep in mind that monthly credits are not reported to the next month, so make the most of them to avoid wasting data.
What the WordPress community says about it: Effective support and a great plugin to optimize images in bulk and exclude some of them – “This tool will save you time, money and speed up your site”.
4. EWWW – Free WordPress Image Optimizer and no File Size Limits
With EWWW IO, you can optimize all your existing images from any plugin! EWWW IO takes care of new image uploads automatically. You don’t need to do anything else.
Key features:
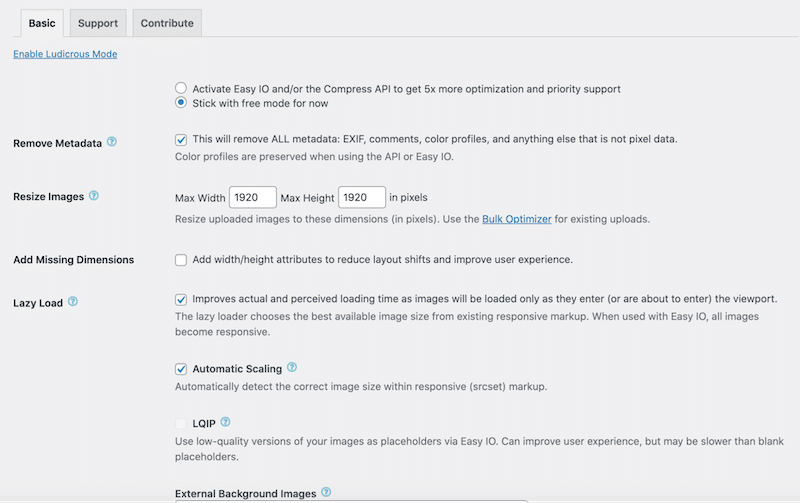
- An intuitive wizard that helps you set up the plugin and choose the optimization options you need for your website:
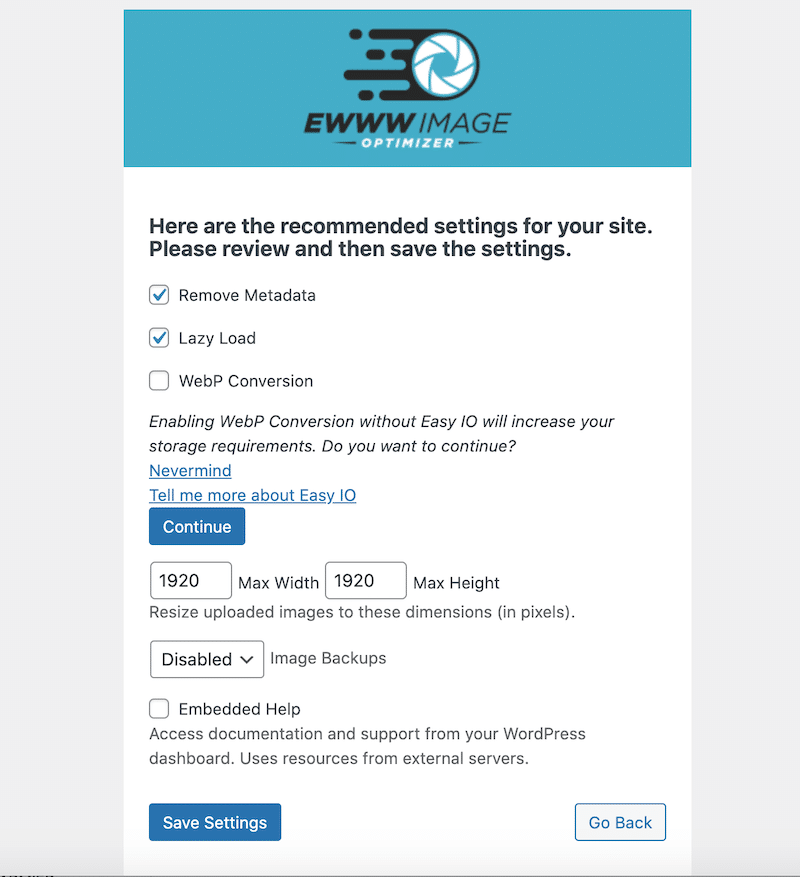
- You can convert images to WebP.
- There are no speed limits and unlimited file sizes can be uploaded.
- Lazy-loading: You can boost your site’s performance and loads above-the-fold images in priority.
- You can automatically resize images on upload to avoid large images from being uploaded to the WordPress library.
- You can easily add missing dimensions (width/height) to your image.
- Responsive options: It detects the correct image size within the responsive markup (srcset).
Pricing:
A free version with all the premium features mentioned above is available for $7 per month. That makes it one of the most affordable plugins on the market with advanced features, providing excellent value for money.
EWWW’s performance results:
My image went from 502 KB to 156.9KB, which means a saving of 69%.

Tips when you use it: Don’t forget to turn on all the performance features of the plugin. Ewww Image Optimizer is a full optimization plugin that also offers a caching engine, CSS/JS optimization, and Google Font optimization to help your site load faster.
What the WordPress community says about it: A plugin that is easy to you, saves you time and bandwidth – “Save time and bandwidth” – “I particularly appreciate how you don’t destroy the original image integrity”.
5. TinyPNG – Optimization and Basic Interface
This plugin automatically optimizes images by integrating with the two popular image compression services, TinyJPG and TinyPNG.
Key features:
- Basic interface but with essential settings: It will take you only a few seconds to activate the settings of your choice and run the automated optimization process:
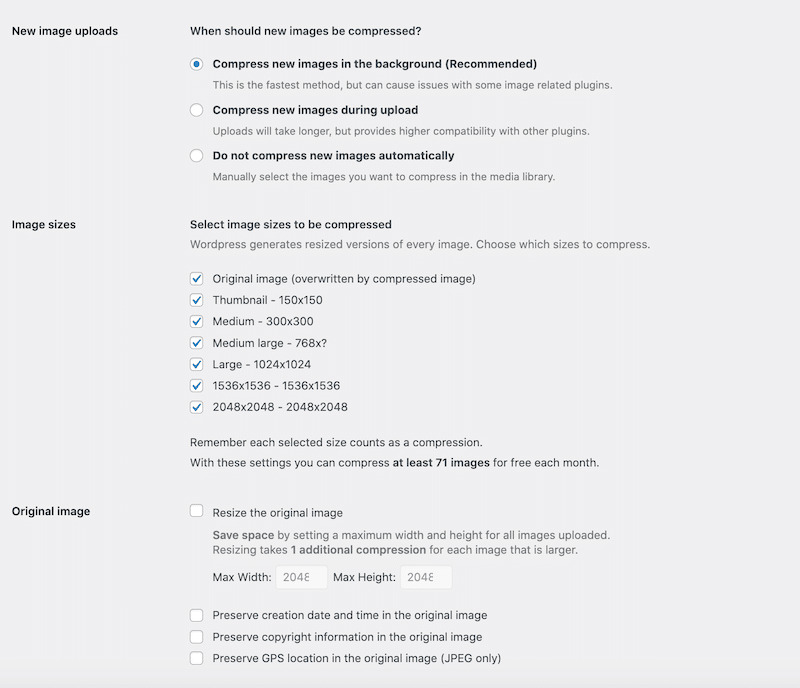
- You can compress the new images in the background and/or during upload.
- You can manually select the images to optimize in the WordPress library manually.
- Easy bulk optimization of your existing media library.
- You can optimize WebP images (but you can’t convert them to this format).
- You can set a maximum width and height for each uploaded image.
Pricing:
If you use the WordPress plugin: You can optimize roughly 500 images each month for free, and a paid account removes these limits. That’s how the pay-per-compression model works:
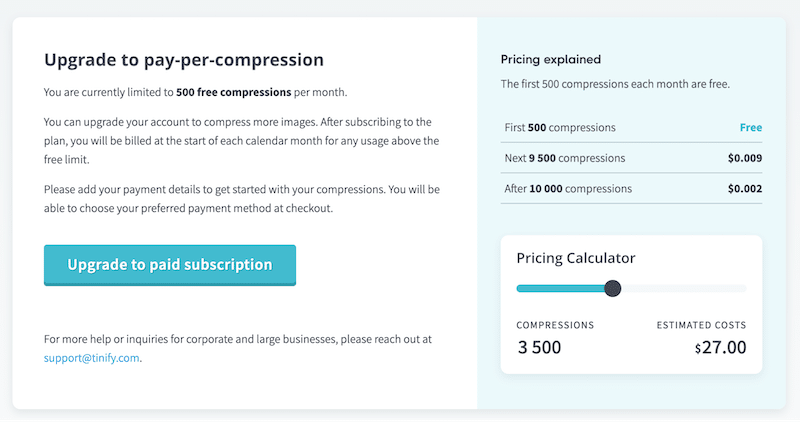
Tips when you use it: It does not offer conversion to next-gen formats such as WebP or AVIF. To unlock this feature, you will need a premium extension called WebPro.
What the WordPress community says about it: Users particularly like that the plugin is easy to use with great compression results. – “Such a good and easy-to-use tool”.
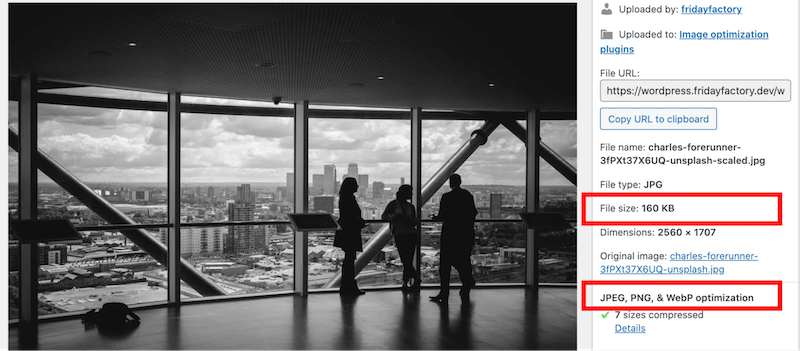
TinyPNG’s performance results:
My image file size decreased from 502 KB to 160 KB, which is a total savings of 61%.
How to Choose an Image Optimizer Plugin
Choosing the right image optimizer plugin is essential for improving website performance. Here are the key considerations to help you select the best plugin for your needs:
1. Compression Quality and Options
- Lossy vs. Lossless compression: Determine if you need lossy (smaller files, slightly reduced quality) or lossless compression (larger files, no quality loss).
- Different levels of compression: Ensure the plugin offers flexibility in adjusting compression levels.
- Preserved quality: Choose a plugin that does not alter the quality of the image during the compression process.
2. Automation, Single and Bulk Processing
- Automation: Look for plugins that automatically optimize images upon upload.
- Bulk optimization: This is essential for optimizing existing media libraries without manual effort.
3. Performance Impact
- Speed and server load: Choose a plugin known for minimal impact on server performance and that optimizes images using its own server.
- CDN integration: Some plugins offer integration with Content Delivery Networks for faster delivery.
- Lazy loading: This feature allows you to prioritize which images need to be loaded first for your visitors.
4. File Format Support and Next-gen Formats Conversion
- Formats compatibility: Ensure the plugin supports a variety of file formats (JPEG, PNG, GIF, WebP, AVIF, SVG).
- Next-gen formats conversion: Choose one that can convert all the traditional formats to AVIF or WebP.
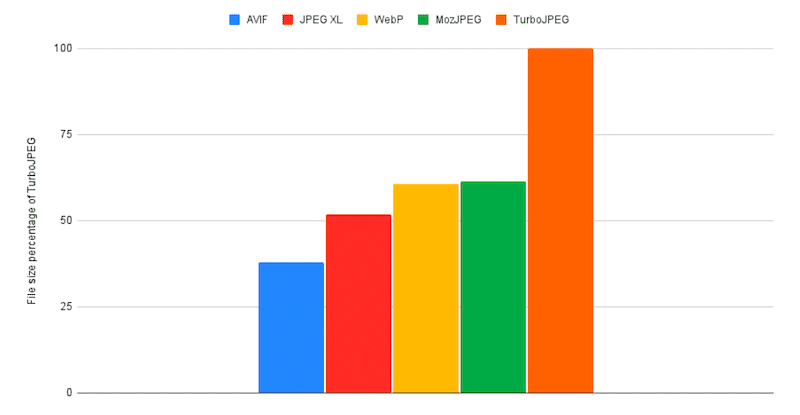
Both recommended by Google, WebP and AVIF are next-generation image formats that offer superior compression than traditional formats. They provide smaller file sizes while maintaining high image quality, which leads to faster website loading times.
According to research from Webdev, the AVIF format is better in terms of compression. For a similar image, AVIF is the best format for a smaller file size.
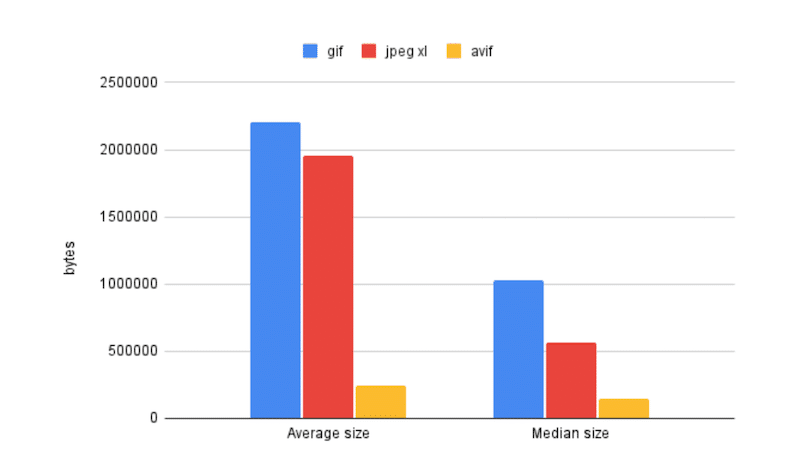
Similarly, AVIF is the best format for delivering animated images instead of GIFs. In the graph below, you can see that the size of an animated image in GIF or JPEG XL format is around 2,000,000 bytes, whereas in AVIF format, it’s only 250,000 bytes, making it much lighter.
5. User Experience and Support
- Ease of use: Choose a User-friendly interface with an easy setup.
- Support and documentation: A reliable customer support and thorough documentation for troubleshooting is essential.
6. Cost and Licensing
- Free vs. Premium: Evaluate the cost of premium plugins versus the features they offer.
- Licensing: Check if the license covers multiple sites and how many GB of images you get for free, for instance.
7. Choose the Best Features According to Your Needs
- Business Owners and WordPress Agencies
Select a plugin that offers automatic optimization upon image upload. This feature ensures that compression occurs automatically without requiring any additional actions from your client in the future.
Also, focus on compatibility with WooCommerce to easily optimize product images or videos if you are building e-commerce sites for clients.
To ensure performance, choose a plugin that compresses on its own server and offers next-gen format conversion (such as WebP and AVIF).
- Web Designers
Look for plugins that offer high-quality image optimization without sacrificing the visual quality. WebP and AVIF conversion are also essential to speed up pages.
- SEO Experts and Marketers
Choose plugins that help improve page load times and support SEO-friendly image attributes.
- Bloggers
Prioritize plugins that are easy to use and come with bulk compression so you can save time and focus on your writing.
Another feature worth mentioning (if you use GIFs on your blog) is the conversion from GIF to AVIF, as it’s the most efficient way to deliver animations on the web.
| 💡Hint: We recommend AVIF for animated images for bloggers and anyone with videos or GIFs on their site, including WooCommerce product videos. |
- Developers
Seek out plugins with customizable settings and comprehensive documentation. Features to look for include multiple levels of compression and options for single or bulk compression.
- Photographers
If you are a photographer who is not willing to compromise on quality, then opt for a plugin that offers lossless compression. You may also need a watermark automatically applied to your images.
How to Easily Optimize Images with Imagify
Imagify is the easiest way to optimize images on WordPress and improve your website’s overall performance. Optimizing images means reducing file size as much as you can without compromising on quality.
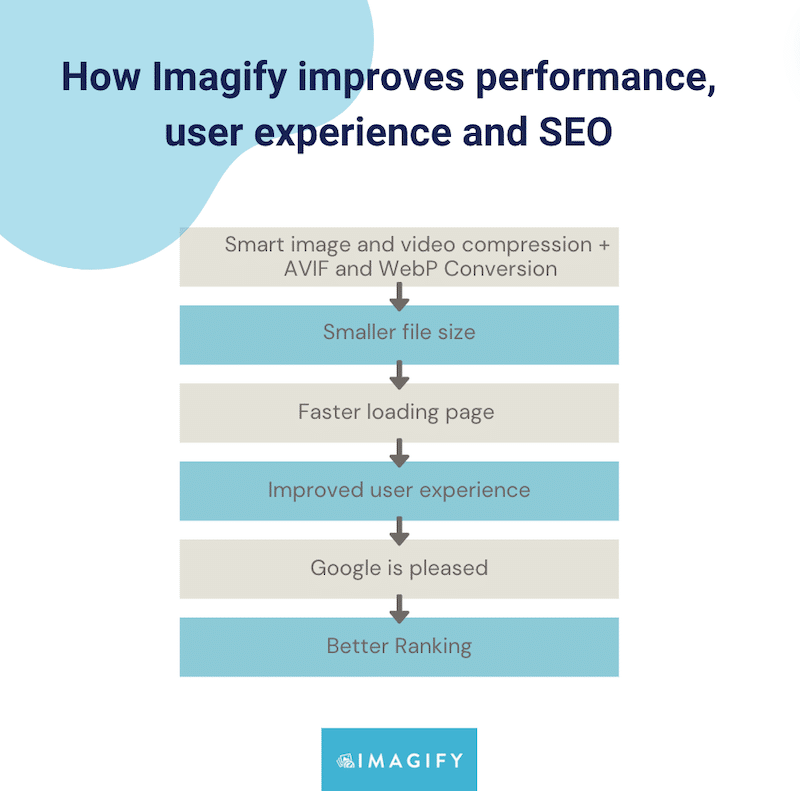
With Imagify, you can achieve five key benefits:
1. File Size Reduction
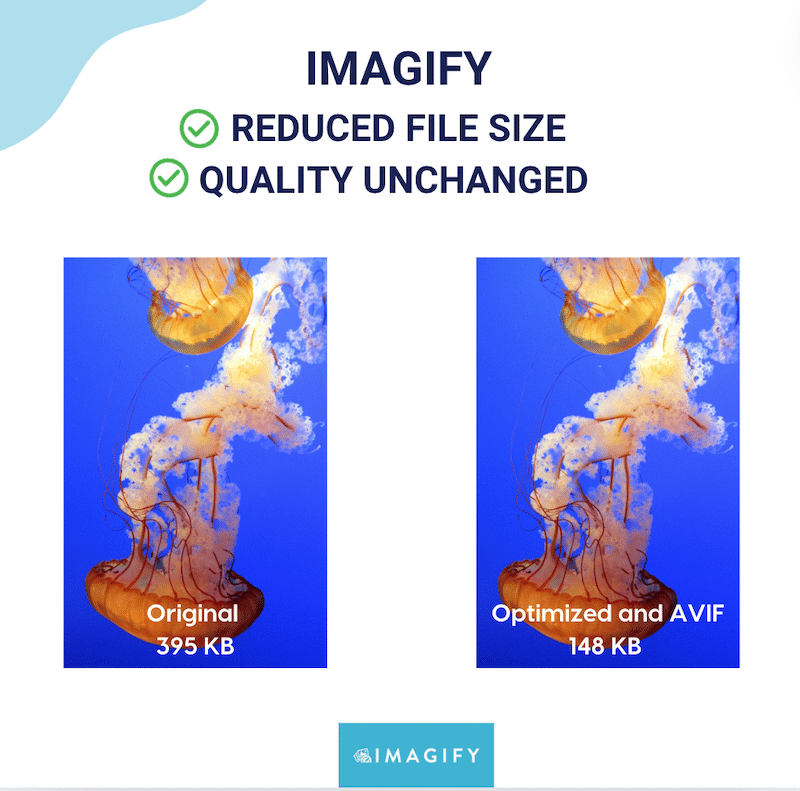
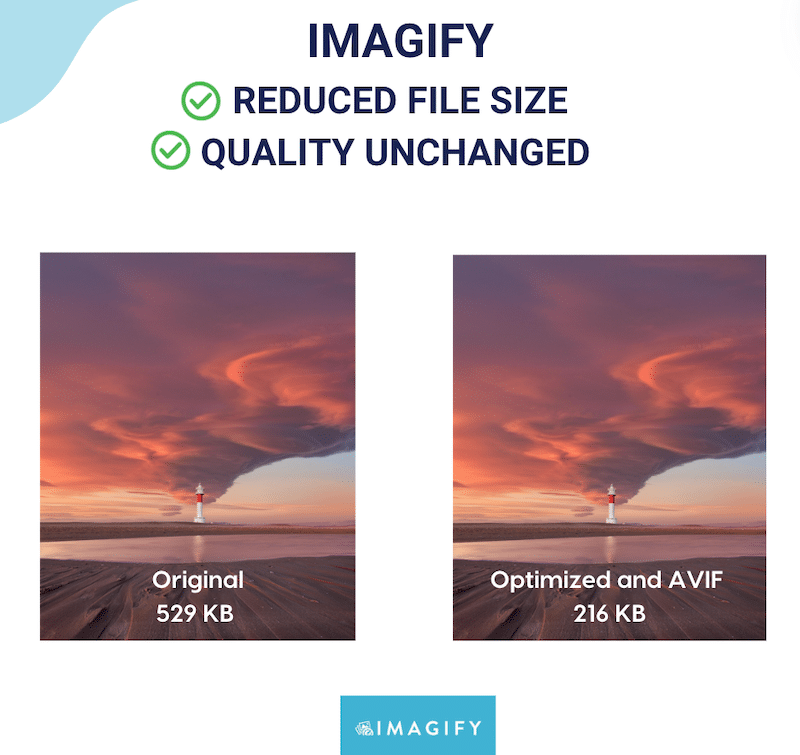
Imagify compresses your images by reducing their file sizes, which helps in quicker loading times and reduced bandwidth usage. The results below were achieved thanks to the Smart Compression feature, which is enabled by default.
| Image file size without Imagify | Smaller image file size with Imagify | % saved | |
| Image 1 | 395 KB | 148 KB | 70% |
| image 2 | 529 KB | 216 KB | 74% |
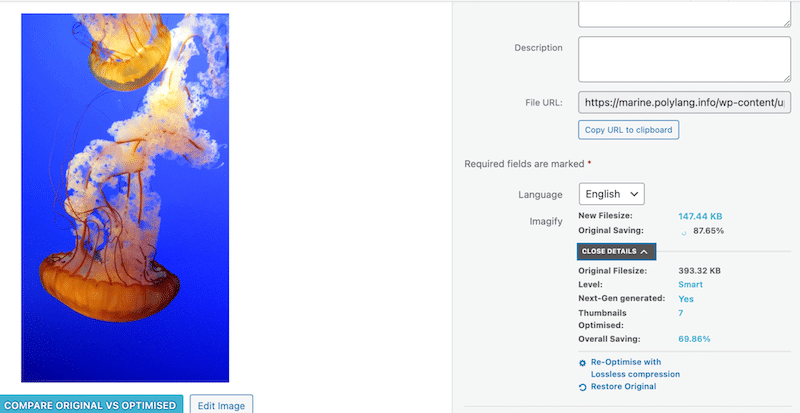
Here’s what the optimization looks like from the WordPress library. Imagify gives you the new file size, original savings, and the generated AVIF or WebP file (it was AVIF in our case).
2. Preserved Quality With Smart Compression
Despite the significant file size reduction, Imagify uses Smart compression to ensure that the quality of your images remains unaffected.
Optimized image #1:
Optimized image #2:
3. Easy AVIF and WebP Format Conversion
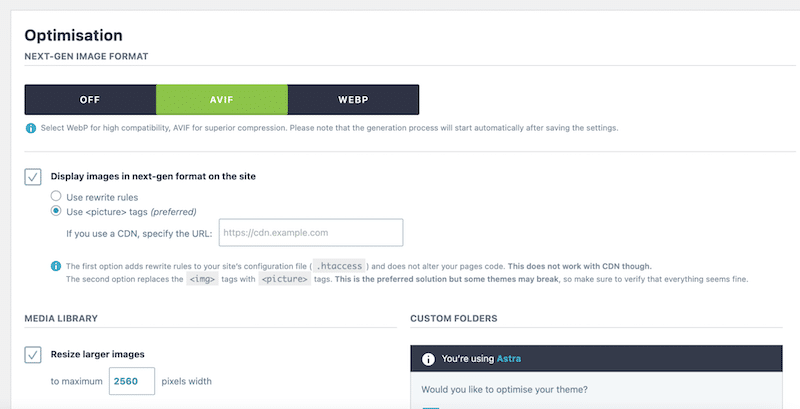
As seen previously, Google recommends AVIF and WebP because these modern image formats offer superior compression efficiency. Imagify automatically converts images to WebP, and you have the choice to choose AVIF in one click.
4. Single and Bulk Optimization
Imagify offers both single and bulk optimization features. You can easily optimize all images with the “IMAGIFY’EM ALL” button:
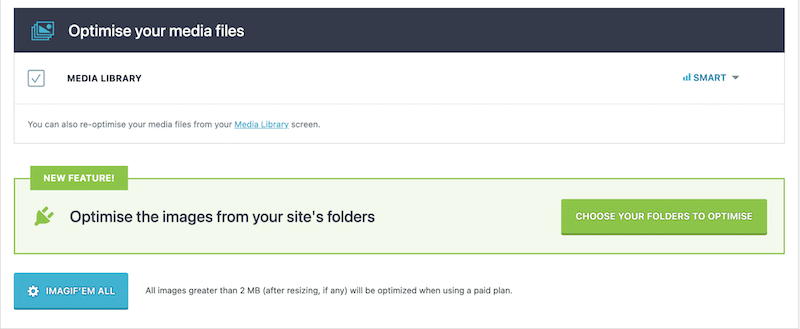
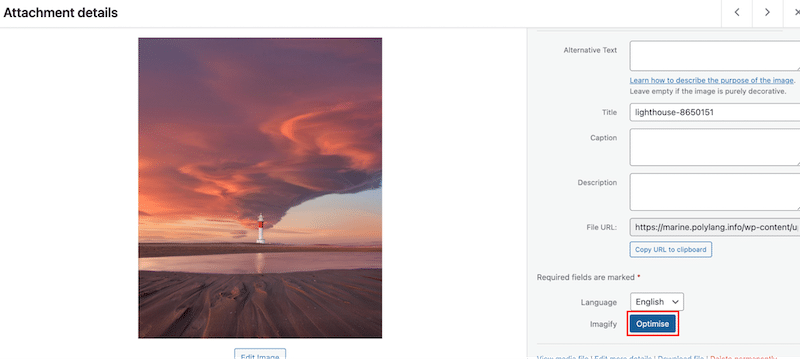
Or you can select images one by one from the WordPress Library and click on the Optimise button.
5. Improved Page Speed
Imagify optimizes images efficiently, as recommended by Lighthouse, so you can see results in page speed and overall performance.

Wrapping Up
According to our performance comparison audit, Imagify is your WordPress site’s smartest and most intuitive optimizer plugin. Our JPEG image went from 502 KB to 53KB (which is almost a saving of 80%).
The imagify image optimizer plugin reduces image file sizes without losing quality, makes your website load faster, improves your SEO ranking, and makes you save bandwidth.
Why don’t you give Imagify a try? It’s free for up to 200 MB of images a month, and the only risk you take is to delight your visitors by serving them faster images!


