Looking for an efficient way to convert your images to WebP and…
So, did you read about the benefits of the next-gen format everywhere and want to know how to use WebP on WordPress? Our guide comes at the perfect time!
Did you know that unoptimized images are often the main reason for a slow website? You should always consider the format you serve them because it can deeply affect your site speed.
And spoiler alert: converting your JPEG or PNG images to the WebP format could significantly improve your site’s performance. Do you need help figuring out where to start your WebP journey?
In this article, you’ll learn everything you need to know about WebP, such as:
- What’s the WebP format, and why you should use it on WordPress.
- How WebP works on WordPress.
- Which browsers support WebP.
- Which WebP converter plugins are best for your needs.
- How to convert your images to WebP using a WordPress plugin like Imagify.
Follow our guide to use WebP on WordPress properly!
What’s WebP Image Format?
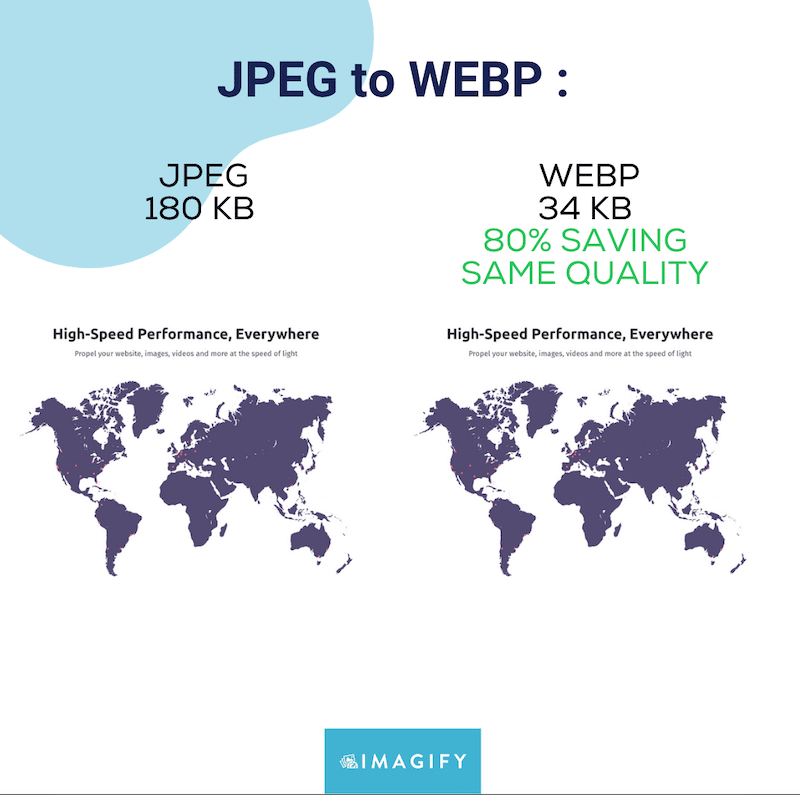
WebP is a next-generation image format created by Google that provides superior compression for web images compared to traditional formats. With WebP, you can serve smaller image files to your visitors while maintaining a quality comparable to JPEG or PNG. In other words, you save some KB without affecting the quality of your pictures.
Why Should You Use WebP Images on WordPress: 3 Benefits
If you are still wondering if you should use WebP images on WordPress, the answer is yes! Here are 3 benefits of using WebP images that will make you want to convert all your JPEG and PNG images to the WebP format:
1. You Make Your WordPress Site Run Faster with Smaller Images File Size
WebP format means smaller file sizes, meaning your browser can render the content to your visitors much faster.
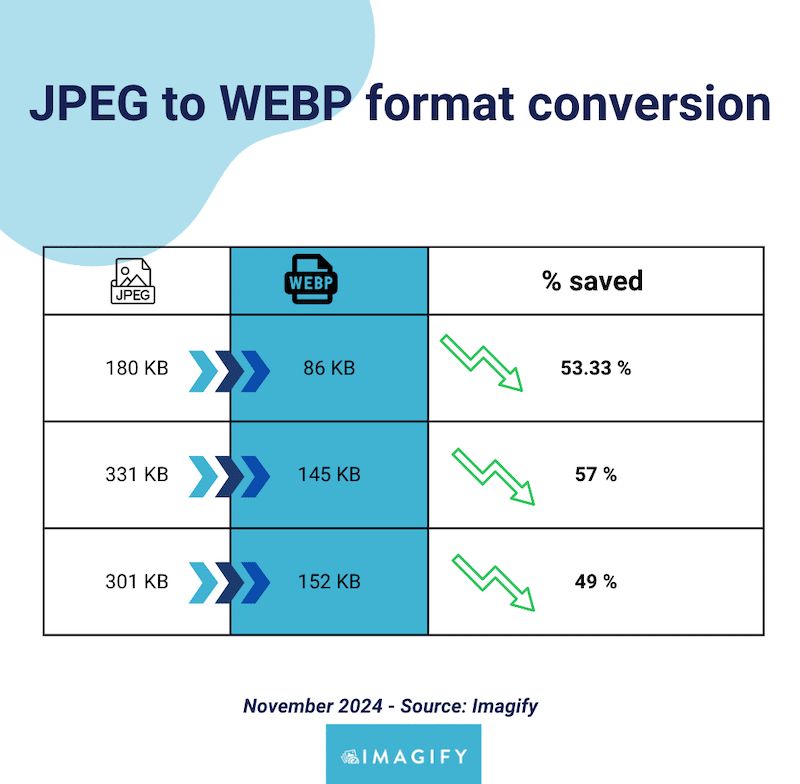
Google states that WebP images are, on average, 30% smaller than JPEG images of quality standards. To confirm their study, we ran our analysis and found that our images converted to WebP were smaller by even more than 30%. Here’s an example below.
Before uploading the images to my WordPress site, I converted all my JPEGs to WebP and saved up 50% on average:
2. You Save on Bandwith
Smaller images require less data from your server to the user’s final device. If you use WebP, you can reduce your bandwidth consumption and, ultimately, limit the cost of your hosting provider.
3. You Rank Better on Google
Speed is important because it’s a ranking factor and may impact your SEO performance. A faster website gives users a better experience, so Google is more likely to rank it higher. Since WebP images are lighter than JPEG and PNG formats, they load faster, which is also essential for offering a top-notch user experience.
Google provides a suite of free tools designed to assess your website’s speed and overall user experience. One of these tools is PageSpeed Insights, which uses the powerful Lighthouse technology to deliver comprehensive performance reports. And guess what? To improve performance and serve a higher user experience to your visitors, PageSpeed Insights recommends you serve images in next-gen formats such as WebP or AVIF:

| 💡Key takeaway: WebP provides smaller file sizes and faster loading times than traditional image formats, making it an ideal format for the web. |
Does WordPress Support WebP?
WordPress supports the WebP format since WordPress 5.8 was released on July 20, 2021. From that WordPress version forward, you can upload and use WebP images in your WordPress library without using any extra plugins.
How to Create and Use WebP Images in WordPress
Creating WebP images on your WordPress site is easier than you might think. Keep reading to discover how to enable and use this format to enhance your site’s performance.
How to Upload WebP Images in WordPress
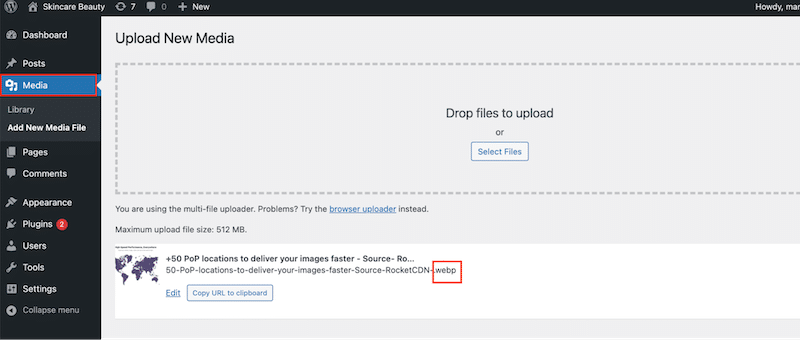
To upload WebP images, follow the process you usually do for JPEGs and PNGs. Go to the WordPress library and upload a new media file.
How to Enable WebP in WordPress and Get WebP Images
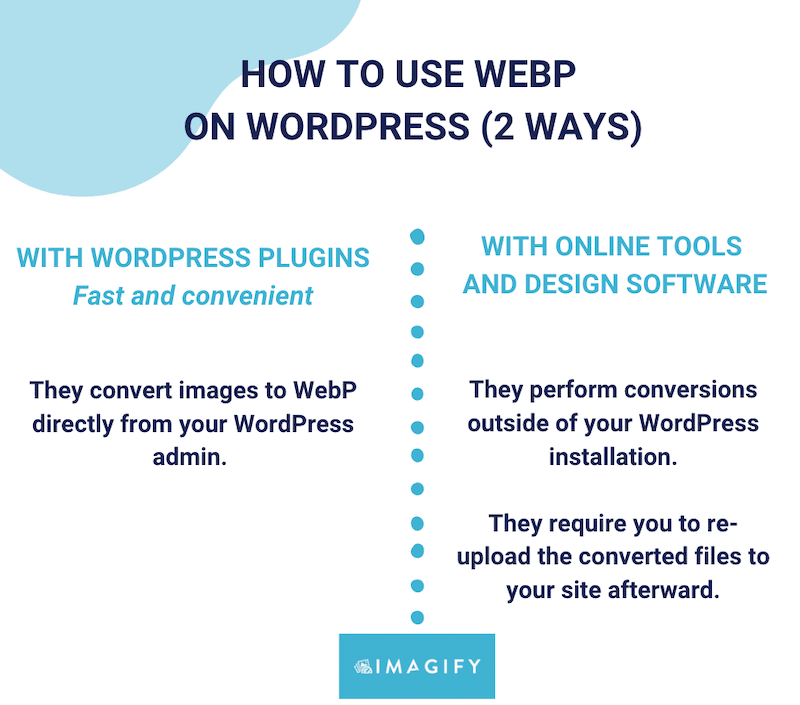
You don’t need to “enable” WebP in WordPress because the format is supported out of the box. You can simply upload your WebP images and use them anywhere when designing your site. However, note that WordPress does not offer WebP conversion. If you upload a JPEG and want to get a WebP image, you’ll still need an online tool or a plugin to do the conversion.
WordPress plugins can convert directly from your WordPress admin, while online tools and software will do the conversion outside your WordPress installation. You’ll need to re-upload the converted file to your site.
How to Check that WebP is Working on Your WordPress Site
There are two easy ways to check that your WordPress site is serving WebP images: by saving the image on your desktop or opening the image in a new tab. With both techniques, you can quickly check whether the image file extension is WebP.
Checking if WebP Works by Saving the Image:
- Go to the page and right-click to save the image on your desktop. Select the “Save Image As” option.
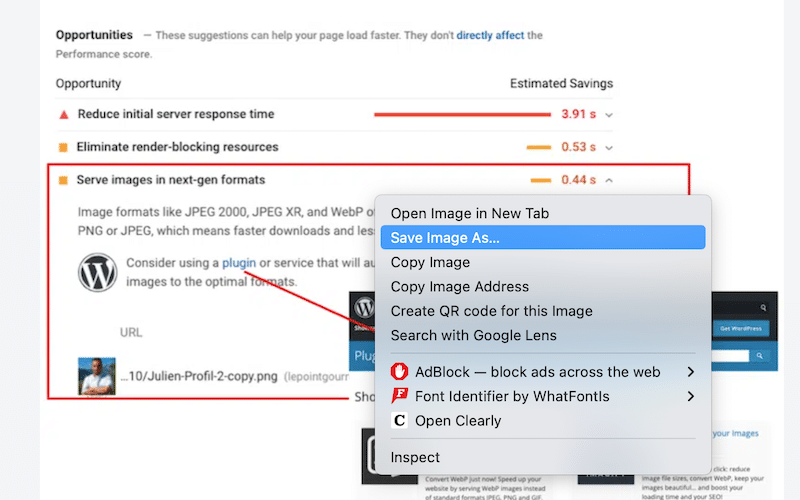
2. If the file extension is WebP, that means the conversion worked and that your site is properly using WebP:

Checking if WebP Works by Opening It in a New Tab:
- Do a right-click on the image you want to check and select the “Open in a new tab” button.
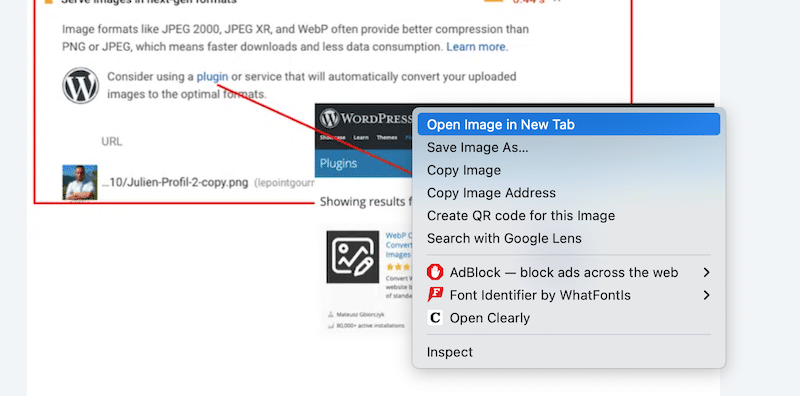
2. Go to the new tab and check the file extension as shown below:

Which Web Browsers Support WebP Images?
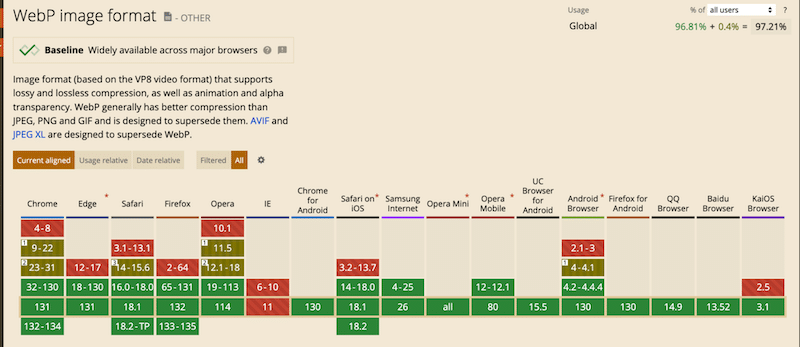
In 2024, the major browsers support WebP as long as they are up-to-date. There are a few exclusions for outdated versions that need to be mentioned, according to the Caniuse website:
- If you are using a version of Edge inferior to version 18, then the WebP images won’t be supported.
- For Safari users, Safari 14.0 – 15.6 has full support of WebP but requires macOS 11 Big Sur or later.
- Outdated versions of Chrome (before 31), Opera (before 19), and Android Browser (before 4.2) offer only partial support for lossless, alpha, and animated WebP images.
Which WebP Converter Plugin is Best For You?
The best WebP converter plugins for WordPress are Imagify, WebP Converter For Media, ShortPixel, and WebP Express.
All of these plugins convert images to WebP easily on WordPress, but some also offer advanced image optimization features that can help you improve your performance scores on PageSpeed Insights.
If you are a WordPress agency…
Try Imagify for its automatic and user-friendly features. You can set it to optimize and convert images to WebP when uploading. If your clients add pictures, they’ll be automatically optimized and converted without additional steps.
If you are a blogger with just a few images…
Choose WebP Express or WebP Converter For Media if you’re looking for straightforward WebP optimizers without extra advanced features.
If you are a WooCommerce store owner…
Opt for Imagify or ShortPixel because you may need WebP conversion plus advanced options like compression or auto-resizing for large image product files.
If you are a developer or a performance-focused WordPress user…
Imagify is your best ally for passing PageSpeed Insights audits, offering WebP conversion and advanced optimization with its Smart compression level. Imagify can compress your images up to 90% without impacting the visual quality.
If you are a photographer…
ShortPixel is worth considering because it offers WebP conversion combined with Glossy compression, meaning your images maintain top-notch quality to showcase your photography work.
| 📖 Do you still need help in finding the best WebP conversion plugins? Check the 4 best WebP plugins for more details. |
How to Use WebP Images with Imagify
Imagify automatically converts your images to WebP directly from your WordPress admin (and it’s free for up to 20MB of data a month!).cImagify is also the easiest image optimization WordPress plugin that compresses images without impacting their visual quality. Thanks to the Smart level compression mode, Imagify does all the heavy lifting, ensuring a perfect balance between image compression and quality right after installing the plugin.
Ultimately, you will get a faster website and boost your PageSpeed Insights score. Imagify can also help you address the PageSpeed Insights audits related to image optimization, such as “Efficiently encode images” and “Serve images in next-gen formats.”
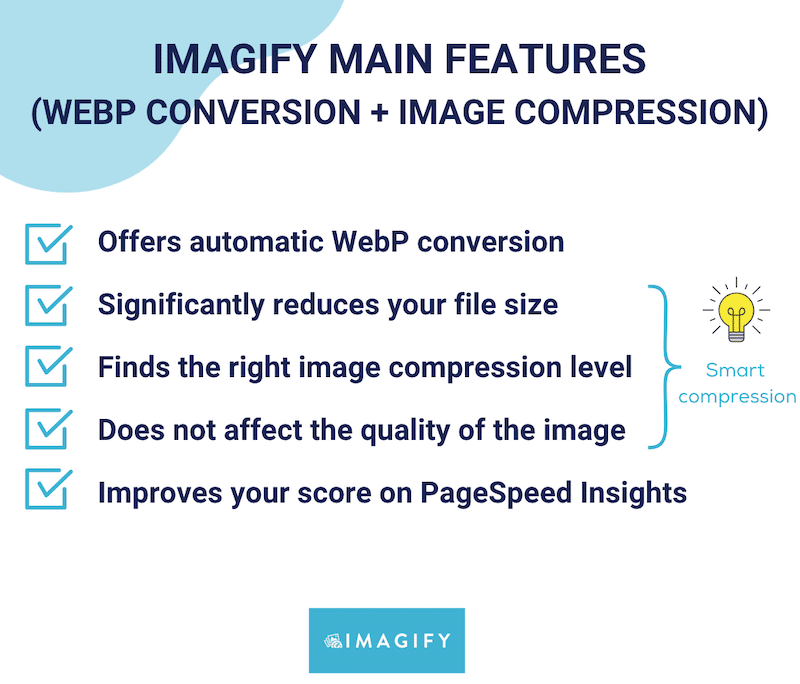
Here’s how to use WebP images on WordPress thanks to Imagify:
1. Download and Install the free Imagify plugin.
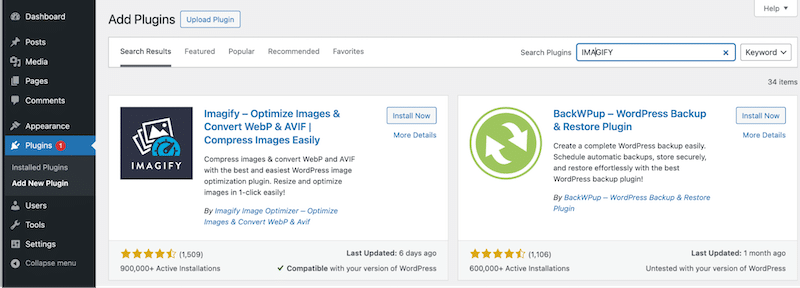
2. Create a free account to get your API key.

3. Go to Settings > Imagify > Optimization Next-gen image format. Imagify selects WebP by default and converts your images to WebP during optimization.
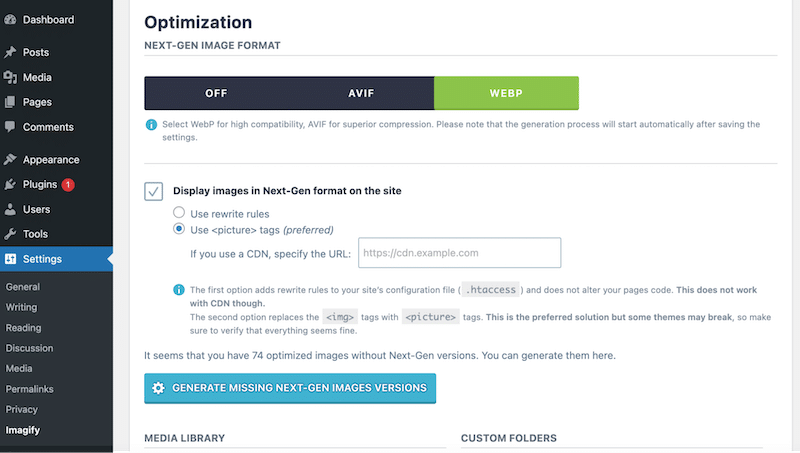
4. Click on the Generate missing next-gen images versions button.

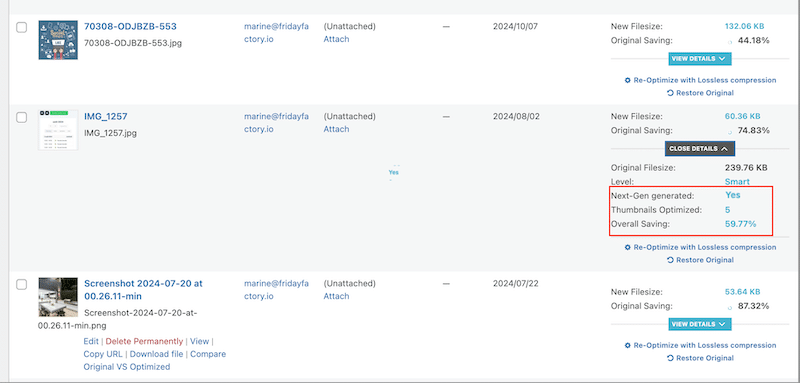
5. Go to the WordPress library to see that images are now in WebP. You will also see some indications about the whole image optimization process and the total savings.
| 📖 Read the full tutorial about converting images to WebP with Imagify to see Imagify’s impact on performance. |
Wrapping Up
WordPress supports WebP formats like traditional PNGs or JPEGs, but if you need to convert your images to this next-gen format, you’ll need a plugin like Imagify.
Converting images to WebP is an excellent start for optimizing your pictures, but more can be done, such as compression and serving images at the correct size according to the user’s screen.
Imagify is the easiest image optimization plugin to help you convert images to WebP and apply powerful compression directly on WordPress. You don’t take any risks because Imagify is free for up to 20MB per month! Try it, convert your images to WebP, optimize them with Imagify, and enjoy the performance boost!


Can I revert it to other formats (PNG, JPG etc) if I see some problems on my site after activation?
Hello Mustafa, sure thing! You can either re-optimize the image by choosing another compression type or restore the original format.
Well explained, thanks a lot!