Looking for an efficient way to convert your images to WebP and…
Do you need image SEO tips to rank better and naturally appear on Google Images? Optimizing your images isn’t just about high-quality visuals; it’s a powerful way to boost your image search engine ranking and drive organic traffic to your site. That means more people will find you for free, simply by searching for what you offer.
The truth is, it can be a lot of work to create unique and original images; now is the time to turn them into SEO assets!
In this article, we’ll dive into 14 proven image SEO practices that work.
Plus, we’ve asked SEO agency experts to share the successful techniques they’ve used to help their clients rank better.
Ready to uncover a few image SEO secrets and stats? Let’s get started!
| 📦 TL;DR: What Are the Best Image SEO Tips? The best image SEO tips focus on performance, context, and structure. Start by compressing your images and using next-generation formats like WebP or AVIF. Implement lazy loading and use a CDN to ensure images don’t slow down the initial page load. Then, help search engines understand your visuals: write clear, descriptive alt text, use relevant file names, and include captions that are meaningful. Finally, structure the surrounding content with a strong page title, meta description, and schema markup to boost your visibility in search results and increase click-through rate. Key Takeaways ✅ Avoid blurry visuals and make sure each image adds value to your content. ✅ Optimize for speed across all devices: convert images to modern formats like WebP or AVIF, resize them appropriately, and compress them. Best tool: Imagify. ✅ Boost performance with advanced techniques like lazy loading and a CDN. Best tools: LazyLoad plugin and RocketCDN. ✅ Give Google some context: write clear, descriptive alt text, rename files meaningfully, and add relevant captions. ✅ Create compelling metadata: optimize page titles and meta descriptions to increase click-through rates. Best tool: Rank Math. ✅ Add Schema markup to structure your content for rich results. ✅ Use Open Graph tags to increase visibility in search and on social media. Best tool: Rank Math, Google XML Sitemap for Images. |
1. Choose the Right File Name
It may sound basic, but using descriptive, keyword-rich image file names helps Google understand the content of your images.
When saving your images, avoid default file names like “IMG_123.webP” that don’t provide any context. Instead, use clear, descriptive file names that tell Google exactly what the image shows. Keep it under six words, add a hyphen between each, and add a keyword if it’s relevant.
✅A good file name: black-comfortable-hiking-boots-men.webp.
❌A bad file name: IMG_123.webP
This helps with image search engine ranking by giving search engines one of the simplest signals they can use to understand your content.
2. Write the Alt Text for SEO Image Accessibility
The most important attribute for providing image metadata is the alt text because it describes the image’s content and purpose. It improves SEO and image accessibility, helping people who use screen readers to understand what’s on the page.
✅ A good alt text: “Pair of black comfortable hiking boots for men on a mountain trail”.
This is a clear, natural-sounding sentence that describes the image for users and search engines. It’s also great for image accessibility.
❌ A bad alt text (Keyword stuffing): “black hiking boots, comfortable hiking boots men, men’s outdoor boots, black trail shoes, men black trekking boots, comfy hiking boots”.
This is unnaturally stuffed with repetitive keywords. It can confuse users, hurt accessibility, and may even negatively impact SEO rankings.
💡 Hint: Remember that Alt text is also used by Google to index your images more accurately, making it a key factor in your image search engine ranking.
| 🥇 Image SEO tip from our expert: You need to optimize file names and alt text: always rename your files using descriptive keywords (e.g., organic-apple-pie-recipe.webp) and write a clear, natural alt attribute (e.g., alt=”Easy organic apple pie recipe”). Vincent Hégo, SEO expert, vincenthego.com |
3. Use Descriptive Captions
Image captions are the short lines of text that appear directly under images. Google uses the content around an image, including image captions and titles, to better understand what the image is about. When you add clear, relevant captions, you help search engines connect the image with the topic of the page.
💡 Hint: Place your images near relevant text and on pages that match the image’s subject matter. It gives Google more context, boosts image visibility in search, and improves the overall user experience.
4. Select the Right Format
Image format refers to the type of file used to store an image, such as the old popular JPEG, PNG, GIF and the more modern next-gen formats: WebP, or AVIF.
There are five widely supported image formats you can use on the web for different needs:
- PNG – it’s best for images that need transparency.
- GIF – it’s used mainly for simple animations.
- JPEG – it combines lossy and lossless compression, making it the most efficient of the older formats for reducing file size.
- WebP and AVIF – they are next-gen formats recommended by Google and also the best for SEO.
5. Convert Images to a Next-gen Format
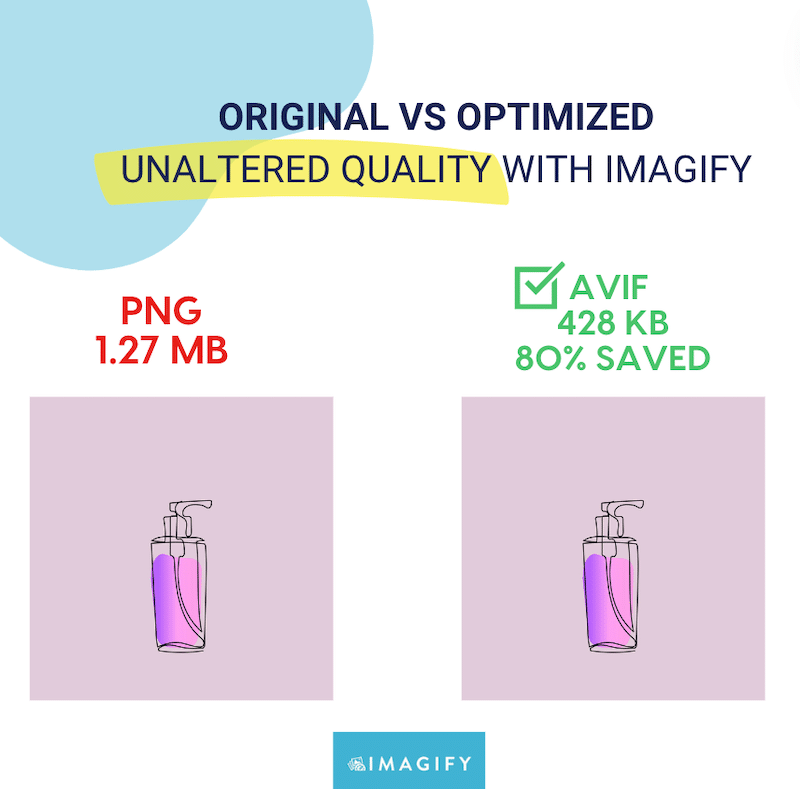
In addition to the older formats, modern browsers support the newer WebP and AVIF image formats. They will generally provide better compression than older formats and should be used where possible. Search engines prioritize fast-loading pages, so lighter image formats like WebP and AVIF can help you rank better.
💡Hint: Imagify converts your images to WebP, and you also have the option to convert to AVIF in one click.
6. Compress Images
Another powerful way to boost your image search engine ranking is through image compression. Compression reduces the file size of your images without sacrificing quality, meaning that your visuals stay sharp, not blurry. Compressed images result in lighter, faster-loading pages, which improves both user experience and SEO.
In fact, GTmetrix, a popular website performance audit tool, flags uncompressed images under the issue: “Efficiently encode images.” So it’s a must-do for better Core Web Vitals and rankings.
💡 Hint: With Smart Compression, Imagify compresses your images automatically while maintaining perfect visual quality, saving up to 90% in file size with no visible difference.

7. Choose the Right Image Size
To properly size images, start by checking whether any oversized files are being loaded on your page. Then, simply resize the width and height to reduce file sizes drastically.
❌ For example, don’t upload a full-size image (2500×2500 px) for something small like a WordPress logo that stays in the corner of your site.
✅ A 250×250 px version is more than enough.
💡 Hint: Resize images to the exact dimensions needed to avoid unnecessary load and save bandwidth. Use Imagify to compress and automatically resize larger images so they don’t slow down your site.
| 🥇 Image SEO tip from our expert: Images are one of the most common WordPress performance optimization issues I come across with my client websites, but it’s usually an easy fix. By uploading them at the right size, using next-gen formats, compressing them, and applying lazy-loading to those below the fold, you’ll be in the green!” Lucio Laria, Onze Agence SEO |
8. Make Your Images Responsive
Your images should adapt to each screen size—whether it’s mobile, tablet, or desktop. Loading a large image on a small screen is wasteful and slows down performance, especially on mobile, where speed is key.
The best practice for creating responsive images is to create multiple image sizes and use the srcset attribute to let the browser select the right one based on the device.
<img

  src="image-250.jpg"

  srcset="image-250.jpg 250w, image-768.jpg 768w, image-1200.jpg 1200w"

  sizes="(max-width: 600px) 250px, (max-width: 1024px) 768px, 1200px"

  alt="comfortable hiking boots responsive">
This code tells the browser to serve a smaller image for mobile, a medium one for tablets, and a larger one for desktop—perfect for performance and SEO!
💡 Hint: Always include a src attribute as a fallback URL when using srcset or <picture> for responsive images. It ensures compatibility with older browsers and guarantees your image still loads if advanced responsive features aren’t supported.
9. Add a Relevant Page and Title Description
Optimizing the landing pages where your images are embedded can significantly boost your image search engine ranking. That’s because Google uses the page’s content and metadata, like the title and meta description, to understand the image’s context better and decide how to display it in search results.
✅ Example of a good title and meta description for a product page:
Title: Men’s Comfortable Hiking Boots— Lightweight & Durable
Meta description: Explore our collection of breathable, black hiking boots for men. Built for comfort and performance on rugged trails.
❌ Example of a bad title and meta description for a product page:
Title: Best boots hiking men’s hiking shoes best hiking shoes hiking cheap
Meta description: Boots hiking men durable men’s shoes comfort quality black best cheap outdoor boots.
According to Google, “Title links are often the primary piece of information people use to decide which result to click.” Make them count by accurately describing your content and branding wisely when needed.
💡 Hint: Use clear, concise, and unique title tags. Avoid keyword stuffing and repetition. Always make sure each page title reflects the page’s real content because Google uses these cues to decide how your page appears in results.
10. Leverage Structured Data for Rich Results
Structuring your content is essential for SEO, especially if you want your images and pages to appear in rich results, such as product previews, star ratings, or image carousels on Google.
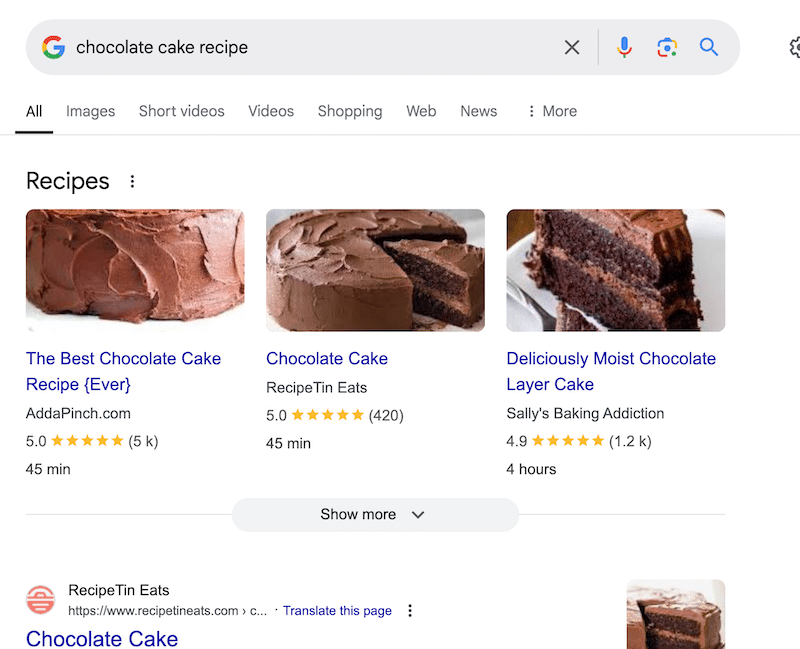
The first advice for providing structured data images is to implement schema markup for images. It’s a type of structured data that tells search engines exactly what your content is about.
Adding schema markup for products or recipes, for example, helps Google understand that your image is part of a product listing or a recipe blog, such as shown below:

💡 Hint: Rank Math is a great SEO WordPress plugin to help you easily add schema markup and Open Graph tags to your content—no coding needed!
11. Use Open Graph Tags to Control How Images Appear on Social Media
Another way to structure your content is by using Open Graph Protocol (OGP) tags. These tags tell platforms like Facebook and LinkedIn how to display your content, such as the preview image, title, and description, when someone shares your page. This gives you control over how your page looks in a post and improves click-through rates.
Let’s say you’re sharing a recipe for “Chocolate Cake” on Facebook. Here’s a basic example of what you’d add in the <head> of your HTML:
<meta property="og:title" content="Best Chocolate Cake Ever!" />

<meta property="og: description" content="Try this easy, chewy, and delicious chocolate recipe that’s perfect for every occasion." />

<meta property="og:image" content="https://example.com/images/chocolate-cake.jpg" />

<meta property="og:url" content="https://example.com/recipes/chocolate-cake" />

<meta property="og:type" content="article" />
💡 Hint: Again, Rank Math WordPress plugin can help you easily add Open Graph tags to your content—no coding needed!
| 🥇 Image SEO tip from our expert: “Images aren’t just there to look pretty. Beyond best practices like format and alt attributes, I recommend treating them as standalone media. A well-designed infographic, for example, can easily be shared by others and earn backlinks — while also showing up in Google Images.” Nelly Kempf, SEO expert at Nellykempf.com |
12. Create an Image Sitemap
An image sitemap helps search engines discover images on your website that may not be easily found through regular crawling. Search engines like Google recommend including image details in your sitemap to improve image indexing and your chances of appearing in Google Images results.
Here’s what an extract of an image sitemap might look like:
<url>

  <loc>https://example.com/recipes/chocolate-cake</loc>

  <image:image>

    <image:loc>https://example.com/images/chocolate.jpg</image:loc>

    <image:caption>Freshly baked chocolate cake</image:caption>

    <image:title>Chocolate Cake</image:title>

  </image:image>

</url>
💡 Hint: Both Google XML Sitemap for Images and Rank Math SEO automatically generate image sitemaps to help search engines better index your site’s visuals.
13. Implement Lazy Loading
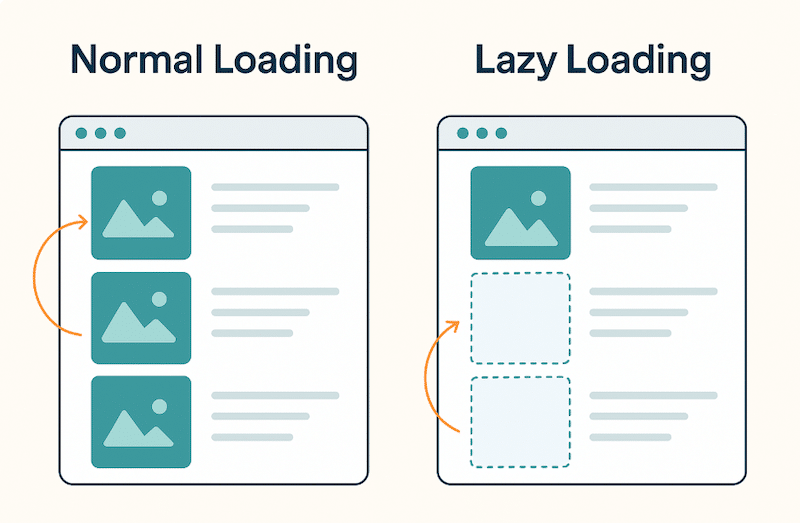
Lazy loading is a technique that delays the loading of non-critical images until the user scrolls to them. Instead of loading all images at once when a page is opened, the browser loads images as needed, saving bandwidth and speeding up the initial page load.

💡 Hint: WordPress has native lazy loading built in since version 5.5—but for better control, you can use free plugins like LazyLoad Plugin to manage lazy loading options.
| 🥇 Image SEO + performance tip from our expert: You also need to optimize format and display for performance: use next-gen formats (WebP, AVIF) and enable lazy loading to reduce loading time—an important indirect ranking factor”. Vincent Hégo, SEO expert, vincenthego.com |
14. Use an image CDN
A Content Delivery Network (CDN) stores your images on servers all around the world. When someone visits your site, the CDN serves the image from the nearest server location, making load times much faster, regardless of where your visitors are. It speeds up global delivery of images and improves page load time. Your international visitors get the content faster, which also reduces bounce rate and results in a longer session.
💡 Hint: A CDN like RocketCDN can automatically deliver your compressed images via a global network. The setup is very easy, and there is a dedicated WordPress plugin that does all the heavy lifting for you.
👉 Any of the above techniques you implement to optimize your images is likely to improve your overall page speed and SEO performance. Want to go further? Read our dedicated article on boosting page speed through image optimization.
Understanding SEO Image Indexing
Google is still a machine—so how do you help it recognize that your image is, say, a chocolate cake and not just a random file? Search engines like Google use a combination of alt text, file names, surrounding content, and computer vision algorithms to interpret accurately and index images.
💡 Hint: Giving context around the image is just as important as the image itself. For example, displaying a chocolate cake on a hiking boots product page sends mixed signals and may confuse both users and search engines.
5 Key Factors That Affect How Google Understands Your Image
Here are five key factors that influence how Google can understand what your image is about:
- Alt text: put a brief description for accessibility and context.
- File name: write a clear, descriptive file name like chocolate-layer-cake.webp.
- Caption: add one to reinforce context and what the image shows.
- Page structure: ensure that titles, on-page text, and meta descriptions align with the image topic.
- Structured data: tools like image sitemaps, Open Graph tags (for social sharing), and Schema Markup help search engines display your image in rich results.
Improving UX and the Impact on SEO
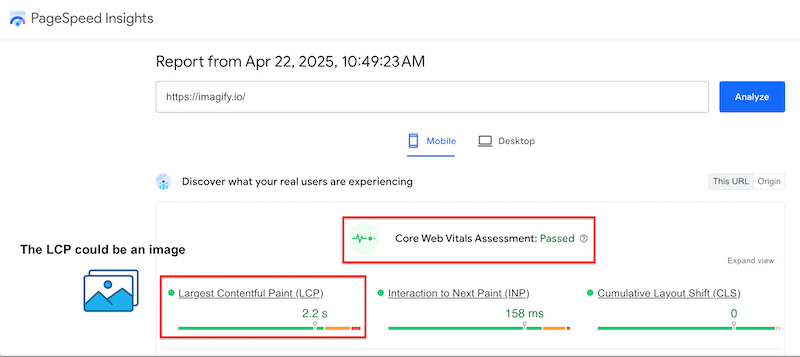
Another crucial part of image SEO is focusing on improving the user experience and page speed, also known as Core Web Vitals. If you maintain them in the green, Google will rank your website better. You may think, what’s the relationship between Largest Contentful Paint, image SEO, and better ranking?
Largest Contentful Paint (LCP) is one of Google’s Core Web Vitals. It measures how quickly the main content on a page—often an image—loads and becomes visible.
If your LCP is an image, optimizing it is essential for better performance and rankings.

Why Image SEO Matters (Key Statistics)
We’ve gathered these key insights from reliable sources like Ahrefs and Supple to show just how powerful image SEO can be for boosting traffic and performance:
- 32.9% of all Google search queries return image results.
- Updating old blog posts with fresh content and images can increase organic traffic by 106%.
- 62% of Millennial and Gen Z users prefer searching by image and other emerging technologies.
- 80.4% of websites are missing alt attributes on images — a significant SEO opportunity.
- 72.3% of websites have slow-loading pages, which negatively affects their SEO.
- 68.5% of websites display a mismatch between page titles and the titles on search engine results pages (SERPs).
FAQs about SEO Image Optimization
Do images matter for SEO?
Absolutely! Well-optimized images can boost your image search engine rankings and help your content reach a wider audience.
How do I optimize my images for SEO?
To optimize images for SEO, ensure they load quickly (with compression, next-gen formats, and lazy loading) and provide context using alt text, file names, captions, and structured data. It helps search engines understand your images and improves visibility in image search results.
What is the best image format for SEO?
The best image format for SEO is WebP or AVIF, which are next-gen formats recommended by Google. These formats offer superior compression, which means smaller file sizes without sacrificing visual quality.
What image size should I optimize for SEO?
There is no perfect size for SEO, but the goal is to match the image dimensions to the display container, not bigger, not smaller. Here’s a clear table with recommended image sizes for SEO and performance, with guidelines to help you avoid oversized images:
| Image Type | Recommended Size | Why It Matters for SEO and Performance |
| Logo | 200×100 px to 400×200 px (max) | Keeps branding sharp without adding unnecessary weight. |
| WooCommerce Product | 800×800 px (or 1200×1200 px max) | High enough resolution for zoom & clarity, but not too large to slow down the page. |
| Blog Post Image | 1200×675 px | Optimized for sharing (especially on social media) and fast loading. |
| Header Banner | 1600×500 px to 1920×600 px | Wide enough for desktops, not too large for mobile, images are responsive and crisp. |
Best Tools and Resources for Image SEO
Image SEO tips can be overwhelming, but with the right tools, it’s much easier than you think! Here are some of the best tools and resources to help you implement image SEO best practices:
🛠️ Top Tools for Image SEO
- Imagify: It’s the easiest image optimization plugin for WordPress. It compresses images without compromising quality and easily converts them to next-gen formats like WebP or AVIF.
- LazyLoad: It’s one of the best free plugins to add lazy loading to below-the-fold images and improve page speed.
- WebP Express: A straightforward WordPress plugin that converts your images to the WebP format for faster load times.
- Rank Math SEO: It’s excellent for structuring your content with SEO in mind. It handles page titles, meta descriptions, schema markup (including for products and images), image sitemaps, and Open Graph tags for social media sharing.
- All In One Schema Rich Snippets: It’s a very handy plugin to create rich snippets without any coding.
- XML Sitemap Generator for Google: It automatically creates an XML sitemap for your website, including image sitemaps, helping search engines like Google index your content more efficiently.
- WordPress Media Library or the block editor: User-friendly and practical to add alt-text, captions, rename image files, and scale images to the appropriate size.
📚 Best Image SEO Blogs to Follow in 2025
Want to go deeper? These blogs are goldmines for image SEO, web performance, and search visibility:
- WP Rocket Blog: It covers performance, e-commerce, Core Web Vitals, and image optimization tips.
- Google Search Central Blog: It’s the official Google blog to get updates straight from Google’s search team.
- Semrush Blog: It’s excellent for SEO strategy, keyword optimization, and tool walkthroughs.
- Backlinko: It comes with proven SEO techniques and in-depth guides by Brian Dean.
- Search Engine Journal: It covers algorithm updates, SEO tools, and technical image SEO.
- Neil Patel Blog: It offers straightforward advice on content marketing and visual SEO.
👩💻 Image SEO Resources for Developers
- Structured Data Guidelines (Google): Learn how to implement schema markup for images, products, and more.
- Title Link Best Practices (Google): Understand how to write clear and click-worthy titles that show up in search results.
Wrapping Up
Now you know how to appear in Google Images and boost image SEO with our 14 Image SEO Tips & Best Practices to drive free organic traffic to your site!
Ensure you’re using solid image optimization techniques, such as image compression, choosing SEO-friendly image file formats like WebP or AVIF, lazy loading images, and making them responsive.
Don’t forget the power of alt text for images, well-written image metadata, and structured data for images (to appear in rich snippets).


