Looking for an efficient way to convert your images to WebP and…
If you have run a performance audit on Google PageSpeed Insights, you might have seen the “serve images in next-gen formats” opportunity popping up.
Content is king but the format you’ll use to deliver it on your WordPress site also matters. Next-gen (short for next-generation) formats are a way to speed up loading times for images on websites. They can be loaded in modern browsers with embedded compression information, so visitors won’t have to wait forever.
This article will go over the next-gen formats available and how to serve images in these particular formats on WordPress to make your site faster and improve your Lighthouse performance score.
What Are Next-Gen Formats and Why You Should Use Them
Next-gen images offer superior compression and quality. They’re perfect for web use as they take up less data while maintaining the same high level of image quality.
There are two main next-gen formats you can use for your images on WordPress, namely:
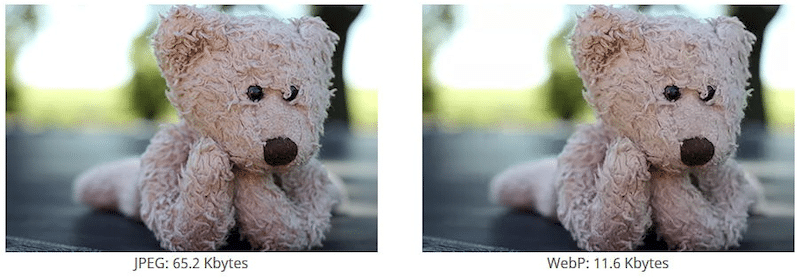
- WebP (developed by Google) is an image format that utilizes both lossy and lossless compression formats. You get a high-quality image with a small file size! WebP is definitively an excellent replacement for JPEG, PNG, and GIF images, as the quality of the image is also preserved:
- AVIF (developed by Alliance for Open Media) is an image file format that makes images smaller while keeping the same image quality. AVIF tends to compress the files even more than WebP, but AVIF is behind for browser support as a young file format. As a result, we encourage you to use the WebP format for your WordPress site.
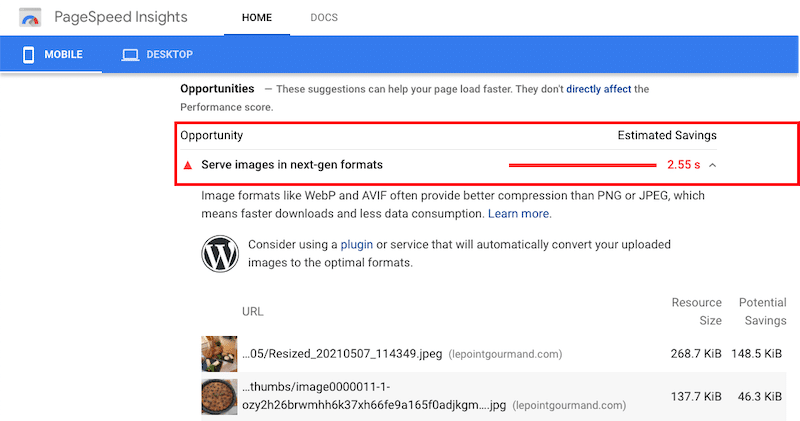
Google PageSpeed Insights also recommends you to serve images in next-gen formats like WebP and AVIF rather than PNG or JPEG:
What Are the Benefits of Serving Images in a Next-Gen Format Like WebP?
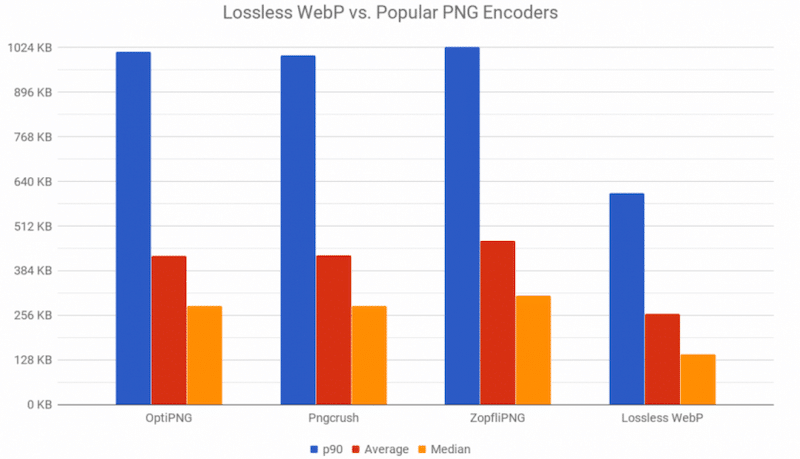
WebP images are around 30% smaller in size compared to PNGs or JPEGs. As shown below, the PNG format does a good job at optimizing images, but it’s outperformed by WebP (the last one).
Bear in mind that for most websites, images are the main culprits to slow down your site. Large images not only slow down your site but also increase the weight of the page. This will impact your performance on mobile because a heavy page will take longer to load on mobile networks.
Finally, website speed is a major factor taken into account by Google when determining rankings. If you don’t want to appear on page 5, then remember to optimize your images using a next-gen format like WebP.
Let’s see how to convert your images to WebP on WordPress.
How to Serve Images in Next-Gen Formats on WordPress
The easiest and fastest way to convert images into next-gen formats is to use a WordPress plugin. However, you can also optimize and convert your images manually.
Let’s go over both options.
Option 1 – How to Convert Images in Next-Gen Formats With a Plugin
Like always, using a WordPress plugin saves you a precious amount of time. Even Google recommends using a plugin to convert your uploaded images to WebP or Avif.
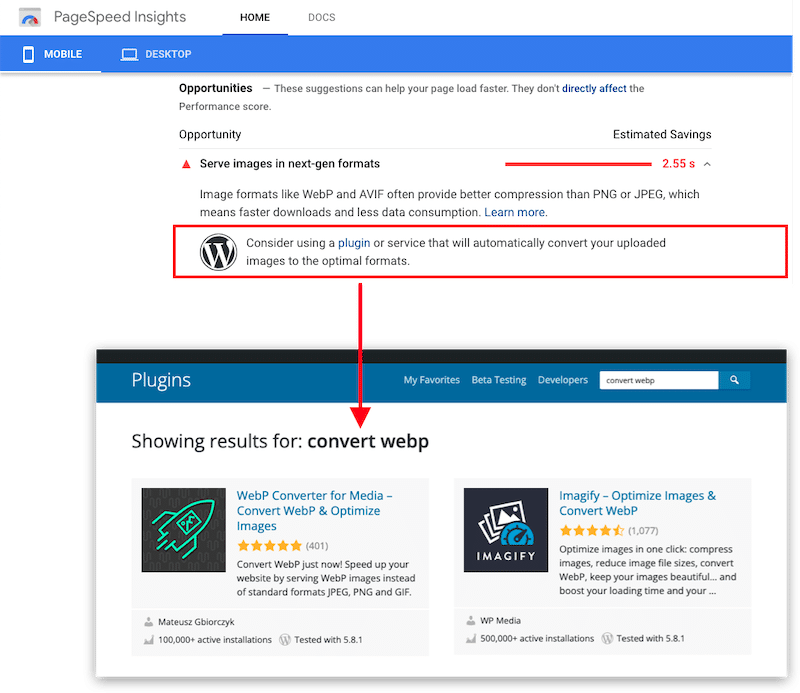
There are six major plugins you can use to optimize your images and serve them into next-gen formats, namely:
- Imagify – a free WebP conversion plugin for around 200 images. Imagify also resize and compress your images to boost performance (bonus: full tutorial and performance test included in our article).
- WebP express – adds a simple line of code to serve WebP images.
- EWWW – a smart conversion option to get the right image format for the job (JPG, PNG, GIF, or WebP).
- Shortpixel Image Optimizer – converts any JPEG, PNG, or GIF to WebP and AVIF.
- Smush – converts to WebP and automatically serve images in Next-Gen WebP format (pro version only).
- WebP converter for media – replaces files in standard JPEG, PNG, and GIF formats with WebP format.
How to Convert Images to WebP Using Imagify
Let’s see an example of WebP conversion using the Imagify plugin. It takes only three steps
Step 1 – Download and install Imagify for free. Activate the plugin and create your API key.
Step 2 – Go to Settings > Imagify and scroll to the Optimization tab.
Select “Create WebP version of images” and “Display images in WebP format on the site” as well as the second option “Use <picture> tags”.
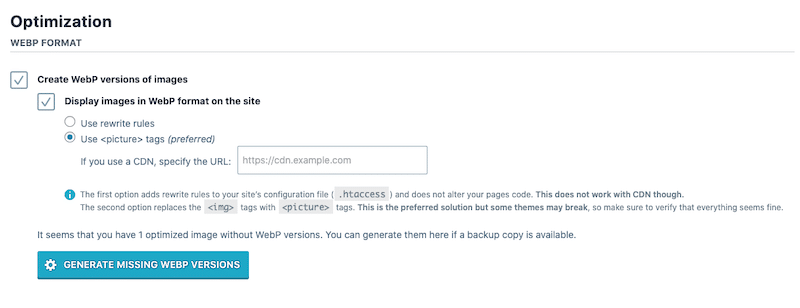
Step 3 – Click on the Generate missing WebP versions blue button.
Congratulations, you are now serving visitors WebP image formats, as you can see in the WordPress library:

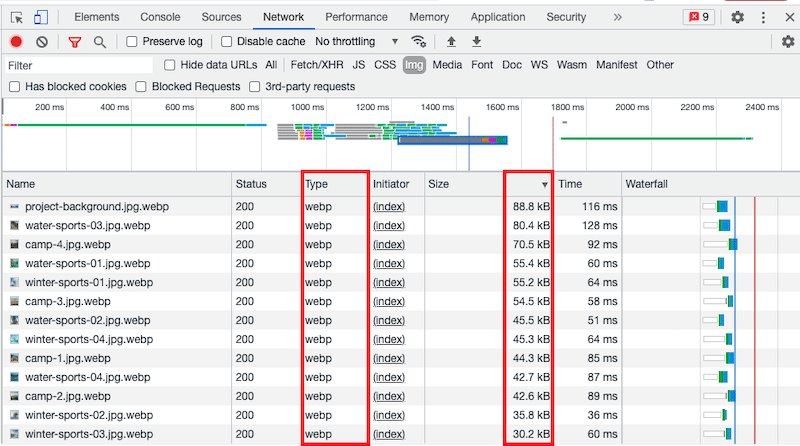
Important note: your newly generated WebP images will not be displayed in the WordPress library. If you want to verify that the conversion was successful, then open the web page showing the image. Then go to the Chrome Developer tab > Inspect element > Network > filter by IMG and look at the Type column.
You should now see the “WebP” format associated with the image.
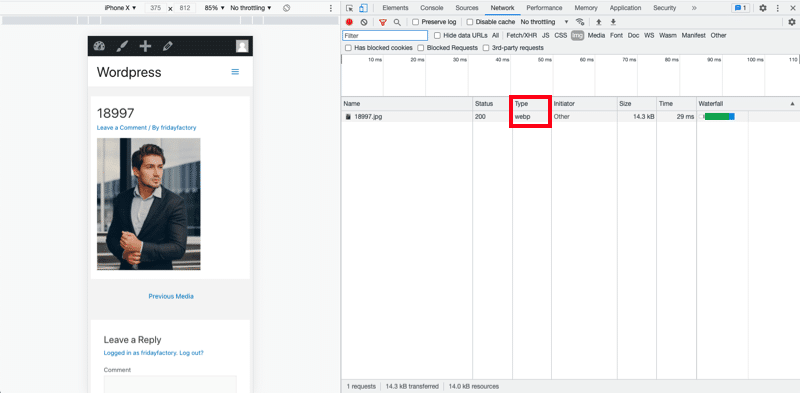
To learn more next-gen format conversions, we recommend following our detailed guide about serving images to WebP using Imagify.
| 🔊 Important to note: as of March 2024, Imagify also converts images to Avif, the other next-gen format recommended by Google to make your images lighter. |
Option 2 – How to Serve Images in Next-Gen Formats Without a Plugin
If you don’t feel like using a plugin to convert your images to the next-gen format, you can manually add a piece of code. Here are two different options you can follow for your WordPress site.
1. Directly edit your WordPress .htaccess file
We recommend you follow this option only if you are very comfortable coding and editing your site files. The .htaccess file is a powerful website file that controls the high-level configuration of your website.
Place the following code from GitHub in your .htaccess file to replace jpg/png/gif images with WebP images:
<IfModule mod_rewrite.c>
  RewriteEngine On

  # Check if browser supports WebP images
  RewriteCond %{HTTP_ACCEPT} image/webp

  # Check if WebP replacement image exists
  RewriteCond %{DOCUMENT_ROOT}/$1.webp -f

  # Serve WebP image instead
  RewriteRule (.+)\.(jpe?g|png|gif)$ $1.webp [T=image/webp,E=REQUEST_image]
</IfModule>

<IfModule mod_headers.c>
  # Vary: Accept for all the requests to jpeg, png and gif
  Header append Vary Accept env=REQUEST_image
</IfModule>

<IfModule mod_mime.c>
  AddType image/webp .webp
</IfModule>
2. Use the <picture> element in your HTML
Modifying the .htaccess file can be tricky. A more responsible option is to use the <picture> tag. In that case, the browser will automatically choose the appropriate file format to display.
<picture>
  <source srcset="/path/to/image.webp" type="image/webp">
  <img src="/path/to/image.jpg" alt="">
</picture>
The Impact of WebP on Performance
As seen above, you can use the Imagify plugin to convert your WordPress images to WebP, the next-gen format recommended by Google. Imagify also allows you to optimize multiple images by resizing and compressing them automatically (and in bulk).
It would be interesting to run a few performance tests to confirm what we’ve been saying. I’ll run two scenarios:
Scenario 1 – Performance results with JPEG images (no Imagify)
- 13 images served in the JPEG format
- Images are not optimized
Scenario 2 – Performance results with WebP images and aggressive optimization mode (with Imagify)
- 13 images converted and served to the WebP format
- Optimized images
Performance tools used:
Google PageSpeed Insights and WebPageTest
My test site:
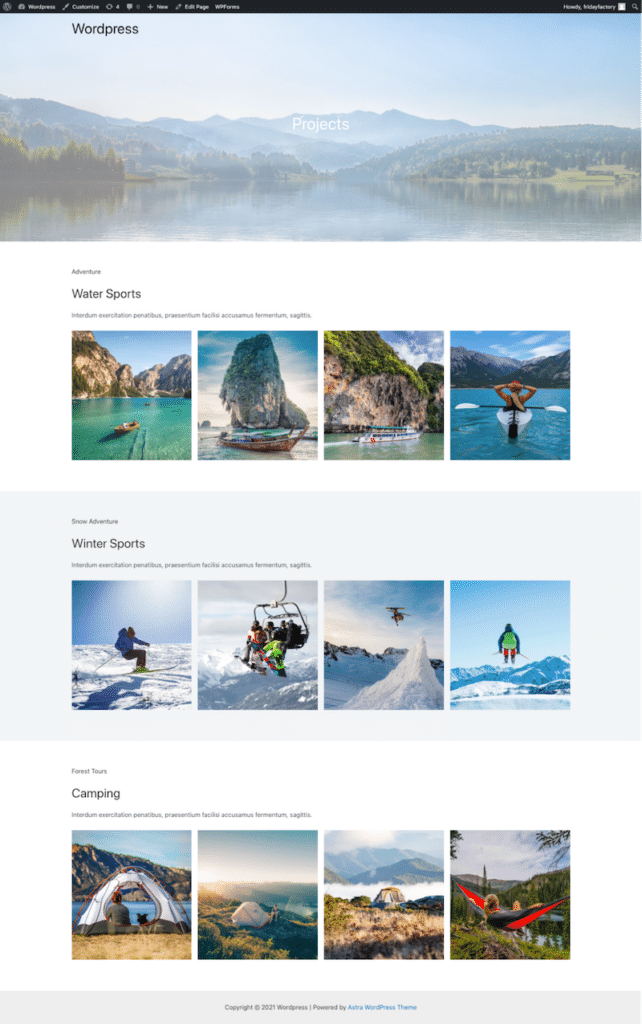
Scenario 1: Performance results with JPEG images (no Imagify)
We start the audit with all my images served in JPEG. On average, their size is 270 KB.
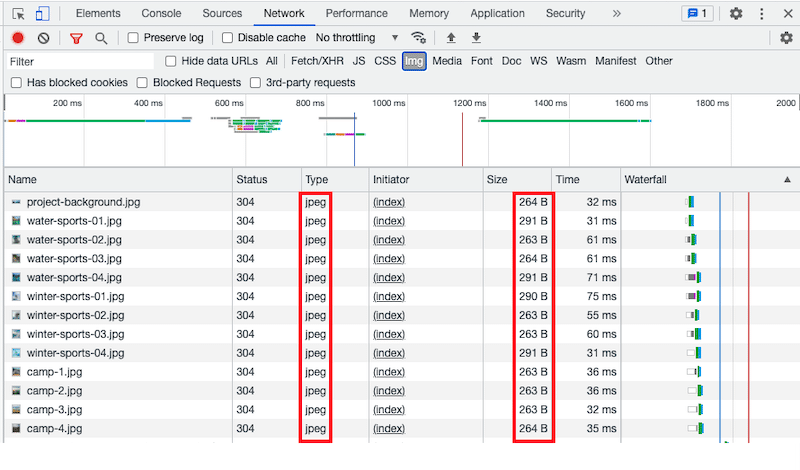
Now let’s have a look at PSI. I’m getting an orange score on mobile (75/100) and the Largest Contentful Paint score in the red. The LCP score is relevant, especially because the LCP element that affects performance is an image (as it often is). There is room for improvement.
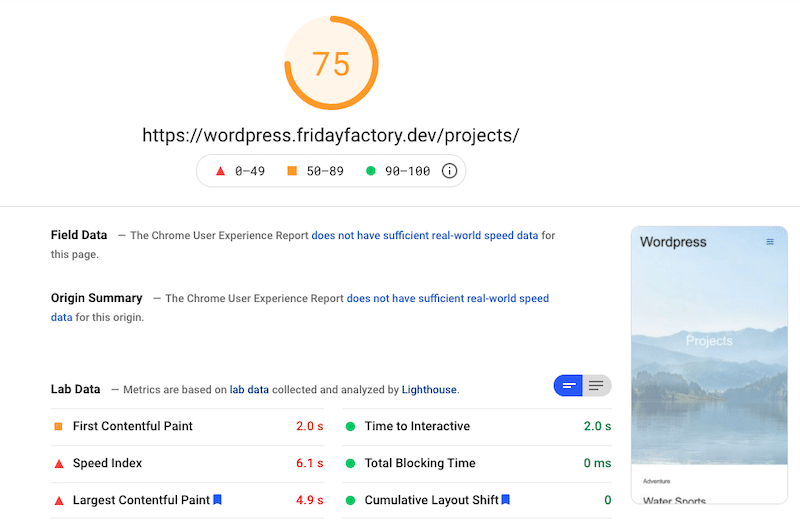
On top of that, PSI has flagged three images-related issues:
- Properly size images (especially from mobile)
- Serve images in next-gen formats
- Image elements do not have explicit width and height
| KPIs | Mobile Score – JPEG images – No Imagify |
| Overall grade | 75/100 |
| PSI Audit | |
| Largest Contentful Paint | 4.9 s |
| Page size | 1.2 MB |
| HTTP requests | 22 |
| Load time | 2.890 s |
Scenario 2: Performance results with WebP images and “Aggressive” optimization mode (with Imagify)
Now it’s time to convert my 13 JPEG images to WebP and optimize them with Imagify.
To do so, we go to Settings > Imagify > Imagify’em all
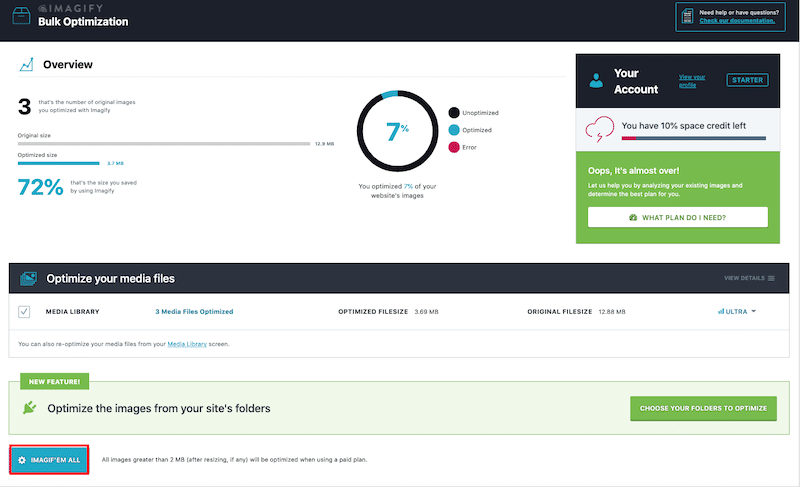
That’s it. My images are now optimized and served in WebP. We notice an important drop in the file size. It’s confirmed, WebP makes your images lighter.
We can now run another audit on Google PageSpeed Insights to see if my performance has improved with Imagify. The results are great. My score went from 75/100 to 92/100 on mobile!
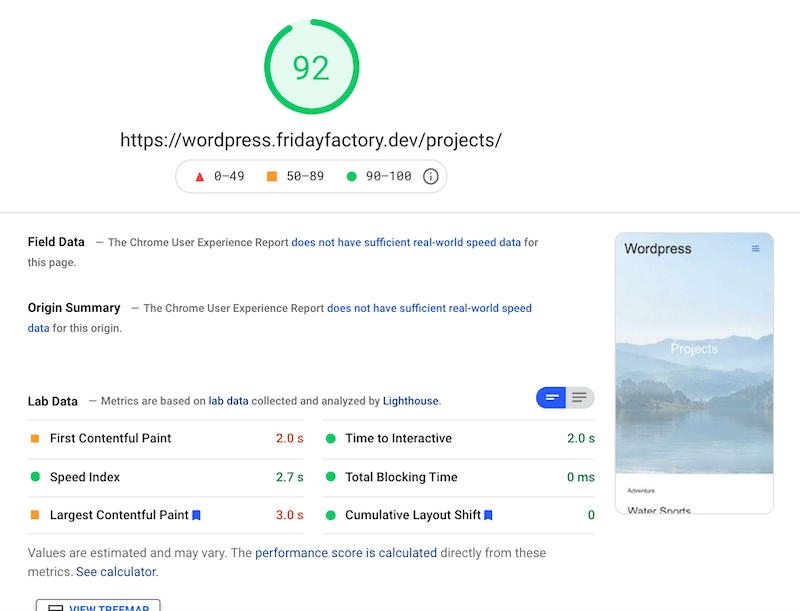
| KPIs | Mobile Score – JPEG images (No Imagify) | Mobile Score – WebP images and Aggressive mode (With Imagify) |
| Overall grade | 75/100 | 92/100 |
| PSI Audit | ||
| Largest Contentful Paint | 4.9 s | 3.0 s |
| Page size | 1.2 MB | 714 KB |
| HTTP requests | 22 | 17 |
| Load time | 2.890 s | 1.059 s |
In conclusion, Imagify made our website faster on mobile: the page is lighter, the number of HTTP requests has dropped, and even my load time is much better.
Last but not least, Imagify has also addressed three main issues previously flagged by PSI:

“Serve images in next-gen formats”, “Properly size image” and “Efficiently encode images” are now a passed audit thanks to Imagify.
Wrapping Up
Overall, we’ve seen that serving images in next-gen formats is a great step toward performance improvement. WebP format – along with optimizing and resizing images – is a winning combination to speed up your WordPress site.
| File size using JPEG | File size using WebP + compressed and resized images (around 80% savings thanks to Imagify) |
The conversion from JPEG or PNG to a next-gen format like WebP and Avif is very easy to do with a plugin like Imagify. On top of that, Imagify also compressed and resized our WordPress images, which made us move to a green score on mobile (92/100 on Google PageSpeed Insights). It’s time to optimize your images and to serve them in WebP.
Conduct your audit and try Imagify for free today!


