
Looking for an efficient way to convert your images to WebP and…
Do you want to learn how to easily make photos load faster on WordPress? In this article, we explain the best image optimization techniques to improve page speed!
Images are often the heaviest component of a web page, and unoptimized visuals can impact loading time, especially on mobile. If you are wondering why your images are loading slow on WordPress, the good news is that a few simple optimizations can make a huge difference!
In this article, you’ll learn how to:
- Compress images without losing quality.
- Choose the best image format for WordPress images.
- Optimize images for page speed and improve LCP.
- Automate image optimization with a WordPress image optimization plugin like Imagify.
Let’s go!
| TL;DR Large, unoptimized images are one of the main reasons WordPress websites load slowly. By compressing images, resizing them properly, using next-gen formats like WebP or AVIF, and optimizing image delivery, you can significantly improve page speed and Core Web Vitals. The easiest way to optimize images on WordPress is to use an image optimization plugin like Imagify, which automates the entire process while preserving visual quality. |
Key Takeaways
✅ Images are one of the biggest contributors to page weight and can heavily impact loading time and Largest Contentful Paint (LCP).
✅ Using modern formats like AVIF and WebP is one of the most effective ways to reduce image size on WordPress and speed up pages.
✅ Manual image optimization quickly becomes time-consuming and difficult to maintain consistently across a website.
✅ A WordPress image optimization plugin like Imagify automates compression, resizing, and next-gen conversion while saving time and effort.
✅ Faster images improve SEO performance, Core Web Vitals, user experience, and conversions.
5 Most Effective Ways to Make Photos Load Faster on WordPress
1. Compress Your Images Without Sacrificing Quality
Image compression is the fastest and most effective way to make photos load faster on WordPress. The goal is simple: reduce the file size as much as possible while keeping the visual quality intact.
🔍 Example: A product image that originally weighs 1 MB can often be reduced to under 200 KB with smart compression, with almost no visible difference for the user. This means faster loading pages, better user experience, and improved Core Web Vitals, especially on mobile.
| 💡Hint: Modern image optimization plugins like Imagify use compression algorithms to remove unnecessary data without making your images blurry, so you get the best of both worlds: performance and quality. |
2. Use the Right Image Size for Every Screen
Uploading too large photos and displaying them in smaller formats is one of the most common mistakes on WordPress. If your theme displays an image at 800px but you upload a 4000px file, you’re forcing the browser to load unnecessary weight.
🔍 Example: A full-width banner might need around 1920px width on desktop, but only 800px on tablet and 375–480px on mobile. By serving responsive image sizes adapted to each screen, you avoid loading oversized files, reduce bandwidth usage, and significantly speed up loading time.
This simple adjustment helps reduce page weight, improves performance, and ensures your site stays fast across all devices.
3. Choose the Right Image Format (Next-Gen Formats Are Faster)
Traditional formats like JPEG and PNG are still widely used, but next-gen formats like WebP and AVIF offer much better compression.
🔍 Example: Google has shown that WebP images can be up to 25–40% smaller than JPEG files while maintaining similar visual quality. That’s a huge gain for page speed without compromising design.
Switching to next-gen formats is one of the easiest ways to reduce image size on WordPress and improve loading speed, especially for image-heavy pages like product listings or blogs.
4. Prioritize Which Images Load First
Not all images need to load at the same time. Lazy loading ensures that only the images visible on the screen are loaded first, while the others load as the user scrolls. This technique improves perceived performance, reduces bandwidth usage, and helps optimize key metrics like Largest Contentful Paint (LCP).
🔍 Example: If your page contains 20 images, only the first few (above the fold) are loaded initially. The rest are deferred, which reduces the initial load time and makes your page feel much faster.
5. Serve Images via a CDN for Faster Global Delivery
A Content Delivery Network (CDN) stores copies of your images on servers around the world and delivers them from the closest location to your visitor. The result is faster loading times, reduced latency, and better experience for international visitors, especially on image-heavy WordPress sites.
🔍 Example: If your server is in Europe and a user visits your site from Australia, a CDN ensures that images are loaded from a nearby Australian server instead of traveling across continents.
The Easiest Way to Optimize Your Photos on WordPress
The easiest way to optimize images on WordPress and make photos load faster is to use a WordPress image optimization plugin like Imagify. Instead of manually compressing, resizing, and converting each image, you can automate the entire process directly from WordPress!
Here’s how to easily optimize photos on WordPress using Imagify:
- Install the free Imagify plugin from the WordPress repository and create an account to add the API key.
- Go to Settings > Imagify to choose lossy or lossless compression, if you want to convert your images to next-gen formats like WebP and AVIF. You can also enable automatic optimization on upload and resize large images instantly.
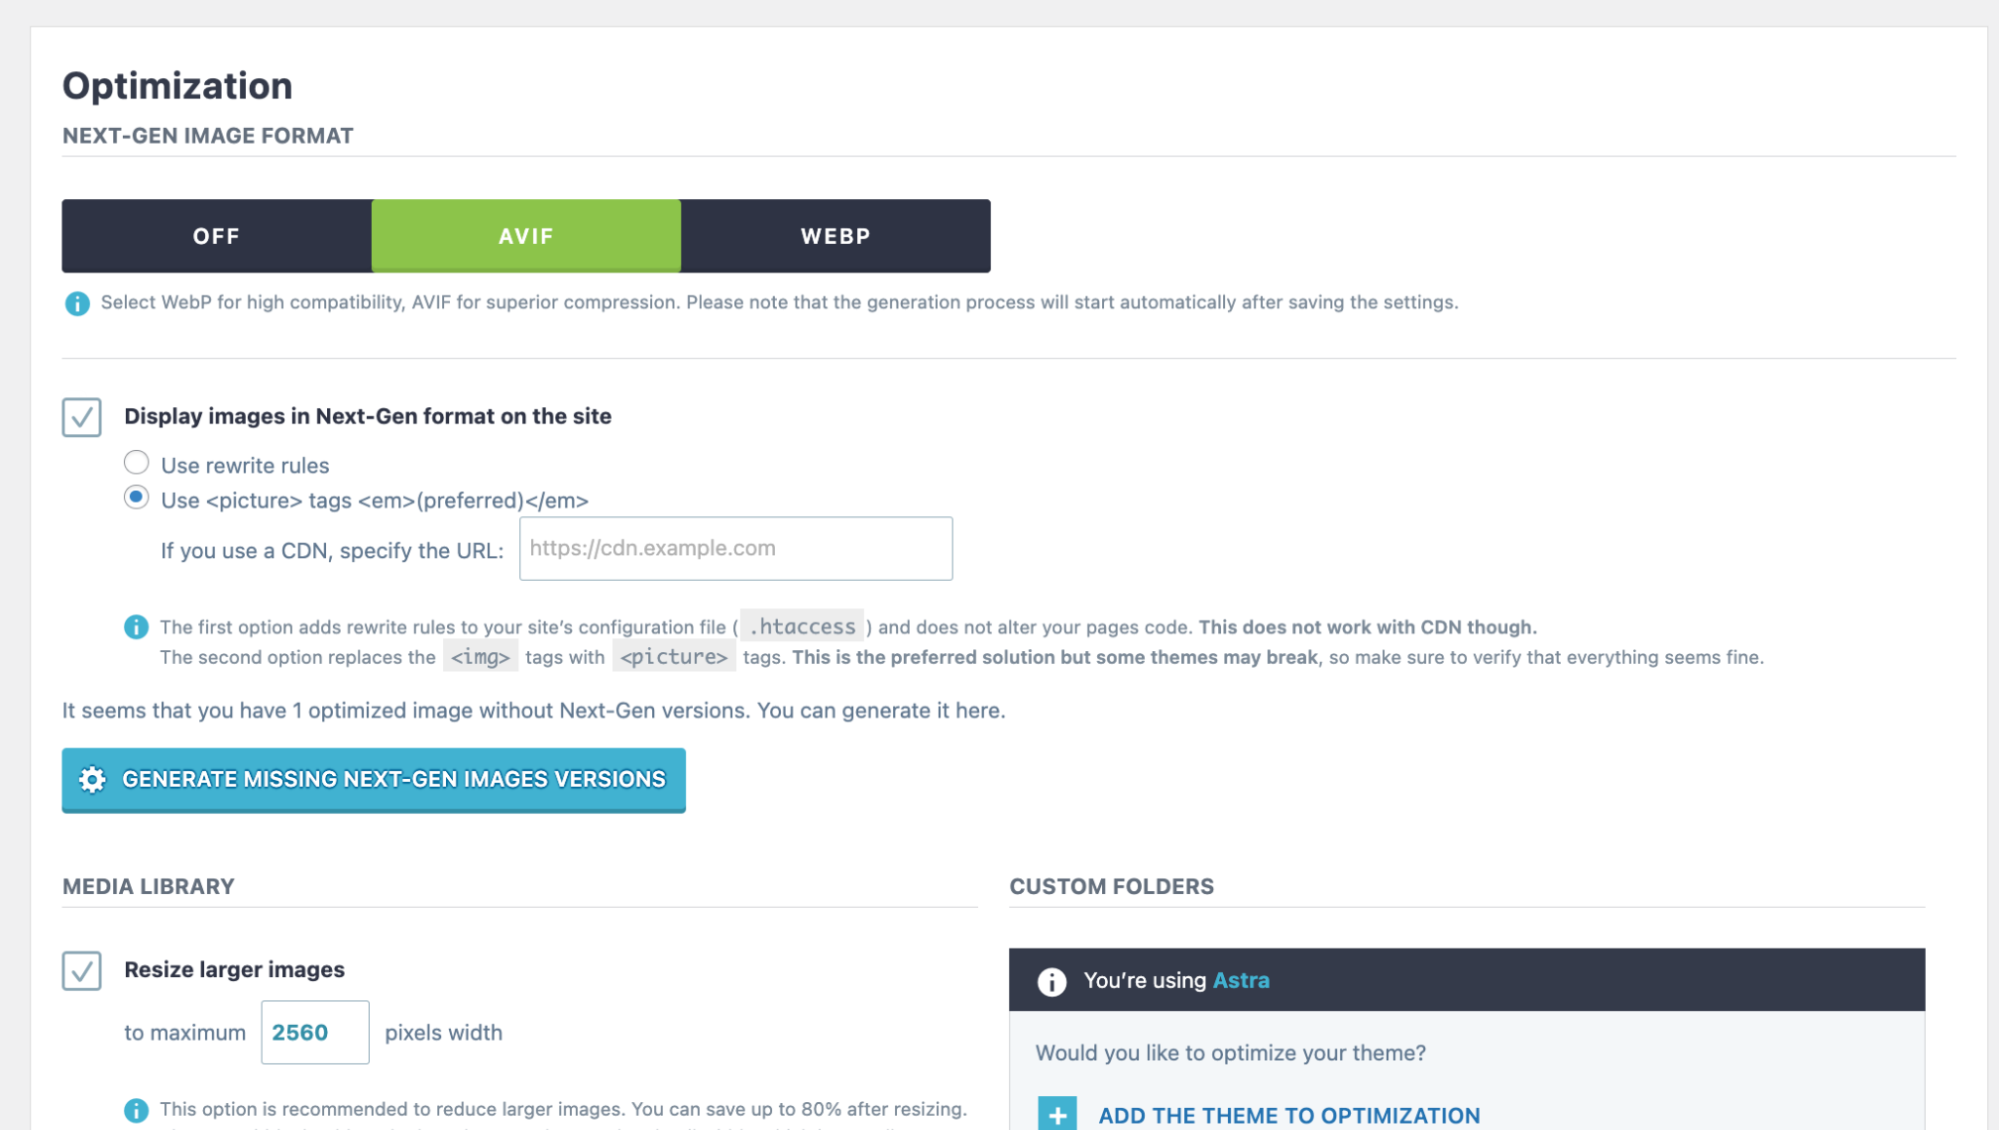
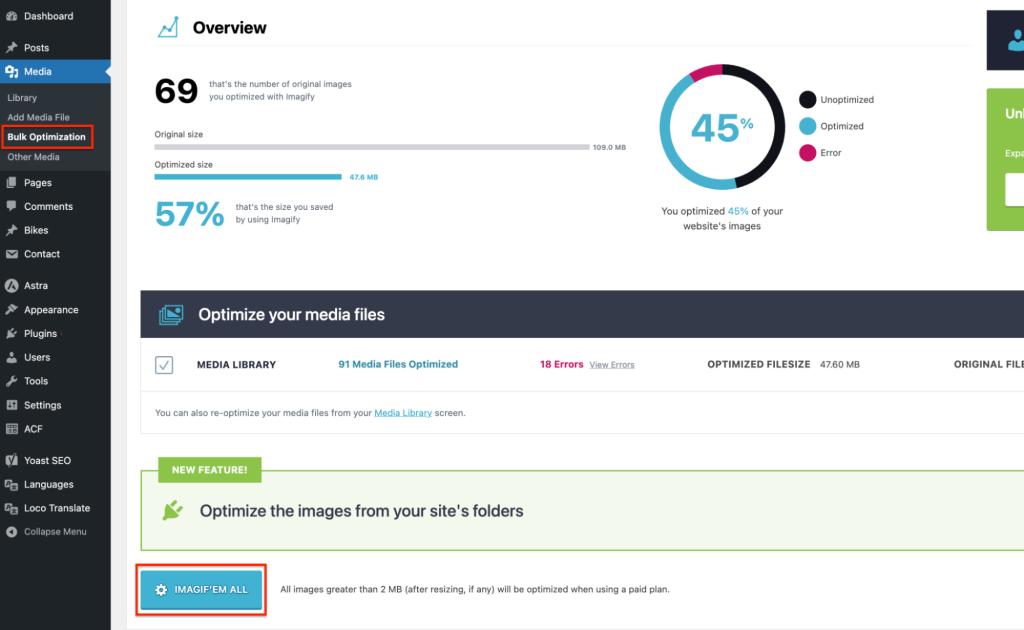
- Go to Media > Bulk Optimization and click on the Imagify’em all button to optimize the entire library at once. Imagify uses Smart compression to reduce image size on WordPress as much as possible while keeping the visual quality intact.
📌 Good to know: Imagify also offers single image optimization from the WordPress library in one click.
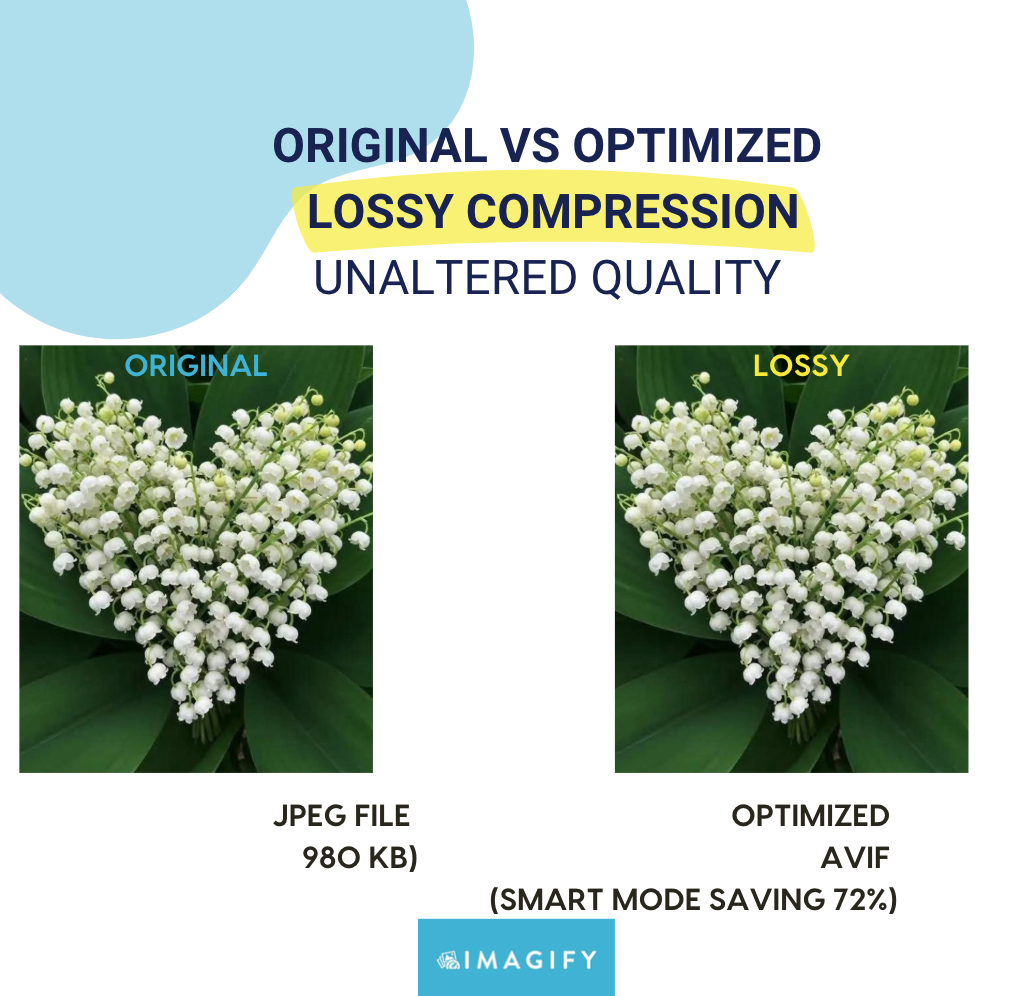
👉 The result? You save time, reduce effort, and improve your website performance without any technical complexity. Here’s a real case so you can see how Imagify helps optimize images for page speed.
- Original JPEG image: 980 KB
- Optimized AVIF image (Imagify’s Smart compression): up to 72% smaller
Even with this significant reduction, the visual quality remains virtually unchanged:
How Imagify Helps Optimize Images for Page Speed
To optimize images for page speed on WordPress, you need to apply a few key techniques like compression, resizing, and using the right formats. The good news is that a WordPress image optimization plugin like Imagify can automate all of this for you. Here’s how Imagify helps you to optimize images.
| How to Optimize Images for Page Speed | How Imagify Helps Image Optimization |
| Compress images without losing quality | It uses Smart compression to reduce image size to the maximum while keeping visual quality intact |
| Use the right image size (responsive images) | It automatically resizes large images on upload to fit your layout and avoid oversized files |
| Use next-gen formats (WebP / AVIF) | It converts images to WebP and AVIF for smaller, faster-loading files |
Why Photos Slow Down Your WordPress Website
If you’re wondering why your images load slow on WordPress, the answer is often simple: images are not optimized properly. Images are often the heaviest elements on a web page, and they play a major role in loading time.
📊 According to HTTP Archive data, images account for around 40% to 50% of the total page weight on average, making them the most common performance bottleneck.
To make photos load faster on WordPress, you first need to understand what is causing the slowdown.
Here are a few possibilities to explore:
Your Images Might Be Larger Than Necessary
One of the most common issues in image optimization WordPress is uploading images at their original size. Images taken from a camera or smartphone can easily be 3000–4000px wide and weigh several megabytes, while your website may only display them at 800px or less. As a result, your browser is loading far more data than necessary, which increases page weight and slows down performance.
⚡ Quick fix: To reduce image size on WordPress, images should always be resized according to how they are actually displayed on the page.
You May Be Using the Wrong Image Format
Traditional formats like JPEG and PNG are still widely used, but they are often heavier than modern alternatives. Formats like WebP and AVIF can significantly reduce image size on WordPress while maintaining visual quality.
⚡ Quick fix: Switching to next-gen formats is one of the most effective ways to speed up images on WordPress and improve loading times across your entire site.
Too Many Images Overloading a Page
Another major issue is loading all images at the same time, especially those visible when the page first loads. To optimize images for page speed, you need to prioritize which images are critical. The most important one is the Largest Contentful Paint (LCP) element, which is often a hero image or banner. This image must load as quickly as possible because it directly impacts Core Web Vitals and perceived performance.
⚡ Quick fix: If you want to understand how to improve LCP images on WordPress, the rule is simple: prioritize the main image, serve it at the right size, use the right format, and compress it efficiently. Lazy loading should not be applied to your critical image. Instead, only images below the fold (not visible on screen) should be deferred.
Uncompressed Images Increasing Load Times
A lack of compression is one of the biggest reasons images slow down a website.
Without compression, image files contain unnecessary data that increases their size. To compress images without losing quality, image optimization plugins use advanced algorithms that remove non-essential data while preserving visual clarity.
⚡ Quick fix: Compress your images and make sure to not impact quality. This process, often called lossy compression, allows you to significantly reduce file size without noticeable differences for users. It is a core technique in any image optimization WordPress strategy and essential to speed up images on WordPress.
The Result: Slower Pages and Lost Conversions
When these issues are not addressed, they directly impact both performance and user experience. All these problems lead to:
- Larger page size.
- Slower loading time.
- Delayed visual rendering.
- Poor Core Web Vitals.
- Higher bounce rates.
If your images are not optimized, your site will feel slow, and users will leave before interacting with your content.
How to Check If Your Images Are Slowing Down Your Site
The first step is to identify if images are actually hurting your performance. The best way to do this is to run a performance audit. Tools like GTmetrix help you analyze loading speed, page weight, Core Web Vitals, and image-related performance issues. GTmetrix is a website performance testing tool that shows exactly what slows down your pages and how to optimize them.
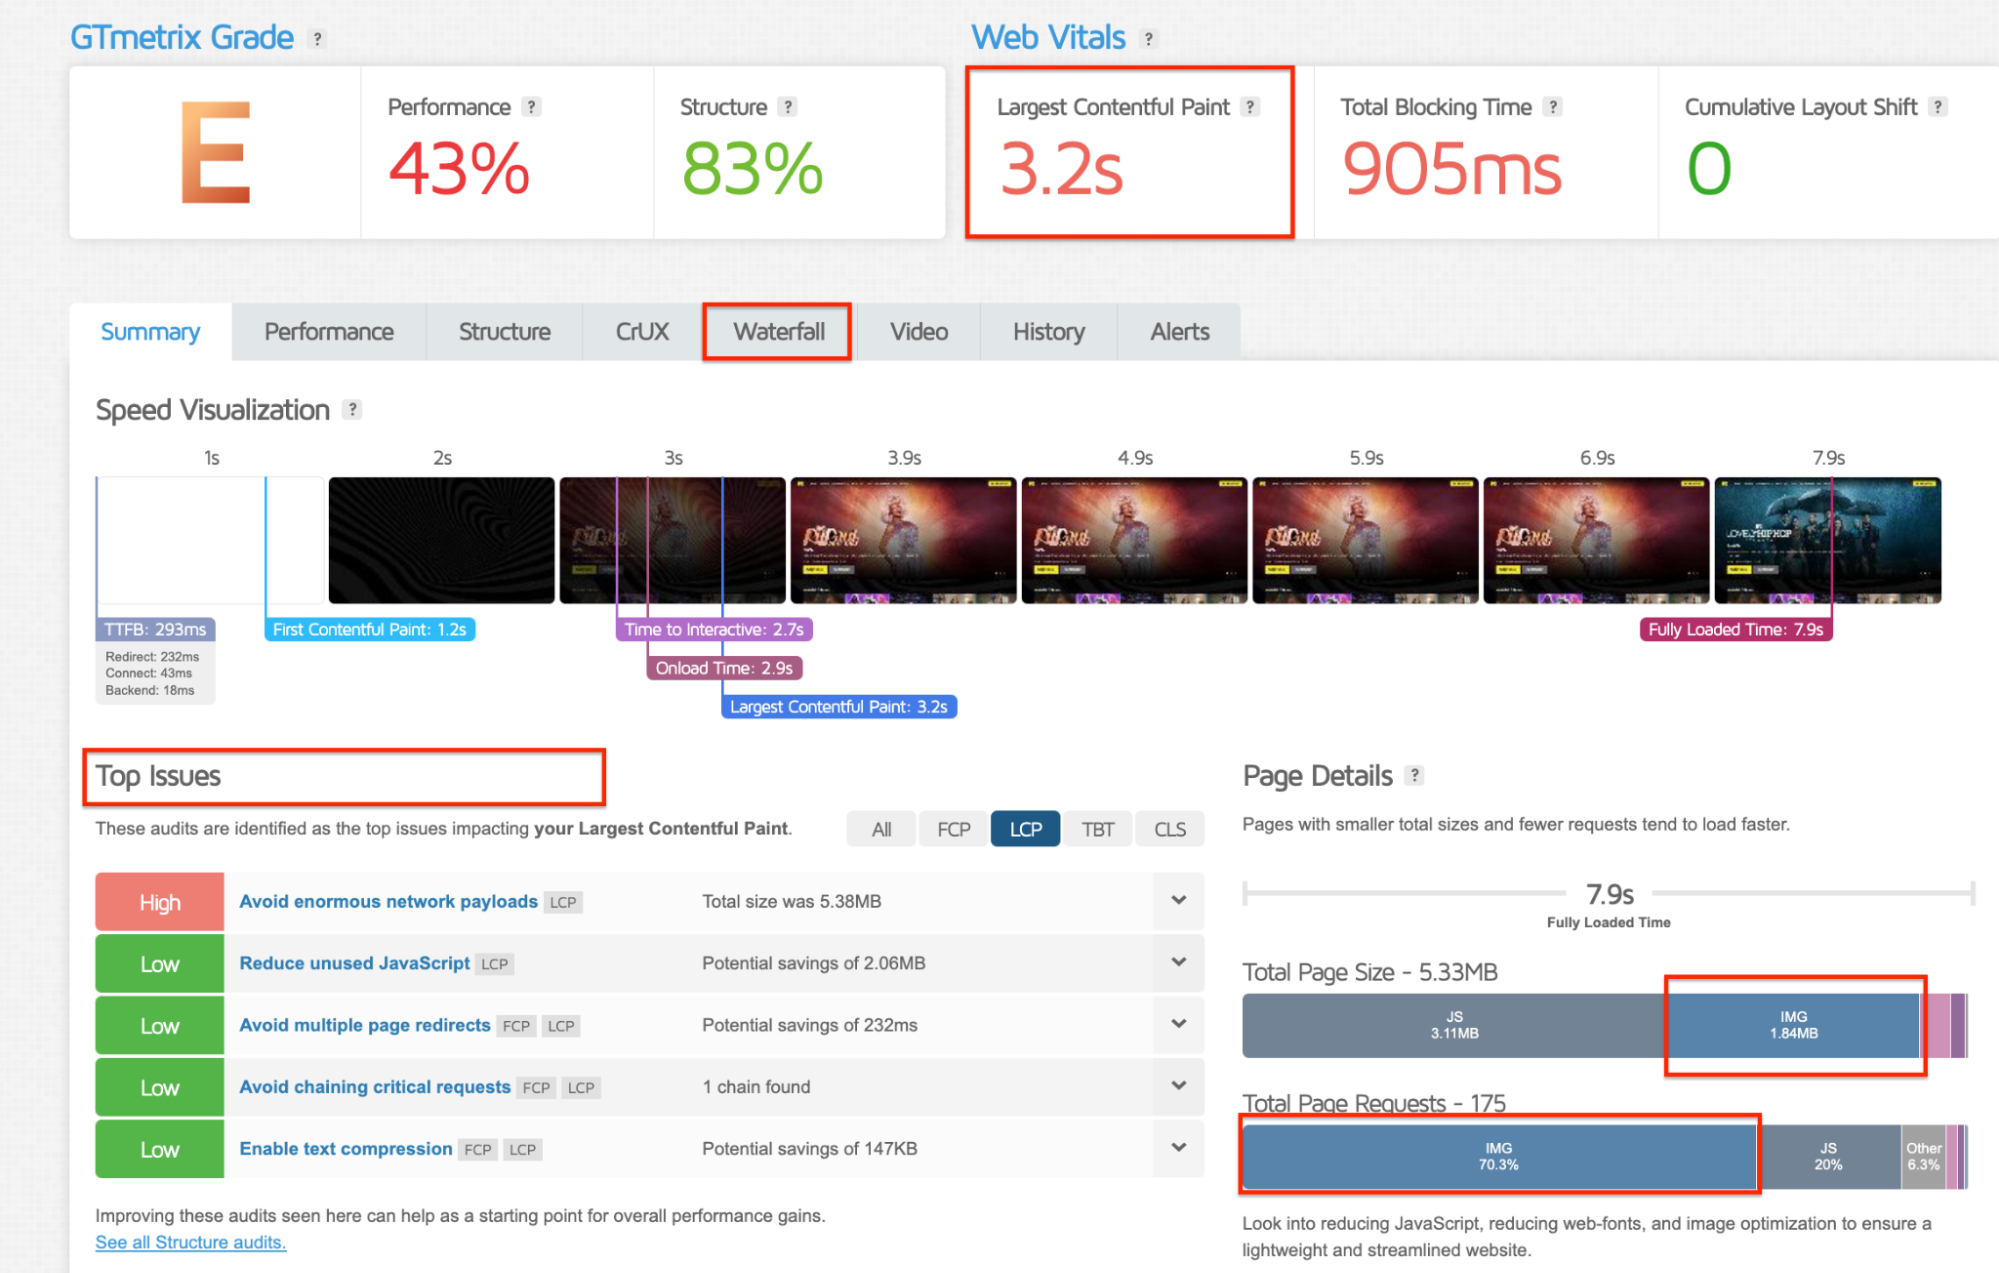
1. Check Your Largest Contentful Paint (LCP)
One of the first things to analyze is your Largest Contentful Paint (LCP) score. In many cases, the LCP element is an image such as a hero banner or featured product image. If your LCP element is an oversized or unoptimized image, it can significantly slow down your site. According to Google, a good LCP score should be under 2.5 seconds.
2. Analyze Page Weight and Image Requests
Then, look at your overall page weight and how much of it comes from images.
On GTmetrix, check the following KPIs:
- Total page size.
- Number of image requests.
- Percentage of page weight taken by images.
As a best practice:
- Try to keep total page size under 2–3 MB.
- Individual images should ideally stay under 200 KB whenever possible.
- Avoid excessive image requests on one page.
If images represent the majority of your page weight, it usually means you need better image optimization on WordPress.
3. Use the Waterfall Chart to Spot Slow Images
The GTmetrix Waterfall chart is one of the best ways to identify image-related performance problems.
It shows every file loaded on your page in chronological order, including images, CSS files, JavaScript and fonts.
If you notice:
- Large image files taking a long time to load
- Many image requests loading simultaneously
- Images blocking rendering
Then your images are likely slowing down your site.
4. Check GTmetrix Image Optimization Warnings
GTmetrix also highlights image-related issues directly in its recommendations section.
Common warnings include:
- “Serve images in next-gen formats”
- “Efficiently encode images”
- “Avoid enormous network payloads”
- “Properly size images”
These warnings indicate that your images are too heavy, not compressed properly, or not optimized for page speed. Fixing these issues is one of the fastest ways to speed up images on WordPress and improve Core Web Vitals.
5. Test Your Images on Mobile and Tablet
Finally, always check how your images behave on smaller screens. Use tools like Responsive Checker or your browser’s mobile preview mode to verify:
- If images are responsive.
- If they look oversized on mobile.
- If banners are cropped incorrectly.
- If mobile pages feel visually heavy or slow.
Many websites serve large desktop images to mobile devices, which creates unnecessary weight and hurts performance. Responsive image optimization is essential to optimize images for page speed and maintain an optimal mobile experience.
Now that you know how to identify images that hurt performance with tools like GTmetrix, make sure you don’t do those 8 optimization mistakes.
Bonus: 8 Common Image Optimization Mistakes to Avoid
Many websites still make simple mistakes that hurt performance, PageSpeed Insight scores, and user experience. By avoiding these 8 common issues you can make photos load faster on WordPress and improve page speed.
1. Uploading Images Without Resizing Them First
Uploading full-size images directly from a camera or smartphone adds unnecessary weight to your pages.
✅ To reduce image size on WordPress, images should always match the dimensions actually displayed on the screen.
2. Using PNG When JPEG, WebP, or AVIF Would Be Lighter
PNG files are often much heavier than needed, especially for photos and large visuals.
✅ Choose the best image format for WordPress images, such as WebP or AVIF, in order to speed up images on WordPress significantly.
3. Skipping Compression or Using Inconsistent Settings
Without proper compression, image files remain much larger than necessary and slow down loading time.
✅ Use consistent image optimization WordPress settings to ensure balanced performance and visual quality across your entire site.
4. Over-Compressing Images and Reducing Visual Quality
Trying to reduce file size too aggressively can create blurry or pixelated images that hurt user experience and trust.
✅ The goal is to compress images without losing quality, not sacrifice design for performance.
5. Not Optimizing Images Already in the Media Library
Many websites optimize only new uploads while leaving older images untouched.
✅ Bulk optimization is essential to improve performance across your entire WordPress media library and optimize images for page speed globally.
6. Relying on Multiple Optimization Plugins That Conflict with Each Other
Using several WordPress image optimization plugins at the same time can create conflicts, duplicate compression, or performance issues.
✅ A single well-configured solution is usually more effective and easier to manage.
7. Ignoring Mobile Performance and Image Behavior on Smaller Screens
Large desktop images served on mobile devices increase load time and hurt Core Web Vitals.
✅ Responsive image optimization is critical to speed up images on WordPress and maintain a smooth mobile experience.
8. Lazy Loading Critical Above-the-Fold Images
Lazy loading is useful but applying it to hero images or banners can delay visual rendering and hurt Largest Contentful Paint.
✅ To improve LCP images on WordPress, critical above-the-fold visuals should load immediately.
Do You Need an Image Optimization Plugin?
The answer depends on your workflow, your goals, and how much time you want to spend manually optimizing images. Here’s how image optimization plugins can fit into your stack:
For Business Owners
If you’re a business owner and your priority is saving time and improving performance without technical complexity, an image optimization plugin is almost essential.
A plugin can automatically compress images, convert them to WebP or AVIF, resize oversized uploads, and optimize images on upload. Instead of manually managing every visual, you can focus on your business, marketing, and conversions while your images stay optimized in the background.
For Web Designers
As a web designer, visual quality matters just as much as performance. Your workflow usually starts in design tools like Figma, Adobe Photoshop, Adobe XD, Sketch, or Canva, where you prepare and resize visuals correctly before export.
Then, a WordPress image optimization plugin helps with the final performance layer: smart compression, next-gen format conversion, and responsive delivery. This ensures your designs stay visually sharp while still loading fast on all devices.
For Developers
Developers often want more control over performance optimization and Core Web Vitals. You may already optimize dimensions manually, preload critical visuals, or fine-tune lazy loading behavior.
In this case, an image optimization plugin becomes a productivity and automation tool. It helps standardize compression settings, automate WebP or AVIF generation, and reduce image weight at scale without manually processing every asset.
For Bloggers and Content Creators
If you’re a blogger and your content relies heavily on visuals, such as travel, food, lifestyle, or photography blogging, image quality is part of your brand experience. At the same time, uploading dozens of heavy photos can quickly slow down your website.
This is where the type of compression you choose becomes important. A good plugin helps compress images without losing quality, so your photos stay crisp and professional while still helping make photos load faster on WordPress.
For SEO Specialists and Marketers
As an SEO specialist or marketer, you’re likely focused on improving rankings, strengthening Core Web Vitals, and increasing user engagement. That’s why an image optimization plugin should be one of your top priorities.
Images often represent the largest portion of page weight and directly impact loading speed, Largest Contentful Paint (LCP), and mobile performance. Since Google considers speed and user experience as ranking signals, optimizing images with a plugin is one of the simplest ways to improve technical SEO while reducing bounce rates.
For Freelancers
If you manage multiple client websites, an image optimization plugin quickly becomes essential. Manually compressing and converting hundreds of images across dozens of sites is simply not scalable. Imagine having to manually compress and convert 200 images per site while managing 40 sites a month? A plugin automates your workflow, keeps optimization consistent across projects, and helps you maintain strong performance standards while saving a considerable amount of time for every project.
FAQs
Why Are My WordPress Images Loading Slowly?
If your images are loading slowly on WordPress, the issue usually comes from oversized files, missing compression, or outdated formats like PNG and JPEG. To make photos load faster on WordPress, you can use Imagify to automatically compress images, resize oversized uploads, and convert them to next-gen formats like WebP or AVIF.
What Is the Best Image Format for WordPress?
The best image formats for WordPress today are AVIF and WebP and Imagify automatically convert your JPEG and PNG images into those next-gen formats.
They offer much better compression than older formats while maintaining excellent visual quality, which helps reduce image size on WordPress and improve loading speed.
Does Compressing Images Reduce Quality?
If done correctly, compression should not noticeably reduce quality. Modern image optimization WordPress tools like Imagify use Smart compression to reduce file size significantly while preserving visual quality for the naked eye.
How Much Can Image Optimization Improve Loading Time?
It depends on how image-heavy your pages are. On pages containing dozens of visuals, image optimization can improve loading time by several seconds and dramatically reduce page weight. The best way to measure the impact is to run a before-and-after GTmetrix test.
What Is the Easiest Way to Optimize Images on WordPress?
The easiest way is to use a WordPress image optimization plugin like Imagify. It automatically compresses images, resizes oversized uploads, and converts files to WebP or AVIF, saving a huge amount of time and effort.
Should I Use WebP or AVIF Images?
AVIF currently offers the best compression results and the smallest file sizes, making it excellent for performance optimization, and you can convert easily to AVIF with Imagify. WebP comes just after and remains one of the best image formats for WordPress because of its strong compatibility and lighter weight compared to JPEG or PNG.
Can I Optimize Images Without a Plugin?
Yes, you can optimize images manually using design software or online compression tools. However, the process quickly becomes time-consuming because you need to resize, compress, convert, and reupload every image manually. A plugin like Imagify automates the entire workflow and helps keep optimization consistent across your site.
Wrapping Up
As you can see, image optimization plays a major role in WordPress performance and user experience. Images should not be too heavy because they slow down your pages, but they should not become blurry either. Finding the right balance between quality and performance is essential.
If you want a simple way to make photos load faster on WordPress while keeping your visuals sharp and professional, try Imagify. Imagify is free for up to 20 MB of images per month, so you can test it on your own website with no risk!


