Looking for an efficient way to convert your images to WebP and…
Are you a photographer looking for some SEO tips? Good thinking! Having captivating images alone is not enough; it’s equally crucial to establish an online presence and ensure that your website is optimized for search engine visibility and fast loading times. In this article, we’ll lead you through 10 invaluable tips to improve your website’s SEO and performance, aiming to draw in more visitors and deliver a seamless experience for potential clients. Whether you’re a seasoned professional photographer or a passionate photography enthusiast, these SEO tips will help boost your Google ranking.
10 SEO Best Practices for Your Photography Website
To improve the SEO for your photography website, consider applying the following tips, which can be effortlessly put into action with the right tools:
- Design a Responsive Website
- Conduct Keyword Research
- Perform On-page Optimization
- Create Internal Links
- Work on Backlinks
- Create Unique and Compelling Content
- Optimize Your Images (SEO + performance)
- Use Caching and Code Optimization
- Use Sitemaps
- Do Local SEO
Let’s dive in!
1. Design a Responsive Website
A photographer’s site should look great on desktop, tablet, and mobile, given the prevalence of mobile device usage for online content consumption.
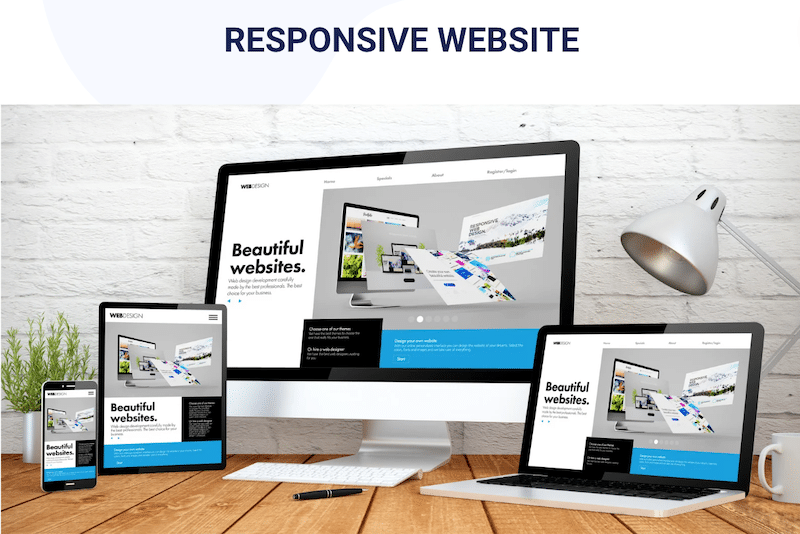
On top of that, there is a correlation between Google ranking and responsive design: Google considers mobile-friendliness a ranking factor! Websites with responsive design – which adapt well to various screen sizes and devices – are more likely to rank higher in Google search results, as they provide a better user experience for mobile users.
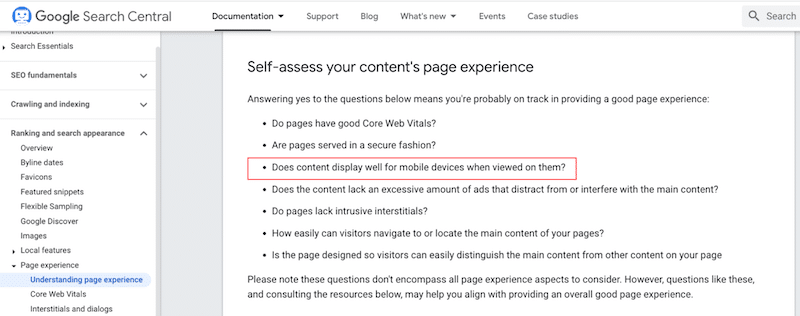
To delve into further details, page experience is a crucial factor in SEO, emphasizing user-centric elements such as loading speed, mobile-friendliness, safe browsing, and the absence of intrusive interstitials. In a nutshell, Google’s algorithms prioritize pages that offer a positive experience, including mobile users.
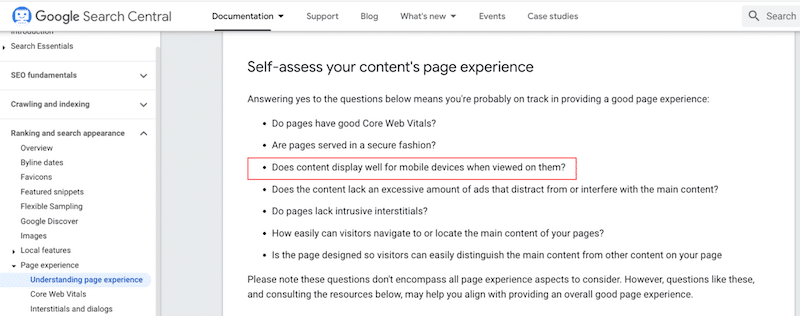
As demonstrated below, a series of questions enable you to assess whether your photography site provides a positive page experience. Amongst them, you will find the responsive-related query, “Does content display well for mobile devices when viewed on them?”.
How to Check if Your Photography Website is Responsive
✅ Browser Resizing:
- Open your website on a desktop or laptop computer.
- Resize your browser window by dragging the edges to simulate different screen sizes.
- Observe how your website content adjusts to fit the changing screen dimensions.
- Ensure the text, images, and navigation elements remain readable and accessible.
✅ Mobile Devices:
- Visit your website on various mobile devices like smartphones and tablets.
- Check if the content displays correctly and is easy to navigate without excessive zooming or horizontal scrolling.
How to Build a Responsive Photography Website
✅ When buying your design tool, choose a responsive page builder or theme.
Visit their “features” page and resize the browser to examine their demo’s adaptability.
✅ Design your website directly using the mobile view instead of the desktop.
✅ Use the “src”, “srcset” and “size” attributes on your images. We have a full tutorial available that explains how to make your images responsive.
2. Conduct Keyword Research
Keyword research is crucial for the SEO of a photography site because it helps photographers understand the specific terms and phrases potential clients use when searching for photography services, such as “wedding photographer in [location]” or “portrait photography for families.” By identifying these keywords, photographers can optimize their website content, making it more likely to appear in relevant search results.
This not only enhances visibility but also ensures that the right audience discovers their work, leading to increased traffic and potential bookings.
How to Conduct Keyword Research for a Photography Website
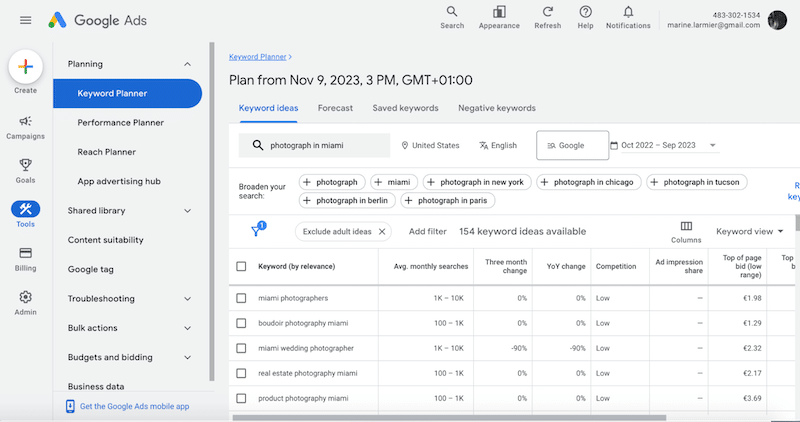
✅ Use keyword research tools: Google Keyword Planner, Ubersuggest, Ahrefs, or Semrush to expand your list of keywords. There, you can enter suggestions they provide around photography. In our example, boudoir, wedding, and real estate are three relevant categories:
✅ Define your niche (if applicable): are you a portrait, wedding, family, or more of a corporate photographer? Understanding your niche will help to target more specific keywords.
✅ Consider location-based keywords: if you cover a specific area, include location-based keywords like “London wedding photographer” or “Los Angeles kids photographer.”
✅ Focus on Long-tail keywords, which are more specific phrases that potential clients might use. For example, “Christmas portrait photography in London.” Long-tail keywords can be less competitive and more targeted.
3. Perform On-page Optimization
On-page optimization is another efficient way to improve your photography website’s SEO. This type of optimization has three main pillars:
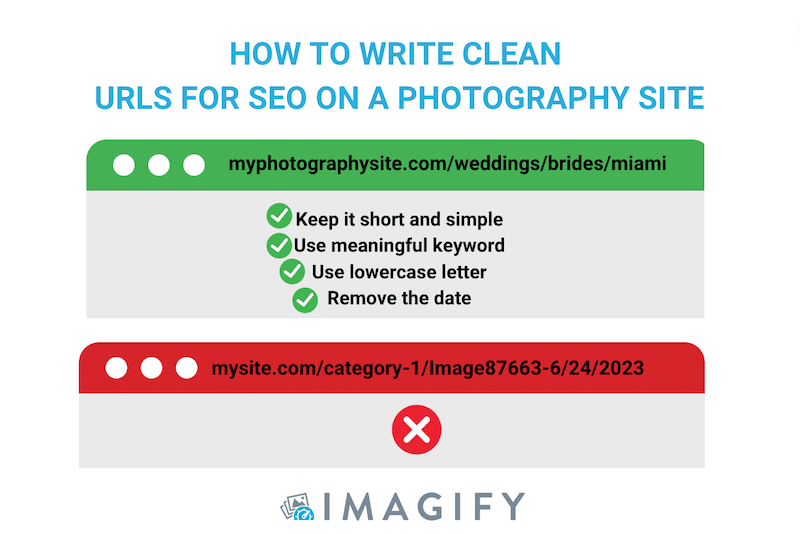
- URL structure: Create clean and descriptive URLs that include keywords
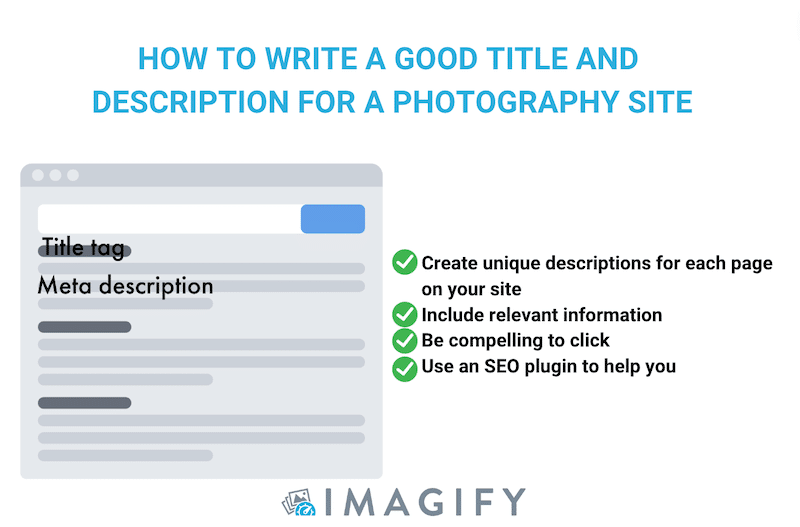
2. Meta tags: Writing compelling meta titles and descriptions that include target keywords. The title serves as the page’s focal point and includes the main keyword you are targeting. It should entice users to click. Meanwhile, the meta description, positioned below the title, provides a concise and descriptive overview of the page content, aiming to be brief, relevant, and informative.
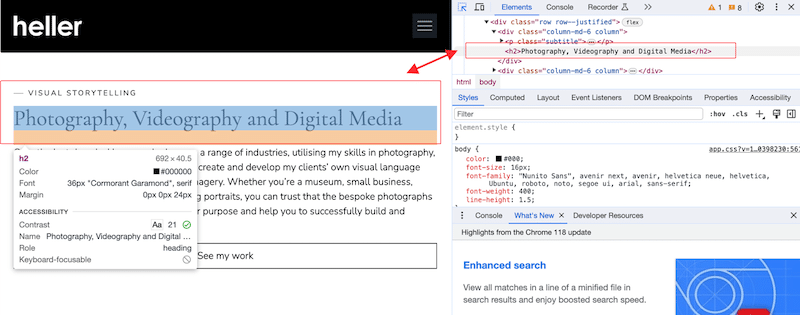
3. Header tags (H1, H2, etc.): Structure content with header tags to create a hierarchy and make it easier to read and understand. There are six heading tags, <H1> to <H6>, with <H1> being the most important. Use these tags to emphasize your most relevant content, such as titles of sections or categories.
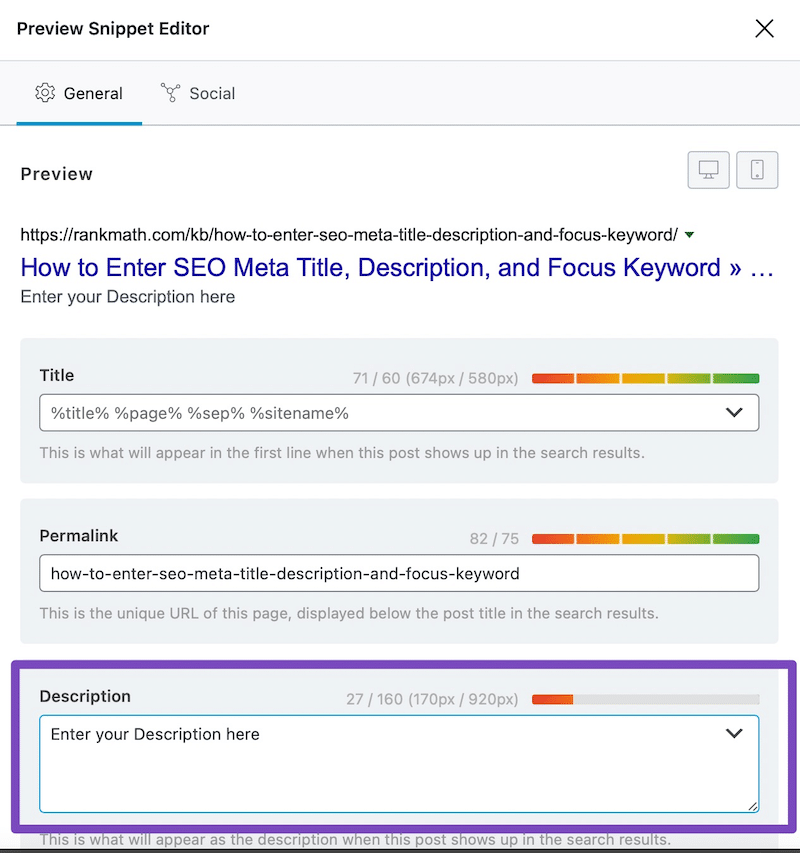
How to Write a Meta Title and Description For My Photography Website
✅ Use a WordPress plugin like Rank Math SEO or Yoast SEO. If you use Rank Math SEO, go to the General tab and add the Meta title, description, and focus keywords in the matching fields:
4. Create Internal Links
An internal linking strategy on a photography website can improve SEO by:
- Enhancing site structure: Internal links establish a logical hierarchy, making it easier for search engines to understand the website’s structure when they crawl it. (That’s also beneficial for users who can navigate the site more efficiently through well-placed internal links).
- Distributing page authority: Internal links can distribute page authority throughout the site, boosting the SEO value of important pages.
How to Do Internal Linking
✅ The concept is to incorporate links within the main article to connect to these related posts and reciprocally link back to the main content.
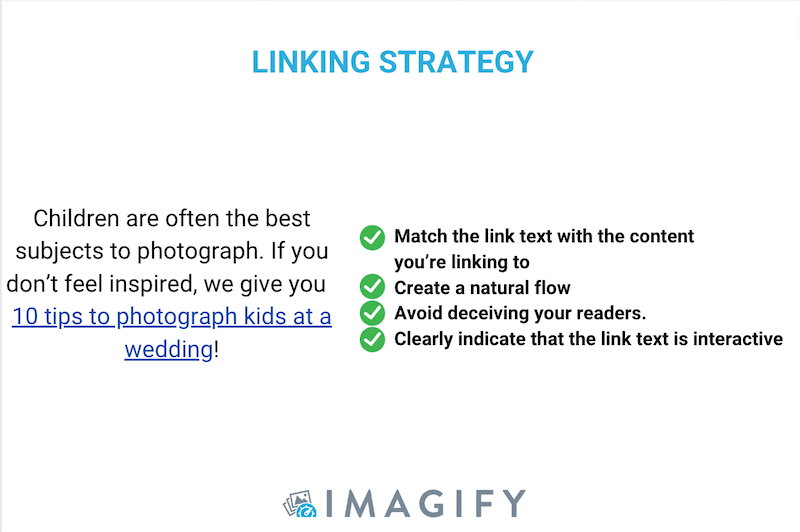
If you’re a photographer, you might have a pivotal article titled “The Ultimate Guide for Wedding Photography.” Surrounding this central piece, there could be other pertinent articles like “5 Ideas to Photograph the Bridesmaid” or “10 Tips to Photograph Kids at a Wedding.”
5. Work on Backlinks
Backlinks can help your photography website’s SEO by building authority.
High-quality backlinks from respected websites indicate that your photography site is reliable and authoritative to search engines.
It also improves your site’s visibility and drives more referral traffic to your photography site. Listing your site on related industries is also a networking initiative that establishes valuable connections, contributing to improving your business and online visibility.
How to Get Backlinks
✅ Search for highly authoritative domains on tools like Ahrefs. Reach out to them for inclusion or submit a guest post related to photography.
✅ Engage in photography contests so they will mention you if you are the winner of any prize.
✅ Generate compelling and shareable content that attracts reposts and links.
6. Create Unique and Compelling Content
Unique and compelling content for photographers can benefit your SEO in several ways:
- Set aside from the competition: Unique content sets you apart from competitors, making your photography site stand out in search results.
- Keyword relevance: Creating content around specific photography topics allows you to naturally incorporate relevant keywords, improving your site’s visibility for those search queries.
- Backlink attraction and user engagement: Compelling content is more likely to be shared by others in the industry, contributing to valuable backlinks that enhance your site’s authority (see previous point).
- Establishing authority: Consistently producing unique and insightful content establishes your authority in the photography niche, reinforcing your credibility with users and search engines.
Delivering content that aligns with the search intent enhances SEO, as it is a component of Google’s algorithm.
7. Optimize Your Images (SEO + Performance)
Image optimization is one of the most powerful techniques to boost performance and, as a result, improve SEO. To optimize your images for SEO, follow the steps below:
- Choose appropriate file names: Use descriptive filenames relevant to the image content.
- Use Alt text: Include concise, keyword-rich alt text for accessibility and search engine understanding. You can add your content directly from the WordPress library
- Compress images: Reduce file sizes without compromising quality to improve page loading speed.
- Select the right file format: Use the appropriate image format (WebP is the next-gen recommended format by Google). The quality is good, and the compression rate is superior to JPEG and PNG.
- Specify image dimensions: Define image dimensions to enhance page rendering speed.
- Implement lazy-loading: A technique that defers the loading of non-essential images until they are about to be displayed on the user’s screen. This improves the webpage loading times of your photography site and saves bandwidth by loading images only when needed.
How To Compress and Convert Image to WebP
✅ Imagify is one of the best optimization plugins in the market that compresses your images while preserving their quality (which is crucial for a photography website). Additionally, it provides the capability to convert images to WebP format. The user-friendly interface ensures a seamless experience, requiring just a few clicks to initiate the compression and conversion process.
| 🔊 Important to note: as of March 2024, Imagify also converts images to Avif, the other next-gen format recommended by Google to make your images lighter. |
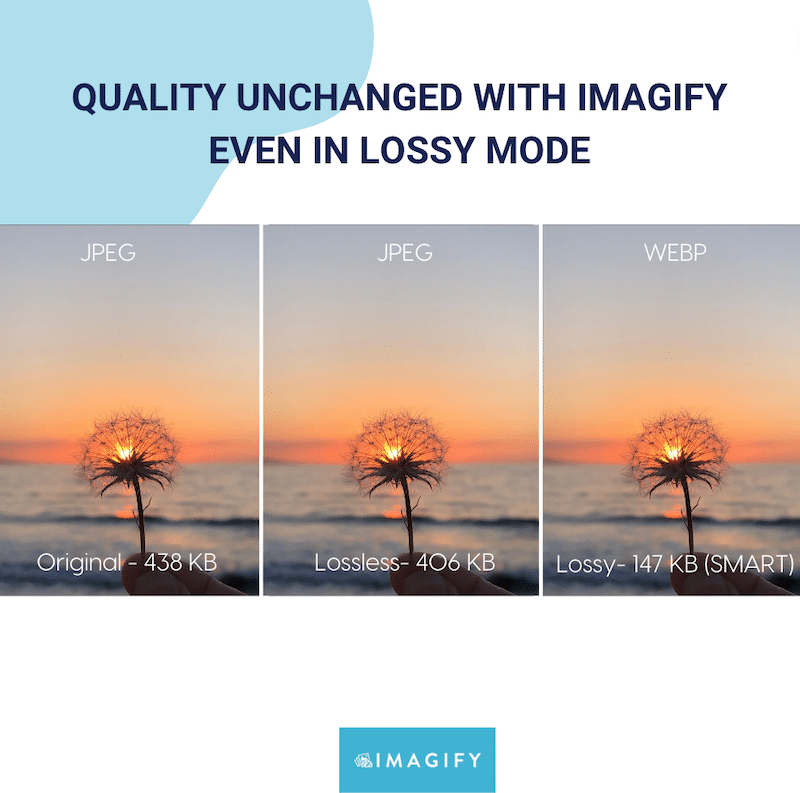
| 📷 Concerned as a photographer that Imagify might overly compress your photos and compromise quality? Rest assured, there are two key points you should be aware of: – You can convert to WebP and compress using the lossless mode (zero impact on quality) – You can convert to WebP and compress using the lossy mode (a smart mode that slightly impacts quality but that is invisible to the naked eye). Read more about lossy vs lossless compression in our detailed guide. |
How To Add Lazy Loading on Images
✅ Manually using the following “loading=”lazy” script on your images:
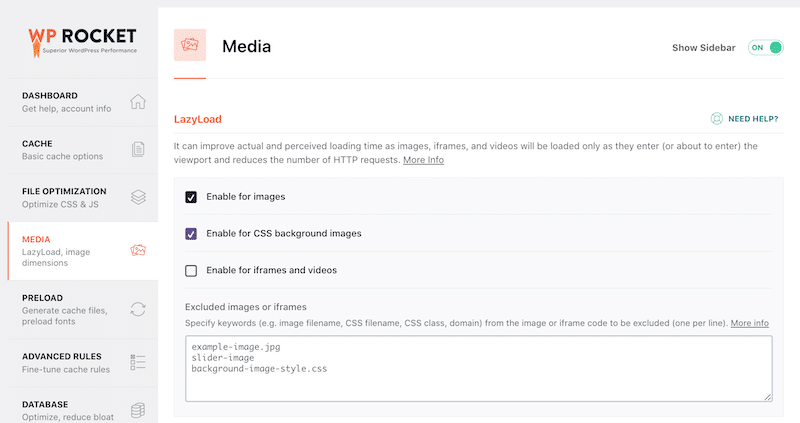
<img src="”example.webp"" loading="lazy" alt="…">✅ Using a WordPress plugin like WP Rocket that automatically offers lazy loading (amongst other performance features explained in the next section).
This is how WP Rocket seamlessly allows you to implement lazy loading for your media:
| 🐌 Is your photography site feeling slow? Here are 6 reasons why your images may be slowing down your site. |
8. Use Caching and Code Optimization
Caching and code optimization, including removing unused CSS and delaying JavaScript, can significantly enhance performance and SEO. Here’s how:
- Faster page load times: Caching stores previously loaded resources, reducing the need to fetch them again. This makes your photos load faster.
- Improved user experience: Faster websites provide a smoother and more enjoyable user experience, leading to higher user satisfaction and engagement.
- Reduced server load: Caching minimizes server requests, reducing the server load and allowing for better handling of increased traffic impact on the performance.
How To Implement Caching and Code Optimization
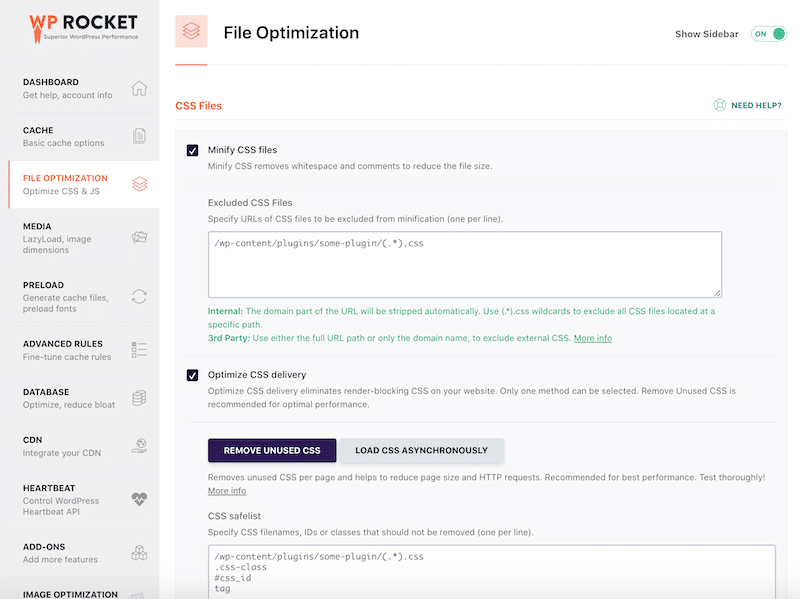
✅ As mentioned in the previous section, WP Rocket is a powerful plugin that improves performance thanks to lazy loading, caching, and code optimization. The plugin applies 80% of the performance best practices upon its activation, including caching GZIP compression and more. The intuitive admin allows you to optimize your files and images directly from the WordPress dashboard:
Before continuing our list of tips, I’d like to underline that WP Rocket and Imagify can also help you boost your Core Web Vitals (which impact your ranking).
9. Use a Sitemap
Sitemaps benefit your photography site’s SEO by facilitating efficient crawling and indexing, ensuring all pages, including images, are discovered by search engines promptly. They also provide metadata, prioritization, and error alerts, contributing to improved search visibility and a better user experience.
A well-structured and regularly updated sitemap ensures that search engines can efficiently crawl, index, and understand the content on your photography site, contributing to improved SEO and better visibility in search engine results.
How To Create a SiteMap
✅ You can use a free plugin like XML Sitemap Generator for Google. To generate a sitemap for your Photography website, follow these steps:
- Install and activate the plugin on WordPress
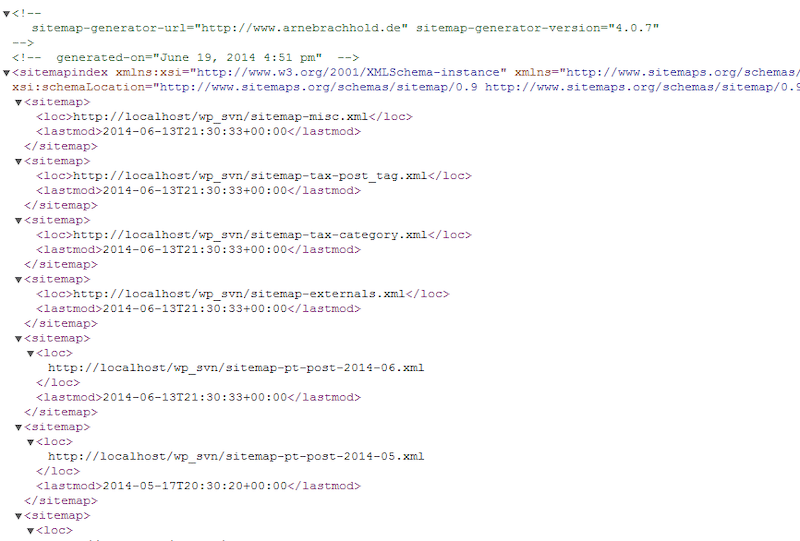
- Once activated, the plugin will automatically generate a sitemap.xml file for your website
- You can access the sitemap by appending /sitemap.xml to your website’s URL (e.g., https://myphotographysite.com/sitemap.xml)
That’s what a sitemap looks like:
10. Do Local SEO
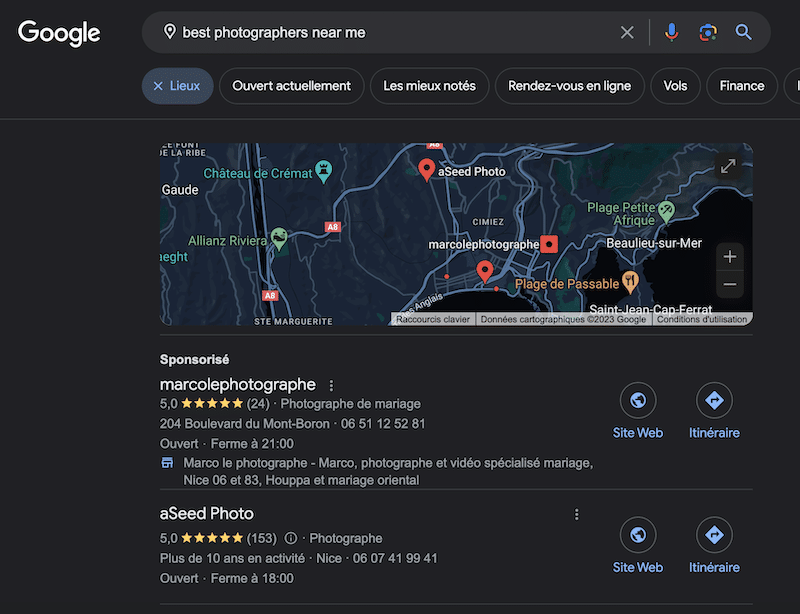
Local SEO can significantly boost your photography site by optimizing it for local searches, increasing visibility in local directories, improving online reviews and ratings, and enhancing the overall user experience for local audiences. This targeted approach can lead to more clients and opportunities within your geographic area.
As you can see below, businesses that are using Google My Business are displayed first:
How To Do Local SEO for Your Photography Business
✅ Create or claim your Google My Business Page and optimize it with relevant content such as opening hours, photos, reviews, contact details, etc.
✅ List your business on local directory sites.
✅ Local events and partnerships: Participate in local events, collaborate with local businesses, and showcase your photography services at community gatherings.
✅ Add the “LocalBusiness” structured data: A standardized format for providing information about a page and classifying the page content (also called riched content). For example, this is how a rich snippet looks instead of displaying a regular search result:
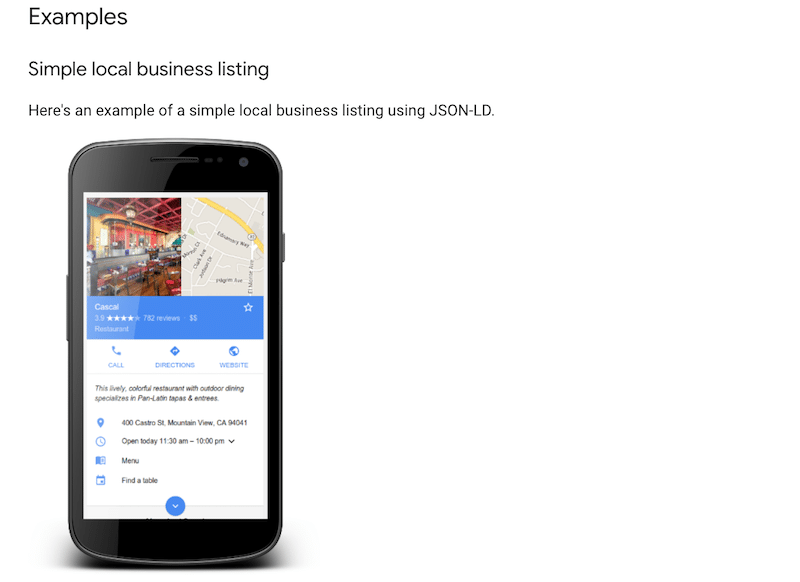
Adding structured data to your local business will create search results that are more engaging to users. This might encourage them to click and visit your photography site.
Tools you can use to implement the structured data and improve local SEO:
- Do it manually with JS code provided by Google
- Use a WordPress plugin like Rank Math SEO or Schema Pro.
Wrapping Up
In conclusion, these 10 SEO and performance tips serve as guidance for photographers looking to optimize their online presence. Among these strategies, performance tools like Imagify emerge as a photographer’s best friend, enhancing website performance without compromising the quality of their artistic work. By incorporating these tips and using Imagify, you can elevate your SEO and ensure a fast online experience for your audience. Try Imagify for free and see how to optimize your photos without impacting the quality.


