


Looking for an efficient way to convert your images to WebP and…
Images draw attention and trigger emotion in your visitors. They are essential in a marketing strategy but must be optimized for the web. Image compression reduces an image’s file size, helping your pages load faster and use less storage space.
In WordPress, a compression plugin can optimize images automatically on upload, including every generated thumbnail size selected in its settings.
We all worry about ending up with pixelated images that ruin the user experience. Fortunately, when compression is done properly, you can make your images lighter without visible quality loss.
To get started, use an image compressor such as the Imagify WordPress plugin, a command-line tool, an online tool like TinyPNG, or design software like Photopea. Below, we cover five ways to compress images in WordPress and share our before-and-after test results.
| Key Takeaways ✅ Image compression reduces an image’s file size, helping your WordPress pages load faster. ✅ Compression works by storing image data more efficiently (lossless) or removing some detail to save more space (lossy). A WordPress plugin can apply it automatically to uploads and their thumbnail sizes. ✅ Lossy compression reduces some image detail, but when done properly, you shouldn’t see a difference with the naked eye. ✅Visible blur or blocky patches can signal over-compression. ✅ In our WordPress test, image compression and AVIF conversion reduced page weight by 54% and fully loaded time from 5.6 to 3.1 seconds. |
What Is Image Compression in WordPress?
Image compression in WordPress means reducing an image’s file size while keeping a good balance between visual quality. For example, a 1 MB photo might become a 150 KB file with no visible difference at its display size.

Resizing and format conversion can also make images lighter, but they work differently:
- Compression reduces the data needed to store an image. Its pixel dimensions can stay exactly the same.
- Resizing changes pixel dimensions, such as reducing a photo from 2,400 × 1,600 px to 1,200 × 800 px.
- Format conversion changes the file type, such as JPEG to WebP or AVIF. These formats can encode images more efficiently, so conversion and compression often work together.
What Does WordPress Do Automatically?
When you upload an image, WordPress generates multiple sizes for different uses, such as thumbnails and larger displays. It also applies a default JPEG quality setting of 82 out of 100 when creating JPEG versions. That’s a quality setting, not an 82% reduction in file size.
These defaults are a useful starting point, but they don’t replace full image optimization. By default, WordPress doesn’t find the best compression level for each image, convert JPEGs and PNGs to WebP or AVIF, or bulk-compress your existing Media Library.
A WordPress Upload Example
What happens when you upload a very large image? Let’s try a PNG measuring 17,126 × 5,315 pixels, with a file size of about 1.2 MB.

After uploading it, WordPress shows a smaller PNG measuring 2,560 × 794 pixels and weighing 152 KB. Its filename now ends in -scaled.png.

Why does WordPress add -scaled? When an image exceeds 2,560 pixels in width or height, WordPress creates a smaller copy and keeps the original on the server.
This is resizing, also called scaling: WordPress reduces the image’s pixel dimensions and saves it again, which usually makes the file smaller too. It’s different from a dedicated compression step; the scaled image and its thumbnails can still benefit from compression and WebP or AVIF conversion.
| 💡 Expert tip: To avoid this default resizing, keep the image’s longest side at 2,560 pixels or less before uploading. |
Why Image Compression Matters for WordPress Sites
Large images can slow down your website, frustrating visitors and potentially sending them to competitors. Compression reduces page weight, helping pages load faster, especially on slower mobile connections. It can also help your main image appear sooner, improving LCP.
Smaller files can reduce storage needs and speed up backups, although any originals or extra image versions you keep still take up space.
🛒 Example: 10 WooCommerce product photos at 5 MB each mean 50 MB to download if they all load. Compression reduces that download size, so shoppers spend less time waiting.
Now that you know why image compression matters for WordPress, let’s see how it works.
How Does Image Compression Work in WordPress?
On a WordPress website, image compression makes your image files smaller so visitors have less data to download when they open a page. It works by storing image data more efficiently (lossless) or removing some fine detail (lossy). For example, a 1 MB photo might become a 150 KB file with no noticeable change in appearance.
How JPEG Compression Works
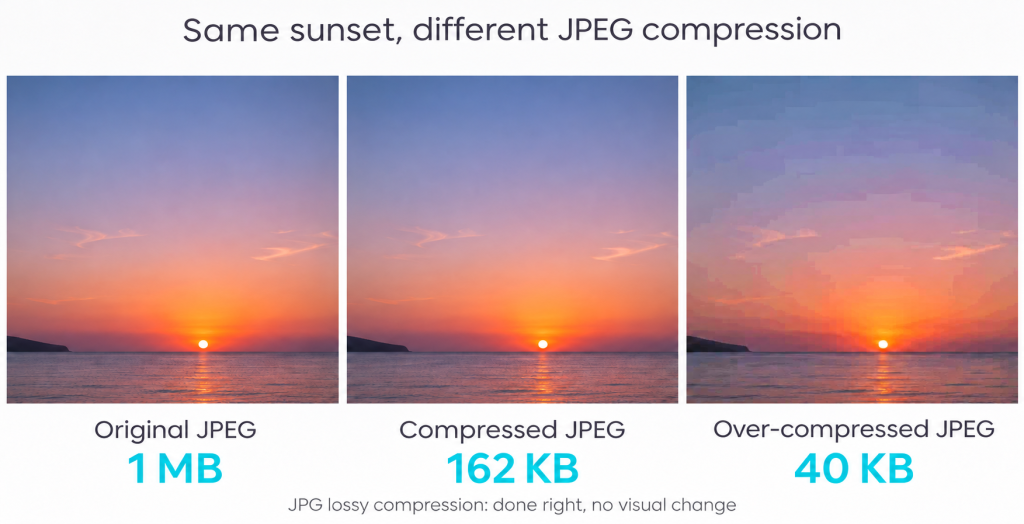
JPEG usually uses lossy compression. It processes small 8 × 8 pixel blocks and simplifies fine detail before packing the remaining data. This simplification is called quantization: stronger settings usually mean smaller files, with a greater risk of visible changes.

Example: Small changes between similar shades in a sunset may go unnoticed, but too much compression can make the sky look patchy:
| 💡 Expert tip: Check the image at its display size and at 100% zoom before deciding whether the quality is good enough. |
How PNG Compression Works
PNG’s standard compression is lossless. It records patterns and differences between nearby pixels, then packs that data more efficiently. Your browser reverses the process to recreate the same pixels. Some PNG optimizers also reduce the number of colors. That can save more space, but it can change the image.
Example: A logo can become lighter while keeping its letters sharp and its background transparent.
How WebP and AVIF Compress Better
WebP was developed by Google. Its lossy mode predicts small areas from nearby pixels, then stores the corrections. It can also adjust compression between different parts of a picture.
Google describes WebP as “able to produce files smaller than a comparable-quality image file encoded as JPEG.”
In plain English: you can show a photo that looks similar while downloading less data.
Example: For a blue sky, WebP can predict more blue from the surrounding area and record what differs.
AVIF uses the Alliance for Open Media’s newer AV1 technology. More flexible blocks and prediction methods can often produce even smaller files at similar visual quality. Both formats also support lossless compression.
| See our AVIF vs. WebP comparison for examples and help choosing. |
What Happens When You Compress Images in WordPress
Most WordPress image optimization plugins follow a similar process. Depending on the plugin and your settings, a single image upload can trigger several steps:
- WordPress creates image sizes. These include thumbnails and versions needed by your theme or plugins.
- Imagify compresses the files. It optimizes the full-size image used by WordPress and every generated thumbnail size selected in its settings. Existing images can be optimized in bulk.
- A backup protects your original. With Backup Original Images enabled, an unoptimized copy is kept so you can restore it or try different settings.
- The browser receives a compatible format. If enabled, Imagify creates WebP or AVIF versions and serves them through <picture> markup or server rules, with an optimized JPEG or PNG fallback.
Does Image Compression Reduce Quality? Lossy vs. Lossless vs. Smart
Good compression can make files much smaller without a visible change in quality. Here is the same image shown with different compression methods:

Lossy Compression
Lossy compression removes some image data to make files smaller. Done carefully, those changes may be hard to see at the size shown on your page. It works well for blog photos and product images.
Lossless Compression
Lossless compression makes files smaller without changing their pixel values. Savings are usually smaller than with lossy compression. Choose it when the pixel data must stay unchanged, such as when preserving a detailed screenshot or an original for editing.
| 💡 Expert tip: Keep a high-resolution original for print downloads or competition entries, and follow the file requirements. You can optimize the smaller preview shown on your website. Not sure which mode to choose? See our full guide to lossy vs lossless compression. |
Smart Compression: Lossy, Adjusted Automatically
There’s a sweet spot between smaller image files and good visual quality, and Imagify’s Smart Compression finds it for you. It automatically adjusts compression for each image, making your photos lighter while keeping them looking sharp. You don’t have to test different compression levels or work out which setting to choose: Imagify takes care of that for you.
Original vs. Well-Compressed vs. Over-Compressed
The compressed image should look like the original while using less data. The over-compressed version shows what happens when too much detail is removed.

Signs of Over-Compression and How to Choose the Right Mode
Look for these visible changes:
- Blocky patches or a mosaic effect in photos.
- Blurred text, fuzzy edges, or halos around letters and icons.
- Banding: visible stripes in skies or smooth gradients.
Use this quick table to choose the right compression mode:
| Mode | Best use | Main benefit |
| Lossy | Everyday web photos when you want smaller files and can check the image quality. | Usually greater file-size savings than lossless. |
| Lossless | Files that need unchanged pixel data, such as detailed screenshots or originals kept for editing and print. | You preserve every pixel value, usually with smaller file-size savings. |
| Smart (Imagify’s lossy compression) | WordPress sites, especially those with large media libraries. | Automatically applies lossy compression and checks visual quality, saving time and effort. |
How to Compress Images in WordPress (5 Methods)
To compress images in WordPress, use a plugin, WordPress’s built-in resizing tools, an online tool or image editor before upload, your host or CDN, or command-line tools. The right method depends on how many images you manage and how much of the work you want to automate.
🏆 Our pick: a plugin is the easiest method because it compresses new uploads automatically and handles your existing media library.
Quick comparison: which method should you use?
| Method | Best for | Typical use | Work involved |
| WordPress plugin | WordPress users who want to manage image optimization in one place. | Automatically compress uploads, optimize selected images or the whole library, and create WebP/AVIF versions. | Install and configure once, then manage everything inside WordPress. |
| Imagify plugin + MCP | WordPress users who prefer an AI assistant such as Claude. | Ask: “Optimize this product image and show me the savings.” Check image status, quota, or WebP/AVIF coverage. | Connect your AI assistant. Single-image actions are supported; bulk jobs and settings stay in WordPress. |
| WordPress built-in tools | Users who only need basic resizing or cropping. | Reduce an image’s pixel dimensions or crop it in the Media Library. | Edit images manually. For more compression control or format conversion, use another method. |
| Online tool or design software | Occasional uploads: one or two images, without a large library to process. | Compress or export a few images with tools such as TinyPNG or Photopea before uploading. | Export or download each file, then upload it to WordPress. |
| Host or CDN | Sites with a hosting or CDN plan that includes image optimization. | Serve resized, compressed images to visitors, with next-gen formats where supported. | Check your plan, enable image optimization, and confirm the optimized files load. Originals may stay unchanged. |
| Command line | Developers or teams with repeatable image-processing workflows. | Use ImageMagick to optimize images individually or run a script over a batch. | Write and maintain scripts; connect them to future uploads and generated image sizes if needed. |
1. Use an Image Optimization Plugin (Recommended)
A plugin such as Imagify can automatically compress uploads, optimize your media library in bulk, create WebP or AVIF files, and restore originals when backups are enabled.
ShortPixel offers file optimization and a separate image CDN plugin; Smush Pro has an optional CDN; EWWW supports local compression; and Optimole processes and serves images through its cloud service and CDN.
Here’s how it works with Imagify:
- Go to Plugins > Add New Plugin, install Imagify, activate it, and connect your Imagify account using its API key.
- Open Settings > Imagify. Enable Auto-Optimize Images on Upload to compress new uploads automatically, and Backup Original Images if you want to restore them later. Smart Compression is enabled by default, but you can also switch to Lossless Compression.

- Choose WebP or AVIF, enable Display images in Next-Gen format on the site, select a display method, and save.

- To optimize the whole library, go to Media > Bulk Optimization and click Imagify’em all. For individual images, open Media > Library in List view and use Optimize in the Imagify column:

You can optimize one image or your whole library from the same dashboard. Future uploads follow your settings automatically, so you do not have to download and upload each file again.
Bonus: Optimize Images with a WordPress Plugin and MCP
If you already use an AI assistant, Imagify’s MCP integration lets you check image optimization and request actions from the chat. MCP (Model Context Protocol) connects assistants such as Claude, GitHub Copilot, and Codex to your site’s Imagify data.
To try it:
- Use WordPress 6.9 or later and Imagify 2.3 or later, activate MCP Adapter, then connect your assistant using the Imagify MCP setup guide.
- Ask about an image’s status, your remaining quota, or WebP/AVIF coverage. You can also ask it to optimize or restore one image, then approve the action.

MCP currently works on one image at a time. Use the Imagify dashboard to optimize your whole library or change settings.
2. Use WordPress’s Built-In Image Tools
WordPress’s native tools are useful for resizing and cropping images, but offer limited control over compression.
- Open Media > Library, select an image, and click Edit Image.
- Use Scale Image to reduce oversized dimensions, or crop unnecessary areas, then save your changes.

- Under Settings > Media you can also review the thumbnail, medium, and large sizes WordPress generates for future uploads.
Note: These controls resize images. They don’t include a standard quality slider or a bulk compression button. Changing the media size settings also doesn’t automatically rebuild existing thumbnails.
3. Use an Online Tool or Design Software
Online tools and image editors such as Photoshop, Lightroom, and Photopea are useful for preparing a few images before uploading them to WordPress.
Here’s how to compress images with Photopea:
- Open your image, choose File > Export As > WebP, adjust Quality while checking the preview, and save.

- Then upload the exported file to WordPress.
4. Use Your Host or CDN
If your host or CDN includes image optimization, it can compress or convert images automatically as they’re delivered to visitors.
Cloudflare Polish, for example, optimizes images in Cloudflare’s cache without changing their URLs. Look for a specific image optimization feature: CDN caching alone does not make image files smaller. Here’s what to check:
- Check which image optimization features your plan includes.
- Enable compression and any supported next-gen delivery option.
- Clear the cache and check that visitors receive the optimized images, using your provider’s dashboard or your browser’s network tools.
5. Use Command-Line Tools
Command-line tools suit developers or teams with repeatable image-processing workflows.
- Install a tool such as ImageMagick on your computer or use your existing development environment.
- Use the example command below to create a separate optimized JPEG:
magick input.jpg -quality 82 output.jpg

- Compare output.jpg with the original, check its file size and quality, then upload it to WordPress. The quality setting 82 is only an example; adjust it for your image.
A developer can script this for batches. The extra work is connecting the process to future uploads and generated thumbnails, which an image optimization plugin already handles.
Real Results: Before and After Compressing Images on a WordPress Site
Here’s how our WordPress test page changed after image compression and AVIF conversion with Imagify.
Testing Methodology
We tested the same WordPress page before and after optimization in November 2026, with the site hosted in Paris and GTmetrix testing from Paris, France. We used the Apple iPhone 16 Pro mobile profile and a 4G connection (9/5 Mbps, 125 ms).

The KPIs we measured:
- Fully loaded time: how long it takes for the page to finish loading and its background activity to settle.
- Page size: the total data downloaded to load the page, including images, code, and fonts.
- Image weight: the combined size of all image files downloaded for the page.
- LCP (Largest Contentful Paint): how long it takes for the largest visible piece of content, such as the main image or a text block, to appear. It’s one of the Core Web Vitals and reflects how quickly visitors see the page’s main content.
Scenario 1: No Image Optimization
- Fully loaded time: 5.6 seconds.
- Total page size: 4.28 MB.
- Images: 4.23 MB — almost 99% of the page’s weight.
- Requests: 35; images account for 71.4%, JavaScript 11.4%, and CSS 11.4% of requests.

Image-related improvements flagged in Structure:
- Avoid enormous network payloads: 4.28 MB, Med-High.
- Use explicit width and height on image elements: 1 image.
- Serve images in next-gen formats: 3.52 MB potential savings.
- Defer offscreen images: 2.99 KB potential savings.
- Efficiently encode images: 4.85 KB potential savings.
- Properly size images: 185 KB potential savings.

Scenario 2: Image Optimization with Imagify
We compressed the images with Imagify and converted them to AVIF. Here are the new report values:
- Fully loaded time: 3.1 seconds.
- Total page size: 1.96 MB; images: 1.92 MB.
- Requests: 21; images account for 52.4%, JavaScript 19%, and CSS 19% of requests.
- Grade A; Performance: 94%; Structure: 95%.
- LCP: 1.1 seconds.

What changed in the image audits?
Next-gen formats, encoding, sizing, and offscreen-image recommendations no longer appear in the displayed Top Issues. The warning about explicit width and height remains for one image.

📉 After image compression and AVIF conversion with Imagify:
✅ Image weight dropped from 4.23 MB to 1.92 MB: 55% less image data to download.
✅ Total page weight fell from 4.28 MB to 1.96 MB: a 54% lighter page.
✅ Fully loaded time improved from 5.6 to 3.1 seconds: 2.5 seconds less waiting, or a 45% reduction.
✅ Request counts also changed from 35 to 21, so these figures reflect the tested pages as a whole.
FAQ
Is Image Compression Reversible in WordPress?
Yes, if you kept the originals. Imagify and plugins such as ShortPixel can restore saved backups. Enable the backup option before optimizing; lossy compression cannot recreate discarded image data without an original copy.
What Compression Level Should I Use?
For everyday web images, well-controlled lossy compression is a good choice. Imagify’s Smart Compression adjusts compression and checks quality automatically. Optimole’s Auto Quality also adjusts image quality automatically. Choose lossless when you need unchanged pixel data.
Does Compression Remove EXIF Metadata?
It depends on the tool. Imagify keeps EXIF data by default, while other compressors may strip it or offer a setting. Check this if you need to retain camera or copyright information.
Does WordPress Compress Images Automatically?
Partly. WordPress applies a default JPEG quality setting when generating image sizes. It can also scale oversized uploads above 2,560 px on the longest side. A plugin gives you more compression control and bulk optimization.
Can I Compress Images Already in My Media Library?
Yes. With Imagify, use Media > Bulk Optimization for your library, or choose individual images from the Media Library’s List view. You can optimize existing files as well as future uploads.
Does Compressing Images Help SEO?
Yes, indirectly. Smaller images can improve page speed and LCP, supporting a better page experience. Core Web Vitals are used in Google’s ranking systems, although good scores alone don’t guarantee higher rankings.
Start Compressing Your WordPress Images
Image compression can make your website load faster and improve the user experience when done properly. So, a plugin it is? If keeping everything in WordPress sounds right for you, start your image compression journey with Imagify. Its free plan includes 20 MB of optimization per month. You can also try the web app before installing the plugin. Don’t let oversized files slow down your pages. Give your visitors a faster browsing experience!


 Speed Up Your Website in a Few Clicks
